OVER
De RGBW Dimmer DMX is een directe vervanging voor de PWM Dimmer. Het is ontworpen om op een centrale locatie geplaatst te worden samen met alle andere Loxone apparatuur, aangezien de dimmer is ontworpen om op DIN-rails te passen. Deze dimmer heeft 4 kanalen, waardoor RGBW LED-strips nu eenvoudig gedimd kunnen worden. Op deze pagina laten we je zien hoe je de dimmer moet aansluiten en ook hoe je deze kunt toevoegen aan Loxone Config.
TECHNISCHE DATA
- Vermogensvereisten: 24VDC
- Vermogen per kanaal: 50W (equivalent aan 2,1A)
- Uitgangen kunnen worden overbrugd
- Stroomverbruik: <150mW
- Bedrijfstemperatuur: 0 tot 55°C
- Max. Kabellengte van dimmer naar LED-strip: 30m
LED-STATUSSEN
De status-LED’s knipperen eerst oranje. Nadat de dimmer is aangeleerd, knipperen de LED’s groen om te bevestigen dat dit succesvol was, waarna beide LED’s permanent uit zijn.
INSTALLATIE
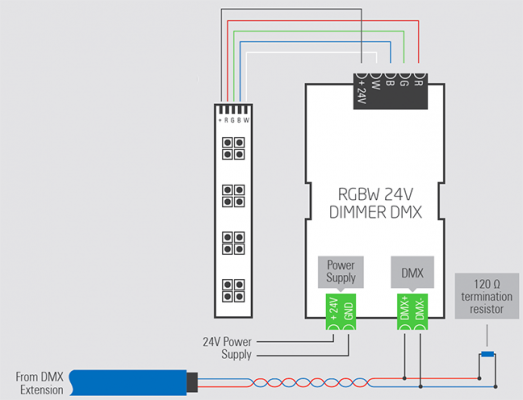
Het onderstaande diagram laat zien hoe je de RGBW Dimmer DMX aansluit. Het is dezelfde DMX-bustopologie als bij de PWM Dimmers, maar nu bevinden alle dimmers zich op dezelfde locatie als de DMX Extension, zodat je de DMX-bus niet door de hele installatie hoeft te trekken.
Uiteraard kan je meerdere locaties hebben voor de RGBW Dimmer DMX’s, de maximale lengte van de bus is 500m. De maximale afstand tussen de dimmer en de tape is 30m.
INSTELLING IN LOXONE CONFIG
Zodra je de RGBW Dimmers op de DMX Extension hebt aangesloten, kun je ze nu instellen in Loxone Config, zodat je jouw LED-strips kunt bedienen vanuit de app of webinterface. Volg deze stappen om erachter te komen hoe:
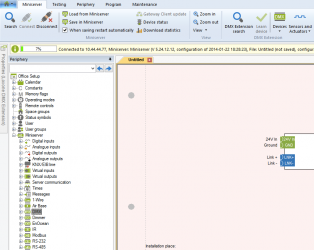
STAP 1: DMX ZOEKEN
Nu al jouw dimmers zijn aangesloten, kun je ze zoeken met behulp van de DMX Extension. Klik op de DMX Extension in de periferieboom en klik dan in het contextmenu in de bovenste balk op DMX Extension Zoeken.
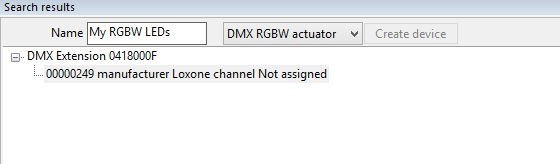
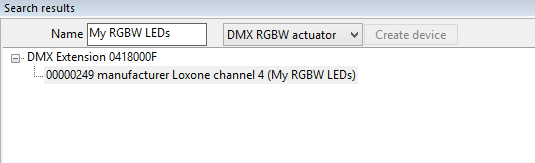
STAP 2: VOEG DE RGBW DIMMER TOE
Je ziet nu alle RGBW Dimmers vermeld in het DMX-zoekvenster. Om er één aan het programma toe te voegen, klik je op de betreffende dimmer, voer je de naam in, selecteer je het type en klik je vervolgens op Apparaat aanmaken.
Het type kan ofwel DMX RGBW-actor zijn (voor het besturen van RGBW LED-strip) of DMX 4 actoren (je kunt 4 uitgangen afzonderlijk besturen, bijvoorbeeld 4 enkele kleur witte strips).
STAP 3: OPSLAAN IN DE MINISERVER
Sla nu het programma op in de Miniserver en je zult zien dat wanneer je de DMX Extension-zoekopdracht opnieuw uitvoert, het kanaal nu is geleerd.
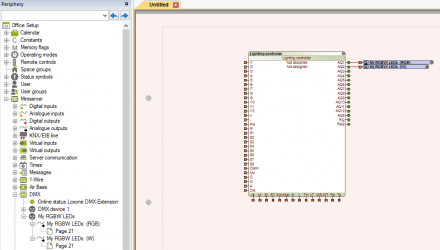
STAP 4: GEBRUIK DE UITGANGEN
De dimmer staat nu vermeld in het venster van de periferieboom, zodat je de uitgangen naar pagina’s kunt slepen en neerzetten om in jouw programma te gebruiken.