Trusts enable the sharing of users, their credentials and access permissions across different Miniservers.
The transfer of users and their data is TLS encrypted, and the Loxone services Remote Connect and Cloud DNS are also supported for data exchange over the Internet.
This feature is useful for granting employees access to different office location, or to use the same login credentials at the weekend home as at home.
 | Trusts require the current Miniserver, the Miniserver Gen. 1 is not supported! |
Table of Contents
- Basic Configuration
- Manage Users
- Trust Takeover
- Using In- and Outputs
- Using Intercom
- Restrictions
- Sort and Group Members
- Trust Link
- Trust in a Local Network
- Private Trust
Basic Configuration↑
First, a new Trust must be created. To do this, connect to the Miniserver that is going to be the manager for this Trust. The Trust and its members are managed on this Miniserver.
Create Trust and Members
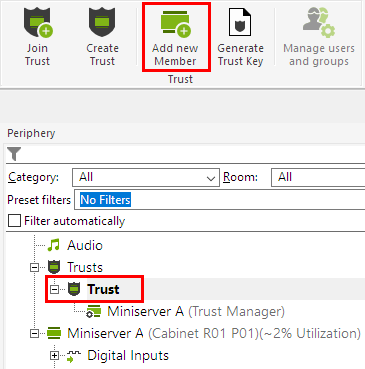
First, click on the Trusts item in the periphery tree of Loxone Config, then click on "Create Trust" in the menu bar at the top:

This will create a Trust with the currently connected Miniserver already set as Trust Manager.
Next, a Miniserver is added to the Trust as a Trust member. To do this, click on the newly created Trust and select "Add new Member" from the menu bar:
Now, enter the serial number of the member in the properties:

Since the created member has not yet joined the Trust, its name is not known and the serial number is used instead.
Other Miniserver can be created as members in the same manner.
Generate Trust Key
In the next step a Trust Key has to be generated to allow the members to join the Trust.
First click on the Trust in the periphery tree of Loxone Config, then click on "Generate Trust Key" in the menu bar at the top:

A key file is created, which can be saved to the PC. This key file can be sent to the administrator of the member Miniserver (e.g. by email), allowing it to join the Trust.
As the final step, the program must be saved to the Miniserver.
Join Trust
The member Miniserver created earlier can now join the Trust.
To do so, connect to the member Miniserver, and have the key file at hand.
First, click on the Trusts item in the periphery tree of Loxone Config, then click on "Join Trust" in the menu bar at the top.

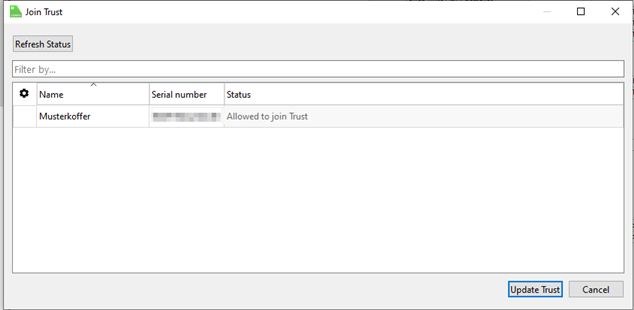
Selecting the key file from the file manager and click on "Join Trust":

Then the connection is checked and the member Miniserver joins the Trust.
Finally, the program must be saved to the member Miniserver.
In the same way, additional Miniserver can be added to the Trust, provided they have been created as members on the Trust Manager.
Finalize Setup
Members that join the Trust send information including their name to the Trust's Manager Miniserver.
Therefore, to complete the setup, it is necessary to load once from the Manager Miniserver so that the information about the joined Miniserver is included in the document.
Once this is done, the members and their names will be displayed correctly on the managing Miniserver, and the Trust is ready for use.
| If external access has been set up manually, it is required to use an HTTPS port and also to set up port forwarding to this port. Otherwise, no connection via the Internet is possible. |
Manage Users↑
To share users and user groups with other Miniservers, the "User Management" right must be assigned to the member Miniservers.
To do this, select the Trust member under "User" in the Periphery tree and assign the "User Management" right via "Permission Management".

Alternatively, the members can also be added to a user group with this right.
To transfer the users of another Miniserver, first click on the Trust in the periphery tree, then click on "Manage Users and Groups" in the menu bar at the top.
The following window opens:
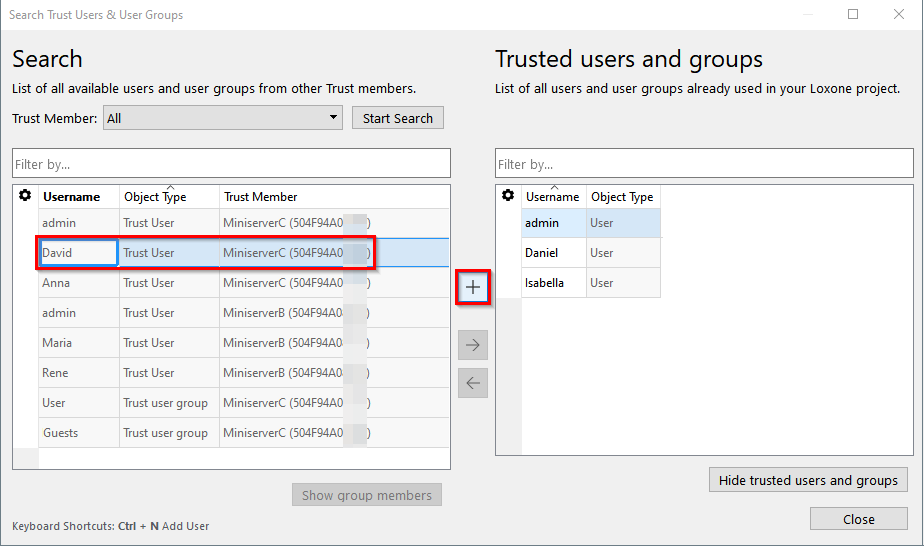
In the above example, the users and groups of the other Miniserver of the Trust are listed on the left, and our own users on the right.
By selecting users or groups, and clicking on the + sign, they will be added to the Miniserver or document we are currently connected to.
When we add a group, the members of that group are automatically added as well.
The added users and groups are then displayed in the periphery tree of Loxone Config as well as in the Trust. The name of the Miniserver that a user or group originates form is also indicated. In addition, the users and groups of a Trust are marked by a different symbol:

Users are only transferred along with their passwords and authentications such as NFC tags, access codes or iButtons.
All other permissions must be reassigned on the Miniserver, as they are specific to each individual Miniserver.
These include the right to access the user interface, and the right for authorization blocks to allow users or groups to access a building.
Using the User and Rights Management, the added users of a Trust can be managed in the same way as the local users, and rights can be assigned:

As the final step, the program must be saved to the Miniserver.
If a user of a Trust changes their password, e.g. in the App, it will be updated across all Miniserver.
Users of a Trust can also be added, removed, and managed within the App:

To log in with a Trust user, you must specify the @Host (either the serial number or the description of the Trust Miniserver).
| The time until a Trust Member is deregistered from all Trusts depends on the "Connection timeout" configured in that Member's settings. If the Member does not send an update within the specified timeout period, the Member is marked as offline, and the associated users are disabled. |
Trust Takeover↑
1. Trust Manager Reachable
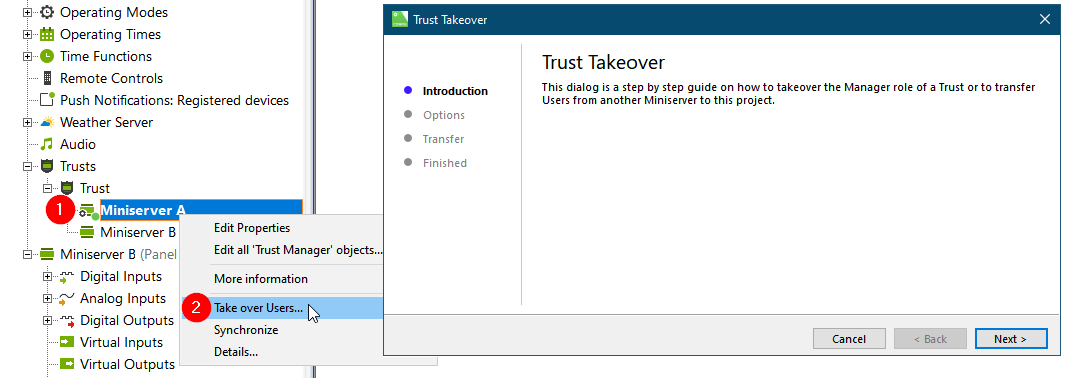
To take over the Manager role or Trust users, a wizard can be started in the context menu of a Trust:
2. Trust Manager Unreachable
Load the program from the old Manager and save it to the new Miniserver. This automatically updates the Trust Manager serial number.
Once the new Miniserver is running the transferred program, the Trust Members can accept the new Manager using one of the following methods:
Method A: System Status Message
A system message "New Trust Manager detected" appears in the App when the old Manager is unreachable.

Select "Accept and reboot".
Method B: Adjust the Trust Manager serial number in the project
Update the Trust Manager serial number in the project.

Save the configuration to the Miniserver.
Method C: Multiplicator Projects
Follow these steps exactly:
Load changes from all Multiplicator Miniservers.
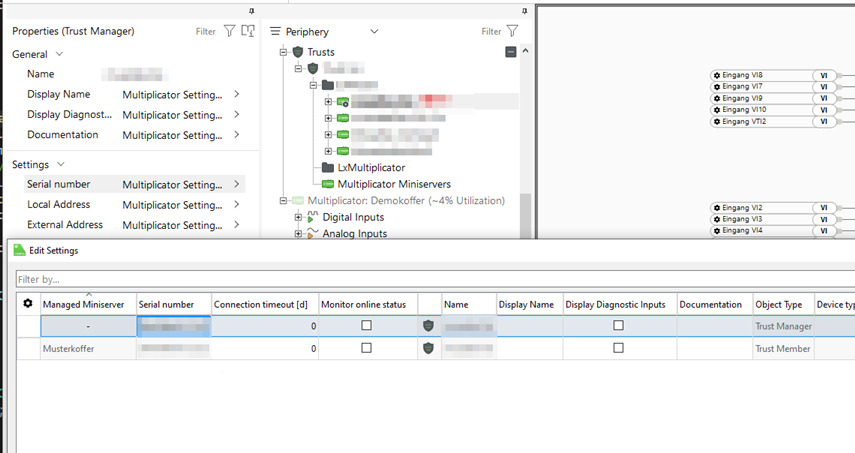
Go to the Trust Manager and click on the serial number setting. This opens a dialog for editing the Trust Manager serial number of all Multiplicator Miniservers. Update the serial number of the Manager to the new serial number, then accept the changes.
Click on the Trust and select Update Trust. Make sure all Multiplicator Miniservers rejoin.
Save the configuration to all Multiplicator Miniservers.
Using In- and Outputs↑
Trusts also enable the transfer of data between the members. For this purpose, in- and outputs are created and the members are assigned the right for the corresponding in-/output via the User Management.

Authorized members can find the in- and outputs via the "Periphery Search" and add it to the programming with the "+" button:

Using Intercom↑
To share an Intercom, select "Intercom" in the periphery tree and add the Trust member via "Authorized users / groups".
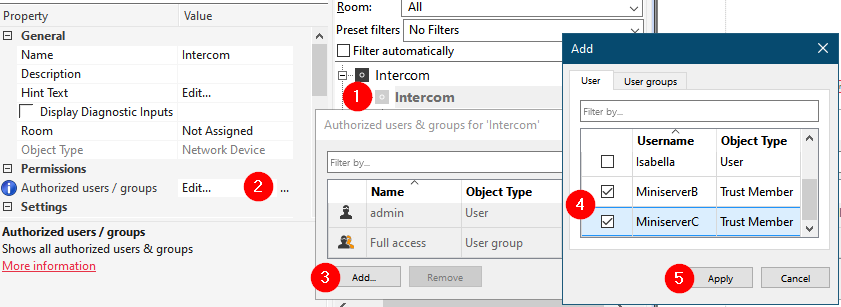
A separate bell output is now generated for each Trust member.

The Trust members can share the Intercom by searching for "Intercom" and inserting the corresponding block.
Trust members receive the bell signal and have access to video/audio of the Intercom when their bell output has been activated.
Therefore, the respective bell output of the various members must be activated with the Doorbell pre-select (Bsel) of the NFC Code Touch and an additional logic.
Restrictions↑
In general, there are no restrictions on the number of Trust members, users, or inputs/outputs. However, it is possible to overload a system if too many requests are made.
For example, in a Trust with 50 Members, each sending 2 requests per second, the Trust Manager would receive 100 requests per second, placing significant strain on that Miniserver. To maintain optimal performance, always configure polling cycles at reasonable intervals. The Miniserver can process up to 5 Trust commands or values simultaneously, with transmission speed depending on the type of connectivity:
Target Miniserver has a fixed external address: fastest.
If Remote Connect is required, it may take a few hundred milliseconds.
If the target Miniserver is unreachable, it will timeout after a few seconds.
Message queue becomes too large: Miniserver will send a warning notification.
For transferring large amounts of data, Network or Tree Intercommunication should be preferred, as they are more efficient for this purpose.
Sort and Group Members↑
For a better overview Trust members can be sorted and grouped.
Therefore connect to the Trust Manager, mark "Trust" and click on "Configure Trust".
In the following window, groups can be created, members added and deleted. Members and groups can be moved via the arrow keys or Drag & Drop.

Trust Link↑
If a user is shared with several Trust members and the right "Webinterface/Apps" has been assigned to this user on the respective Miniservers, then this user can switch between Miniserver in the App via the "Trust" tab without having to log in again. Due to security concerns this feature is not available in the Miniserver web interface.

Trust in a Local Network↑
A Trust can also be established entirely within a local network. Miniservers must be able to communicate with each other using their local IP address.

Internet access is not required for Miniservers to authenticate themselves. Each Miniserver comes with a unique Loxone certificate embedded during production, which is used for authentication. This ensures that any Miniserver contacting another can be verified as legitimate. No internet connection is necessary for this process.
Private Trust↑
In Private Trust mode, Miniservers can access only the users and objects provided by the Trust Manager. Any users or objects from other Miniservers are removed from all Trust Members.
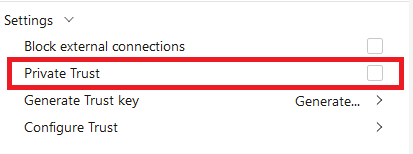
If checked, Trust Members can only view and communicate with the Trust Manager. Direct interaction or visibility between Members is disabled, making this setup ideal for managing multiple independent customer installations.