First start of the Miniserver
First, the Miniserver is installed and connected.
- Connect the Miniserver to the network using a LAN cable (e.g., an internet Wi-Fi router).
- Connect the Miniserver to the 24V power supply
Details about the installation of the Miniserver Gen. 1 and Miniserver Go Gen.1.
Miniserver: The left LED flashes green.
Miniserver GO: The LED on the back and also the LED on the top are permanently white.
Connect to Miniserver
In order to configure the Miniserver, a PC with the “Loxone Config” software is required.
- Download Loxone Config software from our website: Download
- Install the Loxone Config Software
- Open Loxone Config
- When selecting New Project, Loxone Config will scan the network for new Miniservers. Additionally, clicking the green plus button allows you to start a new project manually. It is important that the correct Miniserver is chosen.


- After the project has been created, click on the Connect -> Search button

- Select Miniserver (if a Miniserver is selected, it identifies itself by “fast red/green flashing” of the left LED)

- Give in the credentials, the factory settings for user and password are: admin/admin. Afterwards click on Connect.No Miniserver is found during the search? You can find more information here.If you get an error message stating that the login credentials are incorrect, you can find information on how to reset the password or restore the Miniserver to its factory settings here.You can also search for Miniservers using the “Search Local Network…” option. This will display all Miniservers on the network, not just new ones. However, we recommend using this option only if you have previously connected to the Miniserver. If you connect for the first time this way, the configuration will be loaded automatically from the Miniserver, and the file will be in German.

General Configuration
After the connection to the Miniserver is established, it can be configured.
- Click on the Miniserver in the Periphery
- Select “Configure Miniserver”
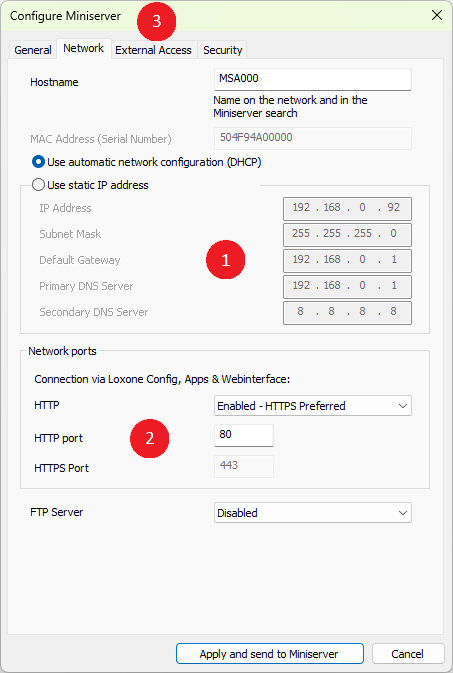
- In the following dialog, check and, if necessary, correct the Miniservers location data.
- Click on the “Network” tab

Network Setup
The next step is configuring the network settings.
- Choose to use either a DHCP or Static IP address and configure the settings to match your network’s requirements.
- Settings of the Network ports (local) for connection via Loxone Config, Apps & Webinterface or FTP protocol:
- HTTP – As of Version 16.1, the default HTTP port redirects to HTTPS for secure, encrypted communication. You can change this behavior in the Miniserver configuration with the following options:
- “Disabled” – HTTP disabled
- “Enabled” – HTTP enabled
- “Enabled with HTTPS Redirect” – If no valid certificate is present, sensitive data may be transferred over unencrypted channels (HTTP). For your Miniserver to obtain a Loxone certificate and ensure secure communication, it requires an internet connection for automatic updates of certificate.
- “Enabled – HTTPS Preferred” – When there is a valid certificate it will redirect to HTTPS, if there is no valid certificate access via HTTP will work. [Default]
- FTP Server – Starting with Version 16.1, the FTP Server is disabled by default for security reasons. You can change this behavior in the Miniserver configuration with the following options:
- “Disabled” – Disabled [Default]
- “Enabled” – Allows unencrypted FTP access
- “Enabled – TLS only” – Only allows encrypted FTP access
- HTTP – As of Version 16.1, the default HTTP port redirects to HTTPS for secure, encrypted communication. You can change this behavior in the Miniserver configuration with the following options:
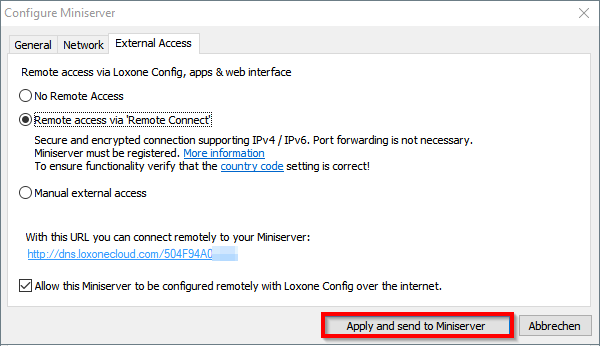
- Click on the “External Access” tabThe Miniserver must have its own static IP address for reliable access.
External Access Setup
By setting up external access to the Miniserver, the Loxone system is also accessible from the Internet and can be operated from anywhere via the Loxone App or the web interface/ visualization.
Remote configuration via Loxone Config is also possible.
Depending on the Miniserver, follow one of the following guides:
Click on “Apply and send to Miniserver”:
The new settings will be transferred to the Miniserver. The Miniserver automatically reboots with the new settings, this process may take a minute.
If the Config software does not automatically reconnect 1 minute after completing the configuration, you can find more information here.
After the initial setup, save to the Miniserver and change the default password.

As you can see in the status bar, you are now connected to your Miniserver:

Additional Steps
The Miniserver is now set up and ready for use. The next step should be to correctly connect and pair all the devices.
You can find more information about this in the documentation for the respective device.
As soon as all the devices are paired, a large part of programming is automatically created by Auto Configuration.
Changing the IP address of the Miniserver
Change address using “Configure Device”
This method is used when no connection to the Miniserver has been established yet.
Open the configuration software Loxone Config and follow the steps below:

- First click on the Miniserver in the Periphery.
- Then click the Configure Device button in the menu bar and select Miniserver as the device.
- The MAC address (serial number) of the Miniserver is copied from the current document. If it is not correct (e.g. blank document), then enter the MAC address (serial number) of the Miniserver. You can find it on the label on the back of the device.
- Enter a valid IP address for the Miniserver that is outside of the DHCP range of the router. Add the subnet mask, gateway (usually the IP address of the router/modem), and the addresses of the DNS servers. (You can obtain DNS server addresses from your ISP or use public alternatives).
- Then click on Send.
The Miniserver restarts and can then be reached at the new assigned IP address.
If this does not work, the connection may have been blocked by a virus scanner or firewall. Disable these temporarily, and try assigning the address again.
Change address using “Configure Miniserver”
This method is used when you are already connected to the Miniserver:

1. First click on the Miniserver in the Periphery.
2. Then click the button Configure Miniserver in the menu bar.
3. The MAC address (serial number) of the currently connected Miniserver is used.
4. Enter a valid IP address for the Miniserver that is outside of the DHCP range of the router. Add the subnet mask, gateway (usually the IP address of the router/modem), and the addresses of the DNS servers. (You can obtain DNS server addresses from your ISP or use public alternatives).
5. Then click on Apply and send to Miniserver.
The Miniserver restarts and can then be reached at the new assigned IP address.
If this does not work, the connection may have been blocked by a virus scanner or firewall. Disable these temporarily, and try assigning the address again.
Using DHCP (Dynamic IP Address)
Instead of assigning a static IP, the Miniserver can automatically obtain an IP address from the DHCP server (usually the router).
To enable DHCP mode:
- Follow the steps outlined above, but instead of selecting “Use Static IP Address”, choose “DHCP”.
- The manual IP settings will be greyed out, as they are managed by the DHCP server.
- Send this to the Miniserver.
- The Miniserver will restart and request an IP address from the DHCP server.
- To find the assigned IP address, check the router’s DHCP client list or use an IP scanner.
Using a Hostname instead of an IP Address
For easier access, the Miniserver can be reached via a hostname instead of a fixed IP address. The default hostname is typically MS + the last four digits of the Miniserver’s MAC address (e.g., MS716F), or a custom name set by the user.
To use a hostname:
- Ensure that the router supports local hostname resolution (via mDNS or DNS).
- Set a custom hostname (e.g., “SmartHome”) in the network settings.
- Once the Miniserver is restarted, it can be accessed via http://SmartHome
- If the hostname does not resolve, verify that the network supports mDNS or local DNS resolution.
Connect Miniserver directly to PC
The Miniserver can also be connected directly to a PC via a network cable or switch if no router or DHCP server is available.
This is useful for troubleshooting in order to rule out network related issues.
Two options are available for this, which differ depending on the Miniserver generation:
Current Miniserver
Since version 12.0, the current Miniserver no longer falls back to 192.168.1.77 if no DHCP server is present. Instead, link-local addressing via Zeroconf is supported.
In this case, the Miniserver and computer adopt a 169.254.x.x link-local address if both are set to DHCP.
However, you can still manually assign an IP address to the Miniserver and the computer to enable a connection.
-
Miniserver Gen. 1
The Miniserver Gen.1 adopts the default static address 192.168.1.77 if it is not assigned an address by a DHCP server.
Therefore, the PC must be assigned an IP address matching the Miniserver in the same address range (192.168.1.x).To do this, go to the “Network and Sharing Center” in the Control Panel. Then click on “Change adapter settings” on the left side:

Then switch to the properties of the Ethernet or LAN connection:

- Now double-click on “Internet Protocol Version 4”:

- In this example, we have assigned the address 192.168.1.1 to the computer:Confirm with OK and a connection with the Miniserver via Loxone Config is possible.

Adjust Miniserver configuration
Any changes to the Miniserver configuration after the initial setup, can also be made while the connection to the Miniserver is active.
-
-
-
- It is recommended to always load the current project, including any user changes, from the Miniserver into Loxone Config before making changes. To do so, simply click on “Load from Miniserver”.

- After making changes, you can save them to the Miniserver. Simply click on “Save to Miniserver” and the local changes made in the software will be transferred to the Miniserver and the Miniserver will automatically restart to load the changes. Once this restart is complete, the Miniserver will run with the updated configuration.

- It is recommended to always load the current project, including any user changes, from the Miniserver into Loxone Config before making changes. To do so, simply click on “Load from Miniserver”.
-
-
Diagnostics
If the Miniserver is not found in Loxone Config/Network, first check its LED status. This can provide valuable insights for troubleshooting.
Details about the LED status of the Miniserver Gen. 1 and Miniserver Go Gen.1.
If the LED status appears normal but the Miniserver is still not found, follow these steps to troubleshoot the issue
1. Check Network Connection
-
- Ensure that both your PC and the Miniserver are connected to the same network.
2. Scan the Network for the Miniserver
-
- Use an IP scanner tool to scan the network in the range where the Miniserver should be.
- The scan should list all devices on the network along with their IP addresses and MAC addresses.
- Miniserver MAC addresses follow these patterns:
- Miniserver Gen 2: Starts with 504F94Axxxxx
- Miniserver Gen 1: Starts with 504F941xxxxx or EEE000xxxxx
- Miniserver Compact: Starts with 504F94Dxxxxx
3. Verify Network Configuration
-
- Check the network settings of both the Miniserver and your PC/Router.
- The Gateway IP and Subnet Mask should match across devices.
- To find the correct Subnet Mask and Gateway IP, open Command Prompt (CMD) and enter: ipconfig -all
4. Check Firewall & Antivirus Settings
-
- Ensure that Loxone Config is allowed through your firewall and antivirus software.
- If necessary, temporarily disable the antivirus to check if it is blocking communication.
5. Ensure Required Ports Are Open
-
- The Miniserver, Audioserver, and Intercom require specific network ports for communication.
- Check that these ports are not blocked by a firewall or antivirus.
6. Confirm Network Type
-
- Ensure that your network is set as a home/work network, not a public network.
7. Direct Connection Test
-
- Try connecting the Miniserver directly to your PC instead of the router.
- Run the IP scan again to check if the Miniserver appears.
8. Factory Reset
-
- If the Miniserver is still not found, consider performing a factory reset.