This allows you to access and operate the Miniserver from anywhere via the Loxone App or the web browser.
Also, configuration via Loxone Config is possible remotely.
This service allows easy setup, without the need for port forwarding.
The configuration depends heavily on the network.
This guide is intended to show the steps that are necessary in most cases.
Depending on the network, additional settings may be needed.
Contents:
Setup in Loxone Config
Port forwarding
Overview of the used ports
Use Custom Certificate
Diagnostics
Setup in Loxone Config
Start Loxone Config and connect to your Miniserver.
Then open Configure Miniserver, and activate Manual external access:
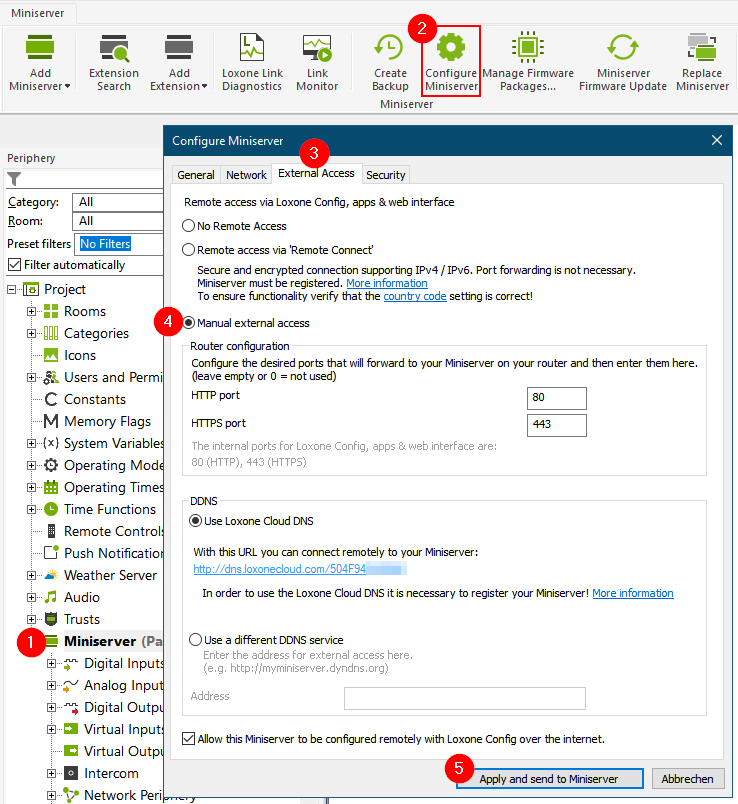
Enter the external port for the connection in HTTP Port.
Not recommended for the current Miniserver. Select a port in the range of 1024-49151*.
The selected port must then be configured in the router’s port forwarding settings.
For applications with increased security requirements, a VPN connection to the Miniserver can be used.
Enter the external port for the connection in HTTPS Port.
Not available for Miniserver Gen 1. Select a port in the range of 1024-49151*.
The selected port must then be configured in the router’s port forwarding settings.
When using HTTPS, it is recommended not to use or forward the HTTP port for external access (enter 0).
*Please note that some ports are considered unsafe by some browsers or Internet service providers and may be blocked.
Many ports are also used for popular services and are therefore well known.
Such ports are theoretically exposed to a higher risk of attacks from the Internet.
We recommend selecting a port that is not included in the following list:
Wikipedia: List of common port numbers
The Loxone Cloud DNS service is used to simplify access if you do not receive a static address from your Internet service provider and the external IP changes frequently.
Alternatively, you can use a different DDNS service, and enter the static address in this field.
To also enable remote configuration via Loxone Config, enable the option:
Allow this Miniserver to be configured remotely with Loxone Config over the internet.
Finally, click on Apply and send to Miniserver and the Miniserver will reboot.
When using Loxone Cloud DNS, the Miniserver can be reached from the Internet after a few minutes at an address according to the scheme https://dns.loxonecloud.com/504F94000000.
The latter part of the address is the serial number of your Miniserver.
If you are using another DDNS service, use your registered address instead.
IPv4/IPv6
In order to access your Miniserver remotely, the network protocol of your home network and the protocol of the external network (Internet Service Provider) must match:
| Internal (home) network | External network (ISP, cellular, guest WiFi) |
|
| IPv4 | IPv4 | ✔ |
| IPv6 | IPv6 | ✔ |
| IPv4 | IPv6 | ✔ |
| IPv6 | IPv4 | X |
The Loxone Remote Connect service supports access via any IPv4/IPv6 combination.
The Miniserver Gen 1 only supports IPv4.
Port forwarding
The internet can be accessed from a network via a router, the router in turn can be reached on the internet at its external address.
Port forwarding opens a specified external port on the router and forwards all data traffic to a predefined internal port of a device in your home network.
This enables the Minsierver to be accessible externally via your router.
Therefore, when forwarding the port on the router, you have to specify the port that was previously set for HTTP or HTTPS port in Loxone Config.
The port forwarding is configured in the settings of your router (usually called Port Forwarding, often part of the Firewall settings). More information about port forwarding and instructions for many router models can be found here: http://www.portforward.com.
After enabling the port on your router, you can already access your Miniserver with your external IP address (Example: http://external-ip-adresse:port-miniserver).
Click here to view your current IP address.
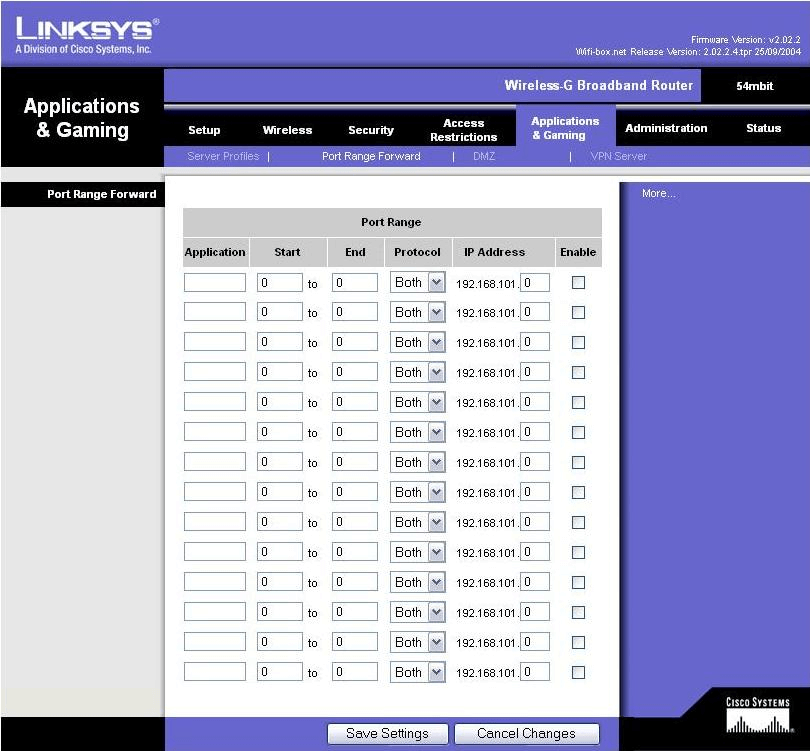
After configuring and saving in the router, your Miniserver can be reached at your Internet IP address.
Overview of the used ports
The following ports are used for external access to the Miniserver.
Port forwarding on the router is required:
| Port | Protocol | Application |
| 80 | TCP | User Interface HTTP (changing port recommend) |
| 443 | TCP | User Interface HTTPS (changing port recommend) |
| 21 | TCP | FTP access (optional) |
Most FTP programs operate in passive mode. If an active connection is required, the FTP command port 20 is also activated.
If the Miniserver is to be accessed externally via FTP, port forwarding must also be set up for port 20.
The following ports are used for outgoing communication with Loxone services.
Port forwarding is not required:
| Port | Protocol | Application |
| 443 | TCP | Push Notifications (optional) |
| 80 | TCP | Caller Service (optional) |
| 7700 | UDP | Cloud DNS (optional) |
| 6066 | TCP | Weather Service (optional) |
| 7707 | UDP | Support Crashlog (optional, deactivated by default) |
| 7777 | UDP | Support Monitoring (optional, deactivated by default) |
Use Custom Certificate
To enable external access via a custom domain, a custom certificate can be used.
Note that port forwarding is required when using your own domain.
Select “Use custom certificate” in the “Security” tab and upload the certificate (.crt) and the private key (.key) separately.
Both PEM and DER format are supported.
The key must not be password protected.
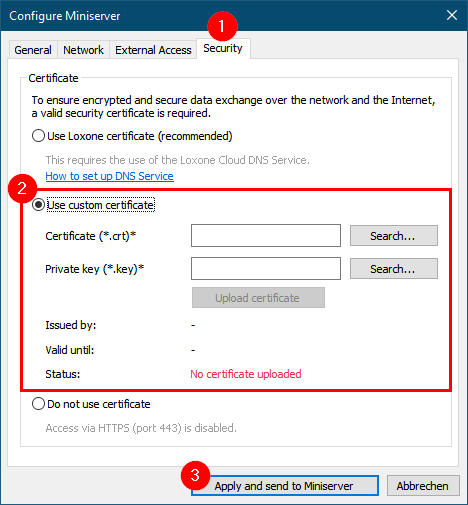
The Miniserver will inform you via system message, a few days before the certificate is expiring, so that you have enough time to update it.
Diagnostics
If you experience issues with external access, please check the following points:
Check if the Miniserver has the correct network settings
IP address (address conflict?), gateway address, subnet mask, DNS address. Please check if these settings match the network.
Have you received a new router/modem from your Internet provider?
In this case, port forwarding must be set up again. It is also possible that the IP addresses of the devices have changed.
Check if the external port is open
Using a Port Forwarding Tester you can check the port forwarding status. If it is negative then the settings in the router/modem must be checked.
Confirm that the correct Miniserver port was specified in the router/modem for port forwarding.
It must match the settings in the Config. If the external port is not open, contact a network technician or your Internet provider.
If the Port Forwarding Tester reports that the port is open, but an external connection to the Miniserver via Loxone CloudDNS is still not possible, please check the external address of the Miniserver in Loxone Config.
Check if the Miniserver can access the Internet
To do this, create a Ping function block and set the address to 8.8.8.8 (Google DNS) or dns.loxonecloud.com.
This way you can determine whether the Miniserver has access to the Internet.
If no Internet access is available, please check the network and contact a network technician if necessary.
Adding the Miniserver to a DMZ on the router/modem is not required and not recommended.