The Gateway-Client function combines programming and also the user interface of the individual Miniservers.
CONTENT:
Application
Planning and preparation
Set up a Gateway-Client System
Programming
Application
Linking several Miniservers makes it possible to automate even large buildings.
At the same time, system reliability is increased because if one Miniserver fails, the remaining Miniservers continue to operate.
In a Gateway-Client System, programming and visualization are combined into a single project.
This enables programming across multiple Miniservers and provides a simple, efficient setup that is suitable for most applications.
Examples:
A Gateway-Client System used in a single-family home.
-
-
Gateway Miniserver on the first floor, Client Miniserver on the upper floor.
-
Gateway Miniserver in the main building, Client Miniserver in the annex.
-
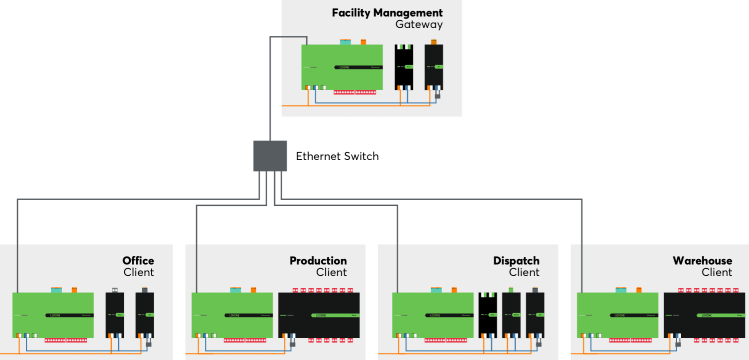
A Gateway-Client System used in larger commercial buildings
-
-
Gateway Miniserver in the technical room / main distribution,
-
A Client Miniserver in each part of the building, such as office, production, shipping, warehouse, etc.
-
For projects that involve many similar units—such as hotel rooms, apartments, or even entire groups of houses—each unit can be equipped with its own Miniserver, including a dedicated user interface. In this case, the Multiplicator option can be used to simplify project setup and management.
The same program can be distributed to multiple clients, which is especially useful when units are identical.
The overall system is not limited to a single Gateway-Client setup. Multiple Gateway-Client systems can be networked together via tree or network intercommunication while remaining largely independent.
In larger buildings, for example, one Gateway Miniserver and several Client Miniservers can be used per floor.
This approach allows efficient automation for almost any building size or number of similar units.
Planning and preparation
The complexity of the overall system increases with its size.
Careful planning and thorough documentation of the system are therefore important, as they also facilitate maintenance.
Since the Miniserver communicates via the local network, the network setup becomes a key part of the overall system.
Ideally, an address range should be reserved for building automation devices, and static IP addresses should be assigned in a logical order when configuring the Miniservers.
The Gateway Miniserver plays a crucial role, even in systems with multiple Miniservers.
It manages the programming of the entire system, distributes updates and program parts to the Clients, and provides access to the shared user interface.
A structured approach to wiring is also important. If a Miniserver is used for a specific part of a building, the periphery of that area—i.e., all sensors and actuators—should be connected to that Miniserver.
With careful programming, each building section can then operate largely independently on its own Miniserver, without relying on other Miniservers.
In the following example, we describe the setup of a new Gateway-Client system.
This system combines programming and visualization through the Gateway.
A Gateway-Client system can also be added later in the same way, for example, when extending an existing installation.
Set up a Gateway-Client System
First, connect individually in Loxone Config to all Miniservers that will participate in the Gateway-Client System.
It is important to use the same username and password on all Miniservers.
Perform the initial setup of the Miniservers and assign static IP addresses. All Miniservers must be on the same subnet.
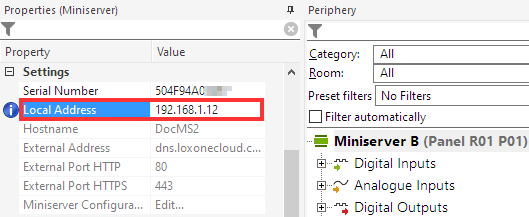
In the Miniserver Settings of each project, the local address must be set to the IP address of the respective Miniserver:
Afterwards, save the programs to the respective Miniservers and also save the projects on the computer.
From this point on in Loxone Config, connect only to the Miniserver that will serve as the Gateway.
There are 2 ways to add a Client Miniserver to the Gateway:
1. Add Miniserver as Client (preferred way)
In the periphery tree, right-click on the Miniserver and select “Add Miniserver as Client…” from the context menu:

Select the desired Miniserver(s) to be added as a client and click on the “+” button.

A new pop-up window will open, prompting the user to enter the credentials for the selected Miniserver.


To finalize the setup, save the configuration in the Gateway Miniserver.
When saving for the first time, an error message may appear because the Gateway does not yet recognize the new clients. Confirm this message by clicking OK.
The next window explains the saving process—confirm this with OK as well.
The Gateway will then restart and distribute the program parts of the merged project to the Clients.
Finally, save the merged project under a new name on the computer.
2. Add Project as Client
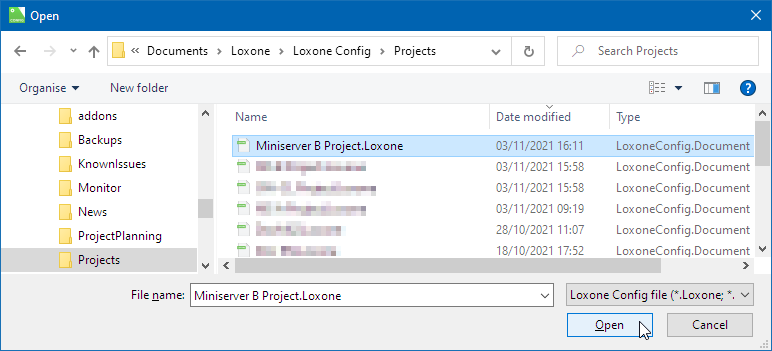
In the Periphery Tree, right-click on the Miniserver and select “Add Project as a Client…” from the context menu.

Then select the previously saved project of another Miniserver:
After that, a message will be displayed indicating the peculiarities of merging the projects. Confirm with OK.
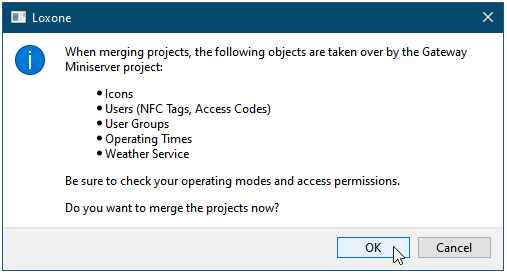
The selected project will now be merged in Loxone Config with the project of the already opened Miniserver. This is automatically created as a gateway.
In the same way, further projects can be added to the gateway as clients.
The merged project must now be saved in the gateway miniserver.
Programming
Let’s take a detailed look at how a Gateway Client project is displayed in Loxone Config.
All Miniserver are displayed together with their periphery in one project.
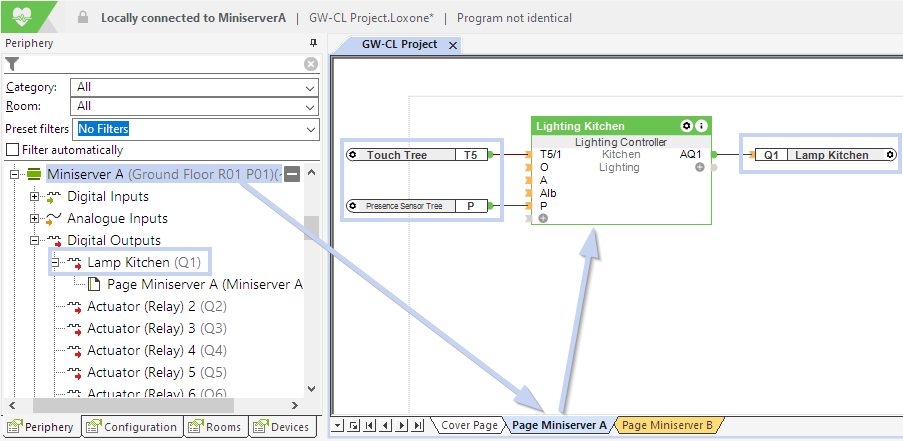
Each miniserver is also assigned program pages in the same color:
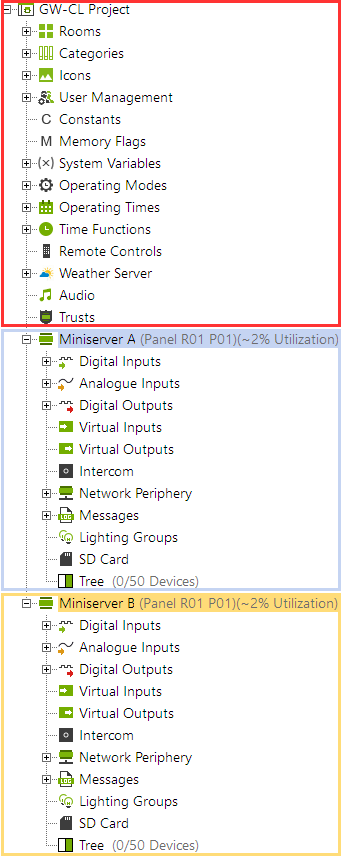 |
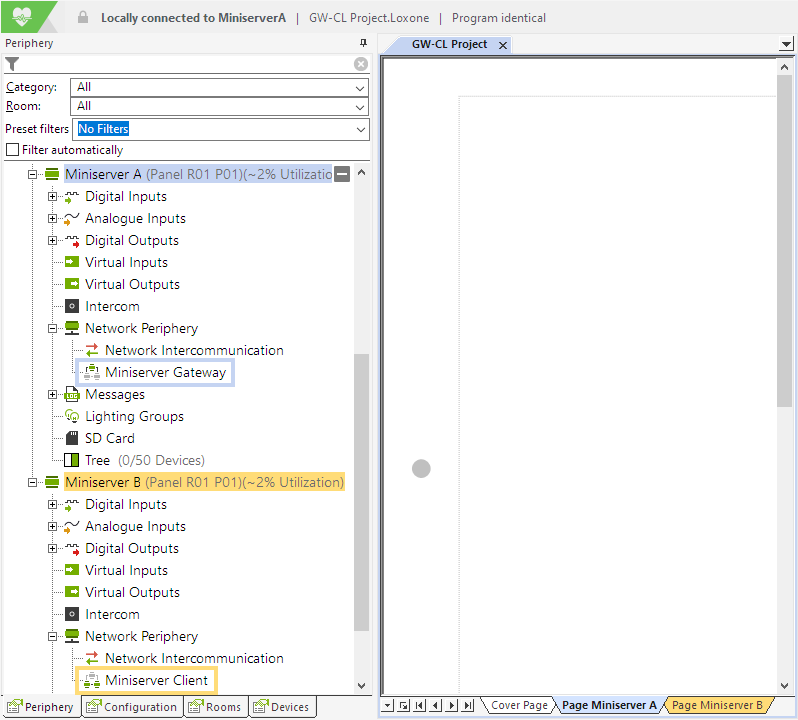
In the Periphery Tree, above the Miniserver, all objects that are shared by all Miniservers are now displayed. When the Gateway Client project was created, these shared objects were automatically combined from all connected Miniservers. Below are the miniserver objects, first the gateway, then the client miniserver. Each miniserver is assigned its peripheral objects such as inputs, outputs, interfaces and extensions. |
A simple example will demonstrate programming the lighting in two rooms.
Miniserver A controls the kitchen on the first floor, and Miniserver B controls the bedroom on the second floor.
The sensors and actuators for the two rooms are therefore connected to different Miniservers.
The light control for the kitchen is added on the program page of Miniserver A:
For the bedroom, the program page of Miniserver B is used:

Now, when the lighting in a room is switched on by button press or movement, only the associated miniserver is involved.
Of course, functions can also be programmed across miniserver boundaries, and many central functions cannot be solved in any other way.
Where possible, however, the detour via other miniserver should be avoided.
The following number of Miniservers is supported for a Gateway-Client system:
| Gateway | Clients | Total |
| Miniserver/Miniserver Compact/Miniserver Go | Up to 9 Miniserver or Miniserver Gen. 1 | 10 |
| Miniserver Gen.1/Miniserver Go Gen.1 | Up to 4 Miniserver Gen.1 | 5 |