THE LOXONE MUSIC SERVER
The Loxone Music Server is the first ever multiroom audio system that’s completely in tune with your Loxone Smart Home and has been developed from the ground up with full integration in mind:
- Enjoy music in every room, from a variety of sources
- Full integration with the Loxone Smart Home
- Use it for a variety of functions including a smart doorbell, alarm clock and burglar alarm sounder
- Compatible with Spotify and TuneIn
- Extendable wirelessly using network streaming (UPnP)
- Playback of pre-recorded audio sinppets on request
- Text-to-speech announcements
Storage for up to 250,000 songs (1TB) built in or stream from your phone using Apple AirPlay
Download Loxone Music Server Quick Start Guide
Contents
Placement/Installation
Music Server setup
Recommendation Internet / Offline Operation
Adding Rooms/Zones
Equalizer
Adding UPnP devices
Features
Adding Music
Adding custom event sounds
Text-To-Speech
Connections
Rack Mounting
Offline updates
Troubleshooting
![]()
Please note, in order to use the Loxone Music server; a Miniserver will also be required for control.
Please note: If you are looking for wiring guides look to the audio cabling page.
PLACEMENT/INSTALLATION OF MUSIC SERVER
We recommend placing the Music Server and Amps on a server rack that has good ventilation so the heat generated by the devices can be dispersed effectively without heating up the server rack it is on or heating up anything else nearby. The recommended ambient temperature for the music server to be in is 30 ° C before ventilation should be considered.
As above, the Music Server is designed, for ventilation reasons; to be placed on a shelf within a server rack. We suggest saving 3U’s to make enough space for the Music Server in the rack as the Server is a little over 2U with the feet and the shelf.
As for the Amplifier, this will require 2U’s of rack space and will be supplied with mounting brackets.
MUSIC SERVER SETUP
After the Loxone Music Server is connected to the network and turned on, it can be set up in via Loxone Config.
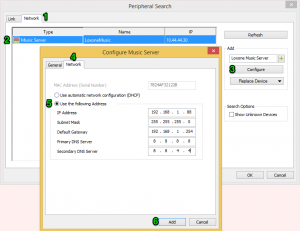
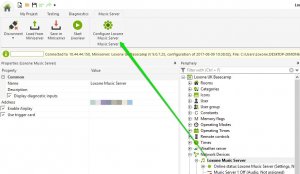
To do this open Loxone Config and connect to your Miniserver. Load the current configuration and click on “Network Device Search” when the Network Devices option is selected in the Periphery.
This will open the search dialog box. In the “Network” tab (1) all Loxone devices on the network will now be listed. Select the Music Server (2) and click “Configure” (3). Here you can select the general settings, such as location, once done change to the “Network” tab (4) to set the desired IP address (5) and click on “Save” (6).
It is also possible to set the IP address of the Music Server via a browser (Google Chrome, Mozilla Firefox, …).
To do so type the current IP address of your Music Server in the address bar of your browser to go to the web interface.
The most crucial part here is the network settings, these must be correct for proper operation please check that these are correct, to change them simply click on the small spanner icon.

Apart from the IP settings you can also reboot the Music Server through this web interface, simply go to Actions – then there is a list of options.
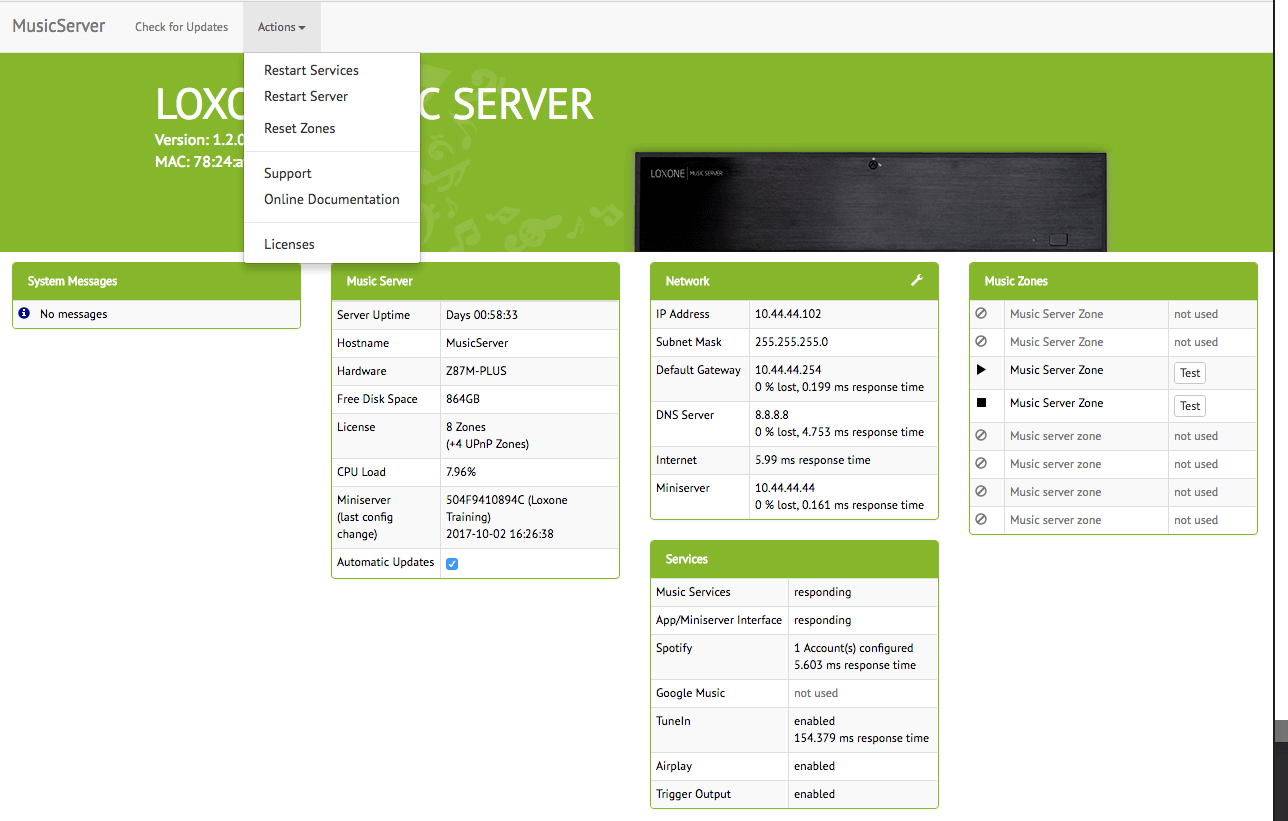
Check for Updates Updates usually get installed automatically (update-check daily at 3:00 am). If the Music Server is regularly switched off at that time you can start the update manually by clicking this button.
Restart Services Restarts the Music Server Services: necessary if there are any connection issues between Music Server and app or Miniserver.
Restart Music Server Restarts the Music Server
Reset Zones stops all zones and resets their names
Recommendation Internet / Offline Operation
Recommendation for secure operation on the internet:
The Music Server requires an internet connection for playing internet radio, synchronizing with Spotify and Google Music, or (optionally) automatically installing updates.
Port forwarding, like for external access to the Miniserver, is not necessary. Even if you are outside of your WLAN range with the app, you can still control the Music Server with the app as usual.
Make sure that your router/firewall does not block outgoing connections on port 8443 (should happen with the fewest routers, but can be a firewall rule in individual cases).
This SSL connection is needed for updates and operating system packages.
Offline Operation:
For Music Servers that are operated without an internet connection, we recommend completely disabling the online functions.
1. Via app, settings, music servers, show internet radio -> switch off.
2. Via http://music.server.ip, Network settings, DNS server: enter 127.0.0.1
ADDING ROOMS/ZONES
When the Music Server is added to your configuration outputs for each zone are created automatically. Which can then be dragged into your configuration.
The only mandatory setting that has to be made in the properties of the function block is to set a room name, which will be used for the user interface and apps.
>>> You can find a full description of the Music Server Zone function block here. <<<
For time zone changes or IP address changing the Music server will restart and will be unreachable for the duration.
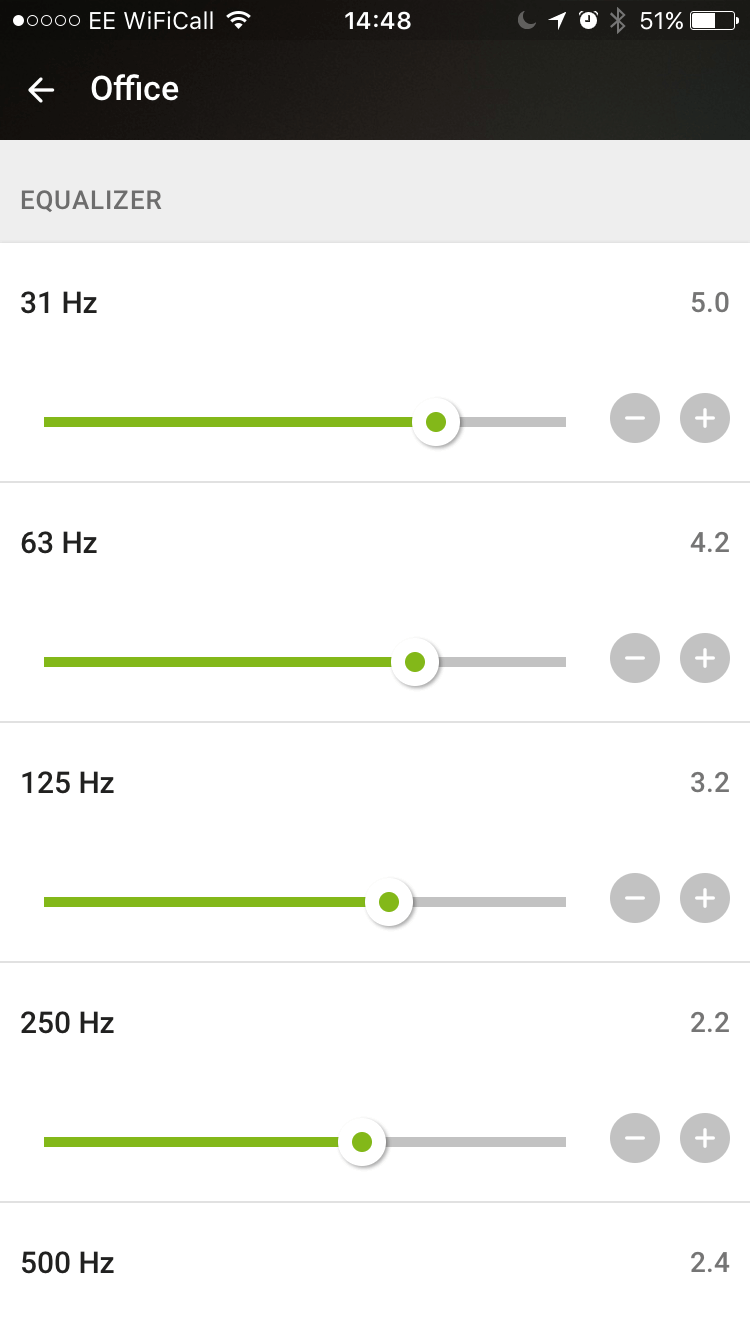
EQUALIZER
In the respective zone settings of your wired zones you will find the settings for the 10-band equalizer.
Adjust your audio zone with the respective frequency ranges for your desired sound picture / room behavior.
The displayed frequency bands are displayed in the order of depth, mid-range and altitude:
– Bass: 31 Hz to 250 Hz
– Centers: 250 Hz to 4 kHz
– Treble: 4 kHz to 16 kHz
ADD UPNP DEVICES
To add UPnP devices select the music server in the periphery tree and in the top ribbon, a button “Configure Loxone Music Server” will appear. Upon clicking that button a window will appear with 3 tabs (General, Network, Zomes) and in the “Zones” tab, you will be able to see all your music server zones.
Once the window is open, your network will be scanned to find any UPnP devices and they will be automatically added to the Music server.
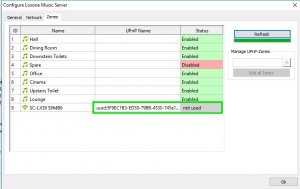
Do note that some zones are disabled. This is because they are not in use by the current Config program (some spare ones for example).
MAXIMUM NUMBER OF ZONES
The maximum number of zones is the number of hardware zones (Music Server outputs) multiplied by 1.5.
That means the LOXONE MUSIC SERVER 8 ZONES can have a maximum of 12 Zones. (8 Music Server outputs + 4 UPnP zones).
It is also possible to not use a Music Server hardware zone and use an additional UPnP zone instead. Theoretically, it is possible to connect 12 UPnP zones to the LOXONE MUSIC SERVER 8 ZONES and leave all 8 hardware outputs blank.
RECCOMENDED UPNP MODES
When setting up a UPNP zone, there are some additional parameters to consider:
- The UPNP mode is 0 by default.
- This is the automatic mode. The music server will automatically search for the appropriate settings sent by the UPNP device.
- On certain devices the music server can not automatically make the correct settings.
- For this purpose, we have created prefabricated UPNP modes for known devices:
1000 Vast electronics WiFi-HiFi
1001 Sonos Play:3, ZP100, Play:1 (1)
1002 Raumfeld
1003 Pioneer (generic e.g. N30)
1004 Pioneer (XW-SMA Series)
1005 Marantz generic
1006 Marantz CR-Series
1007 Marantz NR-Series
1008 Roku Players
1009 IcyBox
1010 Revo Axis generic
1011 Revo Axis Stream series
1012 Musical Fidelity M1
1013 Sony X-xx Series
1014 Lenco Playlink Series Devices
1015 Denon CEOL Series
1016 Sonos Playbar
1017 Sonos Play:5
1018 Sonos Play:1 (2)
1019 Denon generic devices
1020 WHD
1021 Raumfeld II (2016 series)
NETWORK COMMANDS
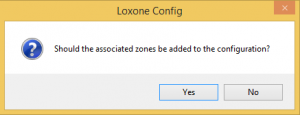
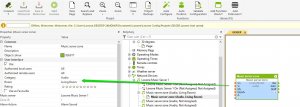
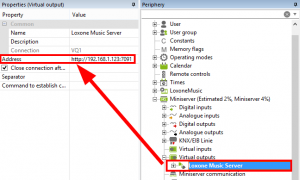
There are predefined commands for the Loxone Music Server in the Loxone Config Software available. To add them simply highlight “Virtual outputs” in the periphery tree, then you will find the drop-down menu “Predefined devices” on the upper right side. In this drop-down menu you can find the Loxone Music Server.
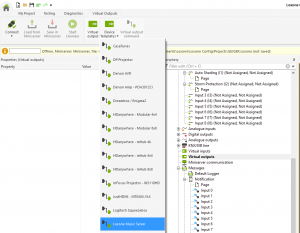
Now the following message will pop up:
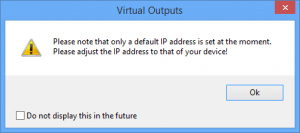
Highlight “Loxone Music Server” in the virtual output section in the periphery tree and adjust your IP address. Take care, you must not change the port “:7091”.
FEATURES
Multiroom Audio
Multiroom audio means that music can be played in any room individually or in every room at the same time. The Music Server and multiroom audio forms the foundation for many functions in your Loxone Smart Home, including the likes of a siren for the burglar alarm, alarm clock and doorbell sound!
Burglar Alarm Siren
The Loxone Music Server allows you to implement an alarm siren function that is sure to send any intruder running. If an alarm is triggered in your Loxone Smart Home, the Music Server will play the alarm sound at full volume across all the zones.
Gentle Alarm Clock
Time’s up for your annoying, shrill alarm clock. In your Loxone Smart Home you will be woken up gently as the blinds are gradually opened to let the light in. The Music Server then helps you to get out of bed by playing your favourite tunes.
Doorbell Function
Old-fashioned doorbell? Ring the changes and let the Loxone Music Server take over. If someone rings your doorbell, you will hear your chosen doorbell chime in the rooms you like. If the kids are asleep, their room will be muted – Simple!
Text to Speech
Your Loxone Smart Home can keep up with your busy lifestyle by giving you reminders – for example if the garage door or bathroom window are still open after sunset. The Loxone Music Server text-to-speech function generates your pre-defined text online and plays it back to you in the relevant zone as a speech output. The speech output reminders are perfect for those occasions when you want to be informed quickly when things are amiss.
Supports the following languages: German, English, Spanish, Finnish, French, Hungarian, Italian, Dutch, Polish and Russian.
Additional Zones Through Network Streaming
Add zones to your multiroom audio system by using UPnP audio devices such as wireless speakers. They allow the Music Server to play your music wirelessly via the speakers on your patio, for example. The Music Server is compatible with all devices that run on the UPnP networking protocol.
How To Stream Music Using UPnP
| 1. Activate UPnP | 2. Activate Zones | 3. Play Music |
| Start Loxone Config and activate UPnP. | Search for UPnP devices and activate them as zones. | The music will start playing. That’s how to stream music from your Music Server to wireless devices. |
Please note that, for technical reasons, UPnP / DLNA network zones can not be played synchronously in a group with wired zones.
This is due to differences in runtime in the network, time behavior and lack of synchronization feedback of the UPnP devices and is therefore not permitted as an operating function in the app.
The UPNP function has to be switched on explicitly in some network routers for the correct detection and operation of UPnP / DLNA players.
Stream Music Wirelessly via AirPlay
Time to get the party started! Send music from your AirPlay-enabled devices (iPhone, iPod Touch, iPad and Mac) straight to the Loxone MusicServer. With AirPlay you also have access to an unlimited number of music services from the AppStore.
How To Stream Using AirPlay
| 1. Activate AirPlay | 2. Choose Room | 3. Play Music |
Activate AirPlay on your mobile device. Choose a room from your list. The music will start playing!
Energy-Saving Power Management
The Loxone Music Server helps to save energy:
| Deep Sleep Mode | Automatic Power Handling |
| Once the music has been stopped in all zones, you can put the Music Server into deep sleep mode. The advantages? Less than 1 watt of energy used, plus a quick reboot time of under 30 seconds | The Loxone Music Server makes sure that the amplifier is using energy efficiently. If music is no longer being played in any of the rooms or zones, the amplifier is automatically switched off. |
Set Up Is Easy With Loxone Config
Your Loxone Partner will integrate the Loxone Music Server into your Smart Home, linking up the Music Server to the network. The automatic configuration in Loxone Config automatically creates the music zones. Then all that’s left to do is to open the Loxone app and start playing your music.
Complete Control Via The Loxone App
As you will be used to with Loxone functions, you can either control your Music Server using the usual buttons or with the Loxone app. Your smart phone can act as more than just a remote control, it shows you an overview of your audio and allows you to change settings at any time. Letting you communicate with the Music Server, the Loxone app makes your multiroom audio system truly complete..
NOTE: In order to use the Loxone Music Server, you’ll need our Loxone Smart Home not Loxone Classic.
Pure Listening Pleasure
The Loxone app gives you a remote control in your pocket – you can see instantly what’s playing in your home and change settings in an instant.
| Music Player | Music Library | Queueing Tracks |
| Play, volume up, volume down, next song… or use your Loxone app to choose the song you’re in the mood for. | In your personal music library, you’ll find all your playlists, albums and songs. | You can queue up the tracks to play next from your music collection or from music subscription services. |
Fine-Tuning Your Multiroom Audio System
Once you have performed the initial set up in Loxone Config, you can adjust it at any time using the app.
| Basic Settings | Room Groups | Favourite Zones |
| Use the Loxone app to define the maximum volume, base volume and audio delay for each zone. | Add multiple zones to a room group where you want to play the same music. | Define your favourites for each zone e.g. children’s songs in the children’s bedroom, rock music in the kitchen. |
Massive Storage
Our Loxone Music Server is kitted out with a 1 terabyte (1024 GB) hard drive. That’s enough room for 250,000 songs that can be played straight from the Music Server.
Copy your existing music collection onto the Music Server and play your favourite songs in all their high-quality glory.
Supported File types:
.mp3
flac
wav
aiff
wma
ogg
alac
Music Tagging
It used to take hours to get your music collection into some kind of order but music tagging means that the Loxone Music Server can do the hard work for you. Missing information such as album covers, genre etc. can be automatically added from an online music database to fill in the gaps.
Integration with Spotify and TuneIn radio
Some services like Spotify can be used, Login details must be entered into the Loxone app.
*Only Spotify premium accounts can be integrated.*
Spotify accounts with a + (Plus) in the email address cannot be used.
Up to 6 accounts can be added to a Musicserver using Spotify Family User Accounts. The accounts are visible to all in the app and you can decide which account you want to use in which zone, whereby an account can only be used in 1 zone at a time. If an account is used in two zones, you will be prompted by the app with an appropriate message.
![]() Please note that it is not possible to have 1 Spotify stream grouped to more than 10 music zones. This means that you can’t have 1 Spotify account playing in 10 zones at the same time.
Please note that it is not possible to have 1 Spotify stream grouped to more than 10 music zones. This means that you can’t have 1 Spotify account playing in 10 zones at the same time.
ADDING MUSIC TO THE MUSIC SERVER
The Music Server can be integrated as a network drive on your local area network so managing the stored music is simple.
WINDOWS
To add network on windows open “My Computer”, in newer Windows versions also known as “This PC”. Now right-click on ‘network’ option on left hand side, and then click on “Map network drive”.
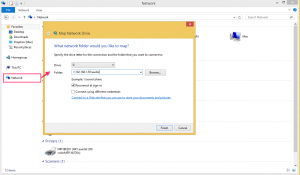
Now enter the IP address of the Music Server in the following format:
\\[IP address]\audio
e.g. \\192.168.1.50\audio
Click ‘finish’
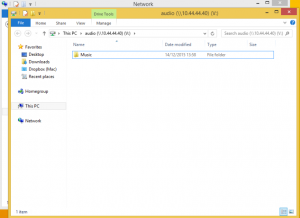
Now you can copy your music to the network folder. This music will now be available on the music server.
OSX
If using a Mac the Music Server is also inserted as a network folder.
First open up ‘finder’, Then click ‘go’ in the top bar. Finally Select ‘connect to server…’
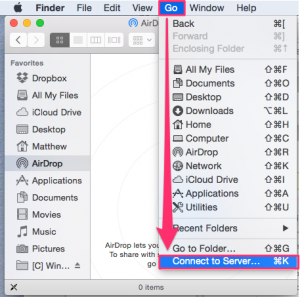
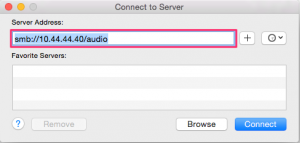
Now enter the IP address of the Music Server in the following format :
smb://[IP Address]/AUDIO
e.g. smb://192.163.1.56/audio
ADDING CUSTOM EVENT SOUNDS
In order to add custom event sounds the process is similar to the above but with some differences. Rather than mounting the “audio” folder on the music server instead mount the “event_sounds” folder. An example of this would be: \\192.168.1.253\event_sounds and you will be greeted by a window that will have a list of all the event sounds. These names are crucial as the music server plays the sound based on a lookup of the name of the file it is after.
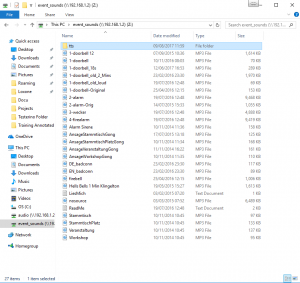
In order to add your own event sound (will be using 4-firealarm) you have to add your own audio file into this folder and rename it to be exactly the same as what you want it to replace. In the example’s instance, the new file has been added, the original 4-firealarm was renamed to 4-firealarm-OLD (it is good practice to rename them to something else rather than delete them so you still have them there) and the file that was added (firealarm sound) was renamed to 4-firealarm.

TEXT-TO-SPEECH
The Text-to-Speech function of the Loxone Music Server generates your predefined text online and plays it in the respective zone. The voice output is perfect for all events where you want to be informed quickly. The language set in Loxone Config is automatically used.
The following languages are supported:
| Language | Language Shortcut |
| German | de |
| English | en |
| Spanish | es |
| Finnish | fi |
| French | fr |
| Italian | it |
| Dutch | nl |
| Polish | pl |
| Russian | ru |
The following languages are not supported, so playback is automatically done in English:
| Language | Language Shortcut |
| Czech | en |
| Hungarian | en |
| Turkish | en |
| Portugese | en |
TTS IN OTHER LANGUAGES
If you want to create a voice output in a language other than that specified in Loxone Config, you can do this using a virtual output connector.
The command looks as follows:
Http: // “IP of the Music Server”: 7091 / audio / “Zones ID” / tts / “Language Shortcut” | “desired text” / “desired volume”
In this example, “Good morning” is played in Zone 3 of the Music Server with IP address 192.168.1.50 with volume 30 in English:
Http://192.168.1.50:7091/audio/3/tts/en|Good morning / 30
Note that there is no slash between the country slash and the text, but a pipe character (|), that is, a vertical stroke.
Grouped TTS
This command allows you to send a TTS message to different zones at different volumes.
Audio / grouped / tts / ZONE1 ~ VOLUME_Z1, ZONE2 ~ VOLUME_Z2, n / My TTS text
BSP .:
audio / grouped / tts / 1 ~ 45,2 ~ 40,3 ~ 55,4 ~ 50,5 ~ 60,6 ~ 30,7 ~ 50,8 ~ 44 / windows open in the bathroom
Event File
Plays its own mp3 from the music server Share “Event_Sounds” and then goes back to the previous state:
/ audio / ZoneID / playeventfile / Event_Sounds / filename / Volume
Eventplaylist: plays a saved Playlist and then returns to the previous state:
/ audio / ZoneID / playeventplaylist / Playlistname / Volume
Interrupting events: if you want to interrupt an event by a virtual command, you can send a pause to the corresponding zone:
/ audio / ZoneID / pause
ATTENTION! When an event is triggered, existing zone groups are canceled so that undesired side effects do not occur
(example alarm clock throughout the house after a party, instead of only in one room).
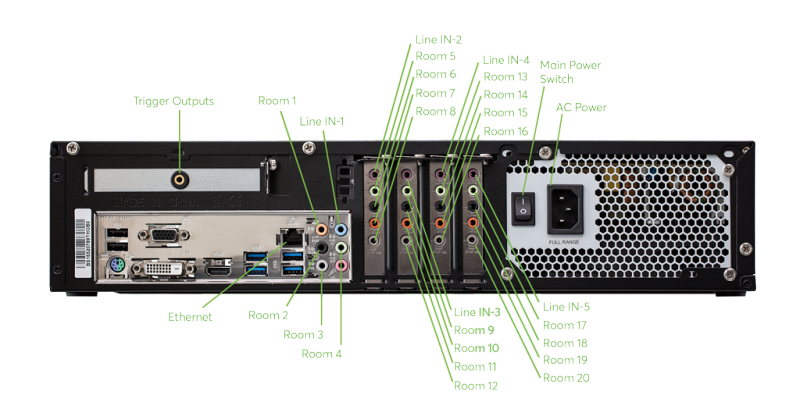
CONNECTIONS
RACK MOUNTING
The Music Server, as with any server requires ventilation, for this purpose it has inbuilt fans. To allow for optimal cooling the server must be placed on a shelf within a server rack. We suggest saving 3U’s to make enough space for the Music Server in the rack as the Server is a little over 2U with the feet and the shelf will add a little extra. Placing the Music Server and amplifiers in a fully enclosed cabinet without any form of passive ventilation is not recommended.
UPDATING THE SERVER OFFLINE
The current update file can be downloaded from our Download page and uploaded to the server via local network or USB stick. To do this, donwload the required .UPD file to your PC.
UPD installation via network:
Connect to the Music Server via network share:
Windows, File Explorer: \\music.server.ip\Updates
MAC, connect to server: smb://music.server.ip\Updates
Now copy the .UPD file into this directory and wait until it disappears automatically. After successful installation it will be deleted automatically.
Depending on the variant, the Music Server may restart automatically afterwards.
UPD installation via USB stick:
Format a USB stick as a FAT32 variant.
Copy the .UPD file to a stick, directly into the main directory (do not create any folders!).
Then plug the stick into the Music Server at one of the rear USB ports. The update will install automatically after one minute at the latest. If you have opened the browser admin interface during this time, you can track when the services are restarted and the server is ready for use again.
Troubleshooting
If the music server stops working or does not start and the error is not found elsewhere, follow these steps:
Turn off the music server, and connect a monitor to the HDMI, DVI, DP, or VGA port on the rear panel.
Then turn on the music server again and see if an error message is displayed at the beginning of the boot phase.
Possible errors are e.g. a defective hard disk, a wrong time, or reset BIOS settings (Setup Defaults).
A strongly deviating time or messages like no Keyboard found are indications that the battery on the mainboard of the music server is empty, and therefore the BIOS settings got lost. A startup may then not be possible.
Persons who are familiar with the inside of PCs can replace this battery.
If the error messages are not understandable, please take a picture of the messages and then ask your Loxone partner or Loxone support for advice.
Please note that the software license of the music server is bound to the hardware. The license expires if components such as mainboard, CPU or hard disk are exchanged without authorization.
Therefore, contact Loxone Support before replacing such parts.