The Loxone Audioserver is a highly versatile audio solution for any type of building.
In combination with the Miniserver, it is possible to play different music for each room and to select from a various audio sources. The doorbell, notifications and announcements as well as alarms are also enabled in this way.
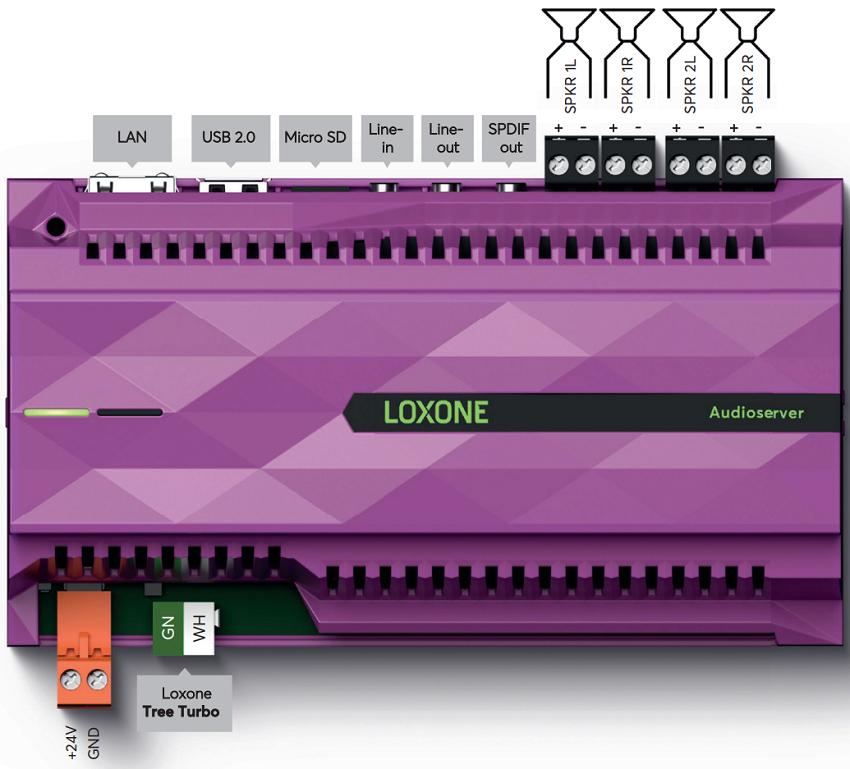
The replaceable microSD card contains the operating system and settings. The LAN interface is used to connect to the Miniserver, and to stream radio stations or music services on the Internet, or media on the local network. The USB interface can be used to connect storage devices with music files.
The Audioserver provides two stereo speaker outputs, which can also be separated and used individually. An analogue audio input, an output and a digital (electrical) SPDIF output (all via 3.5mm jacks) are also integrated.
Using the Tree Turbo interface, every Audioserver can be expanded with up to 10 Tree Turbo Audio devices for additional zones or speaker outputs; our Master/Client products are particularly suitable for this. In very large installations, multiple Audioservers can be combined to scale up the number of speakers significantly.
Using the Audio Player function block in Loxone Config, the system can be highly customized, the speaker outputs can be assigned to the individual rooms in mono or stereo mode. It is possible to create groups across rooms, allowing for a uniform music experience in open spaces.
For larger rooms, multiple speaker outputs are assigned to the same Audio Player function block. Each speaker output can be configured to output either the left or right channel signal, or a downmix of both channels.
The Audioserver is compatible with every type of the Loxone Miniserver.
Table of Contents
- Commissioning
- Pairing with the Miniserver
- Factory Reset, Settings and Updates
- Tree Turbo
- Separate Stereo Outputs
- Line Out, SPDIF Out
- Line In
- SD Card
- Wiring Example
- LED Status
- Dimensioning of Power Supplies
- Planning
- Inputs, Outputs, Properties
- Safety Instructions
- Documents
Commissioning↑
The Audioserver is installed on a DIN rail in a suitable enclosure.
Connect the power supply, the speakers and audio in/outputs as needed. The LAN port is used to connect the Audioserver to the local network or a WiFi router. Connect the Stereo Extensions to the Tree Turbo interface.
The wiring examples provide a brief overview.
The Audioserver starts after switching on the power supply and is ready for operation after about 1.5 minutes. When starting for the first time, the file system on the SD card is unpacked, during this process the status LEDs remain off. Wait until the Audioserver has completed the startup process. After this initial set-up, the Audioserver is ready for pairing with the Miniserver. This is indicated by the status LED flashing red/green/orange.
Then follow the instructions for pairing with the Miniserver.
Pairing with the Miniserver↑
Once the Audioserver is operational and connected to the network, it can be paired with the Miniserver in Loxone Config. Pairing mode is indicated by the status LED flashing red/green/orange.
If this is not the case, reset the Audioserver to factory settings.
To search for Audioservers, first click on Audio in the Periphery tree of Loxone Config, and then on Audioserver Search in the menu bar
The window that opens will list all Audioservers that are ready for pairing. This can take a few minutes:
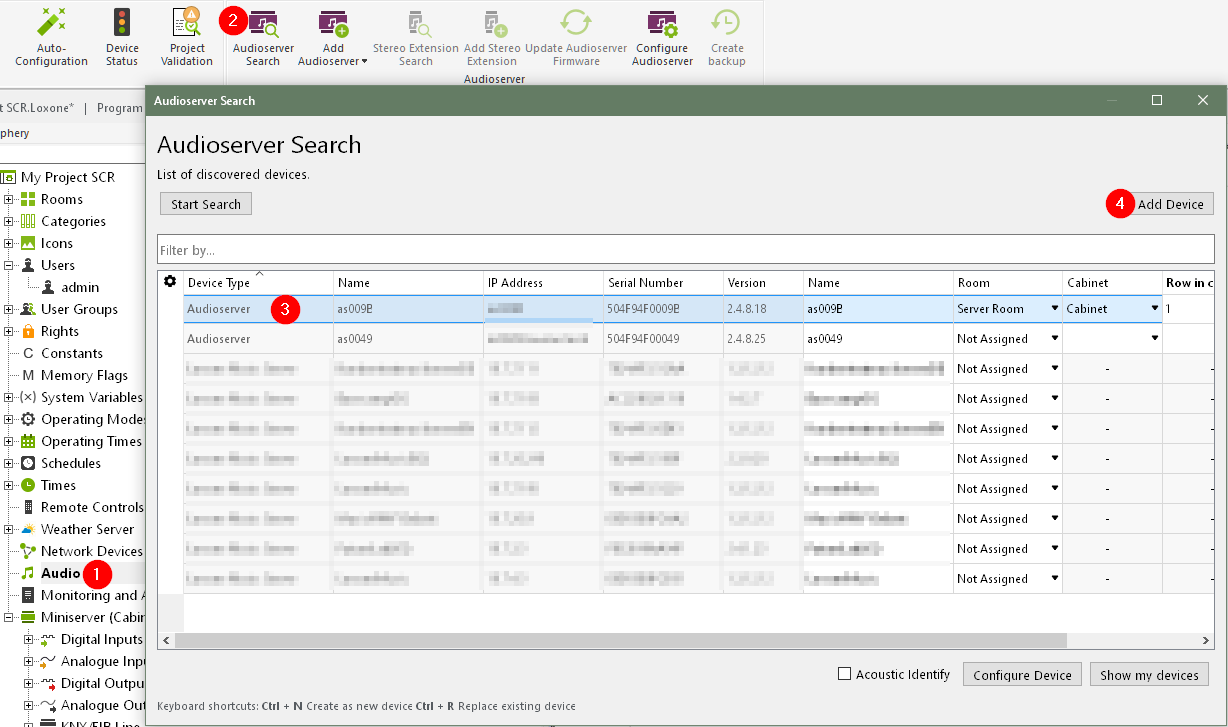
When highlighting one of the devices, it will identify by flashing its status LED or optionally also by an audible signal through the connected speakers. This allows you to easily identify and name the devices.
Select the desired Audioserver and click on Configure Device to assign a static IP address to the Audioserver. This can also be done via the Audioserver's web interface.
Then, select a name, room and installation location for the highlighted Audioserver and add it to the programming using the Pair Device or + button.
The right window lists all the devices that are currently part of the program. You can display them by clicking the button Show my Devices. You can also replace an existing device with a new device of the same type that was found in the search. This is useful when a device needs to be replaced or devices are added to a pre-configured program. Select the device to be added and the device to be replaced. By clicking on the button with the arrow pointing right, the old device is replaced with the new one in the program.
To apply the changes, save the program in the Miniserver.
Now the added devices are ready for use and available in the Periphery Tree in Loxone Config.
If multiple Audioservers are used, ensure they are connected within the same network segment.
Factory Reset, Settings and Updates↑
If the Audioserver was previously paired with a Miniserver and is now to be used in another installation, the pairing must first be released. Connect to the Miniserver and delete the Audioserver from the programming. Then save the program into the Miniserver.
If this is not (or no longer) possible, reset the Audioserver to factory settings by formatting an SD card for the Audioserver in Loxone Config and then inserting it. Alternatively, you can reset the Audioserver to the factory settings via the web interface. Now the Audioserver is ready to be paired again.
 | Without these steps a previously paired Audioserver cannot be paired with another Miniserver! |
The web interface of the Audioserver allows network configuration, status display and diagnostic options. You can access it via the IP address or the hostname of the Audioserver. When searching for Audioservers in Loxone Config, the search result includes the IP address or hostname of the Audioserver.
If the Audioserver is not yet paired with a Miniserver, the login credentials for the web interface are admin/admin.
Once the Audioserver is paired, the login credentials of a user of the user group Full Access (Administrators) of the paired Miniserver are required.
The Audioserver can perform firmware updates automatically, if any are available. This requires Automatic Updates to be enabled in the project properties. The Audioserver adopts this setting.
Alternatively, the Audioserver can be updated manually in Loxone Config. To do so, select the Audioserver in the periphery tree and click on Update Audioserver Firmware in the menu bar. The update can also be started from the Audioserver web interface.
Another option is to manually copy the update file (*.upd) for the Audioserver to the SD card. Shortly thereafter, the update will be applied from this file.
If there is no DHCP server in your network, or if the Audioserver is connected directly to a PC, link-local addressing via Zeroconf is supported. If both Audioserver and computer are set to DHCP, they will adopt a 169.254.x.x link-local address.
This way a connection to the Audioserver is possible even without a network. Although this is not suitable for normal operation, it allows you to restore the factory settings via the Audioserver's web interface, or to manually assign an IP address.
To check the network by a periodic ping, the Audioserver relies on the ICMP service at the router/gateway. If this service does not respond, the Audioserver performs a security reboot about every 10min.
Tree Turbo↑
For Tree Turbo wiring and topology, pairing, and speed requirements, see the Tree Turbo Interface documentation.
Separate Stereo Outputs↑
The option to split one stereo output of the Audioserver or of a Stereo Extension into two separate channels allows you to cover two different rooms or areas with one speaker each. The two outputs can be used independently on separate Audio Player blocks.
To separate the channels, first click on the output of an Audioserver or a Stereo Extension in the Periphery tree, then click on the menu bar button Separate Stereo Output. Now two individual outputs are available in the Periphery tree. In order to merge the two outputs into a stereo output again, click on the button Merge to Stereo Output.
Note: If the outputs are separated, there can be slight crosstalk between the two channels.
This means that at a volume of 65% or higher, you may hear the audio signal on the adjacent channel, even if it is switched off.
For directly adjacent rooms, this effect is usually not noticeable, since at this volume the music from the adjacent room can also be heard through the walls.
The Line Out and SPDIF Out options are not available for separated outputs.
Line Out, SPDIF Out↑
The Line Out (green jack socket) is an analog audio output. Connect AV devices with analog inputs, such as amplifiers, mixers or active speakers, using a 3.5mm to RCA cable.
Equalizer settings are applied to the Line Out.
The SPDIF Out (black jack socket) is a digital electrical SPDIF output. Connect AV devices such as amplifiers or active speakers using a 3.5mm to RCA cable; the electrical SPDIF signal is on the left (white) RCA plug. Connect this plug to a digital coaxial audio input.
Equalizer settings are not applied to the SPDIF Out.
Use high-quality shielded cables for both outputs and run them separately from other cables.
The Line Out and the SPDIF Out can be activated in the properties of the respective output:
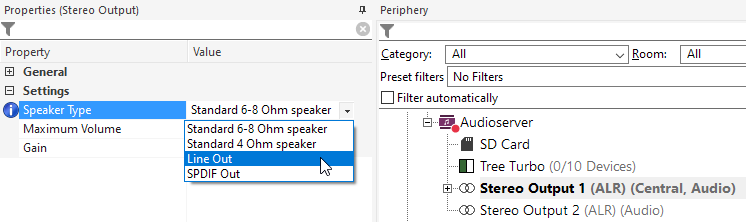
When Line Out or SPDIF Out is selected for an output, the speaker outputs are disabled and the signal is output at the Line Out or SPDIF Out instead.
The Line Out and SPDIF Out options are not available for separated outputs.
The output volume depends on the Volume Mode selected in the output's properties:
Standard: the output signal level varies with the volume set on the Audio Player.
External volume: the output signal stays constant at a fixed level (Fixed Level). The actual loudness is set by an external device such as an amplifier, driven by the Audio Player's external volume outputs.
Two modes are available:
- External volume absolute value: connect the Volume output to a volume actor. The Audio Player sends the target volume value to the device, and the current volume level is shown in the app.
- External volume up/down: connect the V+/V- outputs. The Audio Player sends one pulse per volume step and does not send several pulses at once; no total volume is shown in the app.
Line In↑
The Line In (blue jack socket) is an analogue audio input. Devices with analogue audio or headphone outputs can be connected to this input.
Use a high-quality shielded 3.5mm to RCA cable, or a 3.5mm to 3.5mm cable and run it separate from other cables.
The Line In can be selected as a Source in the interface of the Audio Player function block.
Latency and delay
When playing back audio signals from the Line In, there is a short delay.
This latency is caused by the recording, subsequent data transfer and synchronization and is at least 170 ms.
This is generally not noticeable when playing music.
Even when the sound is played back to a video, many people perceive it as synchronous with the image up to a delay of approximately 50 ms, depending on the content.
Using a microphone
The Line In is not suitable for the direct connection of a microphone.
In this case, additional equipment such as a microphone amplifier or mixer is required.
This enables applications such as announcements via a microphone, since latency is negligible here. The latency here is at least 170 ms.
However, it should be ensured that the speaker does not hear himself over the loudspeakers if possible, as the delay is disturbing when speaking, or feedback can occur.
The system is not suitable for the use of a microphone in live performances, or other applications where real-time playback is required, due to latency.
Adjusting Line-In Input Gain to Prevent Audio Distortion
Some external audio devices may deliver an analog output with a voltage level that is too high, leading to distortion in the incoming or sampled audio signal on the Audioserver. To solve this, you can manually adjust the input gain level of the line-in via an API command.
Steps to Adjust Line-In Gain Level:
1. Access the Audioserver via Config:
-In Loxone Config, go to Device Status.

2. Open the device command by right-clicking on the Audioserver.
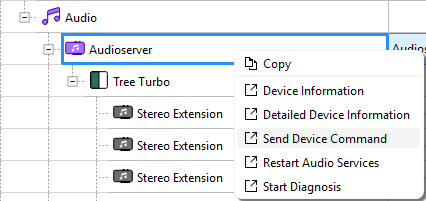
3. Enter the command and confirm by clicking OK.
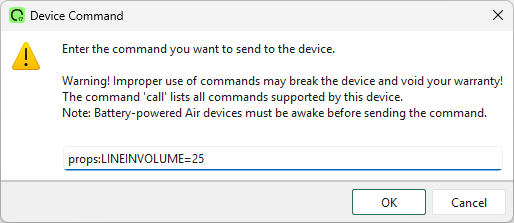
4. Restart the Audioserver:
- To activate the new input volume settings, restart the Audioserver. Alternatively, restart the audio service using the input command restart.
SD Card↑
The Micro SD card, located at the top edge of the Loxone Audioserver, contains the operating system and settings.
The SD card can be removed as follows:
Gently press the visible edge of the SD card inward with your fingernail.
This will release and partially eject the card so it can be removed.
If the SD card fails to latch when inserting it, it needs to be fully removed to reactivate the latching mechanism.
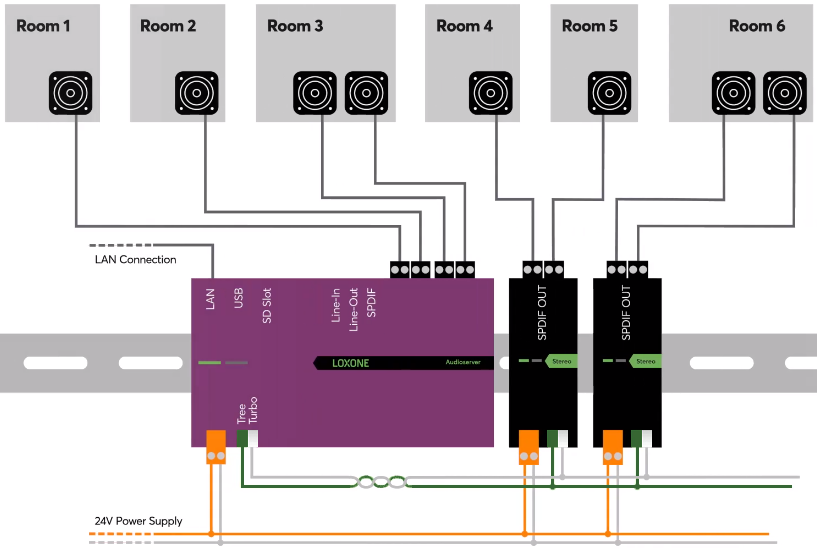
Wiring Example↑
The following image shows a simplified wiring diagram for an Audioserver and two Stereo Extensions:
LED Status↑
| Left LED | Right LED | Description |
|---|---|---|
|
| Device is in pairing mode, ready for pairing. |
|
| Audioserver is booting, or no connection to the paired Miniserver is possible. |
|
| No network connection |
|
| Everything OK, device is online. |
|
| Device was selected in Loxone Config and is identifying. |
|
| Check power supply and SD card. At first start-up: File system on SD card is unpacking, wait for the process to complete. |
|
| No compatible operating system on the SD card. |
|
| Indicates that there is no SD card inserted in the device, or that the SD card is completely defective. |


For the first few seconds after switching on the power supply, both status LEDs flash red and orange alternately.
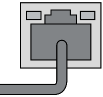
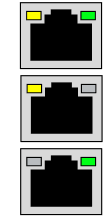
| RJ45 Port | Description |
|---|---|
| Network connection, indicates data traffic. |
| No network connection or the device was unable to start. |
| If one or both LEDs are permanent on without a plug connected, this indicates that the interface is damaged. |
Dimensioning of Power Supplies↑
We recommend using separate power supplies exclusively for the Audioserver and Stereo Extensions.
When sizing the power supply, allow at least 72 W for the Audioserver and at least 36 W per Stereo Extension if the speaker outputs are used.
The Loxone 10 A/240 W power supply is ideal for one Audioserver and two Stereo Extensions; the smallest suitable unit, the Loxone 4.2 A/100 W, can supply one Audioserver or two Stereo Extensions.
Planning↑
Notes on the proper planning of a complete audio system.
Diagnostic Inputs↑
| Summary | Description | Unit | Value Range |
|---|---|---|---|
| Online Status Audioserver 1 | Indicates whether the device can be reached by the Miniserver. Diagnostics for Air devices Diagnostics for Tree devices Diagnostics for Extensions | Digital | 0/1 |
| System temperature | Provides the internal device temperature. This is often the temperature of the CPU or another location in the device. | ° | ∞ |
| Temperature Shutdown | Input is active, when the outputs of the device have been switched off due to high device temperature. Possible reasons: Ambient temperature too high, outputs overloaded. | Digital | 0/1 |
Properties↑
| Summary | Description | Value Range | Default Value |
|---|---|---|---|
| Serial Number | Specifies the serial number of the device. | - | - |
| Monitor Online Status | If checked, you will be notified via System Status or the Mailer if the device is no longer available or goes offline. | - | - |
| Local Address | Address or hostname of the Audioserver or audio device e.g.: 192.168.1.7 or as1234. This setting configures the address the Miniserver will connect to but does not change the configuration of the audio device itself. | - | - |
| Notify of error as a voice message | If the selected source cannot be played or there is an error a voice message giving the reason for the error will be played in the corresponding zone. | - | - |
| Network Share | Configure the network share the device provides for managing audio files: Deactivate - the network share is turned off. Activate - the network share is enabled without password protection. Activate - Password protected – the network share is enabled and protected by a Samba password. The username for authentication is 'audio'. | - | - |
| Line In ID | Use this ID on the input LineIn of an Audioplayer to select the Line In as source. | 1...100 | 1 |
| Device Configuration | Edit device settings. A connection to the Miniserver is required. | - | - |
Safety Instructions↑
Installation must be carried out by a qualified electrician in accordance with the applicable regulations.
This device must be mounted on a DIN rail in an electrical distribution enclosure to ensure protection against contact, water and dust.
Only mount the device on a horizontal DIN rail to ensure heat dissipation by convection.
Documents↑
Datasheet Install Speaker 7 Passive
Datasheet Install Speaker 10 Passive
Datasheet Satellite Speaker IP64 Passive