The McpServer plugin runs a Model Context Protocol (MCP) server directly on the Miniserver. It lets AI assistants and agents query the state of your installation and send commands to controls, using your existing rooms, categories and control names — with no cloud service of its own.
 | Access is protected by Loxone login. A connecting assistant must sign in with a Loxone user account and can only see and operate what that user is permitted to. Create a dedicated user with the minimum rights the assistant needs. |
Table of Contents
- Overview
- Setup
- Prerequisites
- Access and permissions
- What an assistant can do
- Finding your MCP URL
- Connecting your assistant
- Reverse proxy or custom domain
- Inputs, Outputs, Properties
Overview↑
Model Context Protocol (MCP) is an open standard that lets AI assistants connect to external systems through a well-defined set of tools. This plugin implements an MCP server for the Miniserver, so a connected assistant can find controls, read their current state, and trigger commands without any cloud service.
The server reads the installation structure from the Miniserver (rooms, categories, controls) and presents it to the assistant. Requests from the assistant are translated into the same control commands that the Loxone apps use, so no additional configuration of individual controls is required.
Setup↑
Add the McpServer plugin to the installation and let it start. Your assistant connects to the plugin's MCP URL — there is one address for access over the internet and one for the local network. See "Finding your MCP URL" below for how to obtain them, and "Connecting your assistant" for the steps for popular assistants. Paste the address that suits your assistant; the first time it connects, you sign in with a Loxone user account to grant access.
No third-party account or external service is required. The assistant authenticates directly against the Miniserver, and every request runs with the permissions of the Loxone user who signed in.
Prerequisites↑
A Miniserver that supports plugins (.LxAddOn) is required, together with an MCP-capable assistant or agent that can reach the published endpoint, and a Loxone user account for the assistant to sign in with.
 | An assistant can only see and control what its Loxone user is permitted to. Grant the dedicated user the minimum rights required, and revoke access at any time by disabling that user or removing the connection. |
Access and permissions↑
When an assistant connects, it acts as the Loxone user who signs in. It gets exactly that user's rights — the same rooms, categories and controls that user can see and operate in the Loxone apps, no more and no less.
| Create a dedicated Loxone user for each AI assistant and grant it only the rights it needs. AI assistants can misread a request or act on the wrong control, and the signed-in user's permissions are the only access limit the Miniserver itself enforces — a restricted user keeps any mistake within safe bounds. |
Many assistants add a second, client-side limit: you choose which of the server's tools the assistant may use. Tools are tagged so a client can group them:
Read — look up structure and current state (find controls, read values, history, statistics). These change nothing.
Write — send commands that change something, such as operating a control or setting a value.
This server's tools are read or write; allowing only read tools, for example, lets an assistant report on the installation without being able to change anything. Where you set this limit depends on the assistant — see its connector or MCP settings.
What an assistant can do↑
The server lets an assistant work with the controls that already exist in your installation, in two ways: reading their state and operating them. It uses your existing rooms, categories and control names, and it does not change how the installation is programmed.
Reading state, history and statistics
A connected assistant can find controls and read their current values — for example whether the kitchen light is on, how warm it is in a room, or whether a door is open. It can also read recorded history and statistics, so you can ask questions such as "what was the average living-room temperature yesterday" or "how much energy did the heat pump use last week". These requests only read information and change nothing.
Sending commands
The assistant can operate controls the same way the Loxone apps do: switch a light on or off, dim it or set a colour, activate a specific lighting mood, raise or lower a target temperature, move blinds or shades, and trigger scenes. Each command runs with the permissions of the signed-in Loxone user.
| Some controls are protected by a visu password — a control-level password that guards an individual control, separate from the account password used to sign in. An assistant can still operate such controls if you provide that visu password; it is used only to authorise the individual command and is never stored or sent to a cloud service. |
What is not supported
The server operates a running installation; it does not configure or reprogram it. Settings that require elevated rights — where the Loxone app asks you to re-enter your account password to unlock them — are out of scope. This is a different password from the control-level visu password above, and the server cannot perform these actions. They include:
User management — creating or changing users, rights and permissions.
Expert mode and configuration changes made in Loxone Config.
The Automatic Designer.
To make changes like these, use the Loxone app or Loxone Config directly.
Finding your MCP URL↑
When you connect an assistant such as Claude, you paste in the address of the MCP server. It always ends in /mcp. There are two addresses — one for reaching the Miniserver over the internet and one on your local network. Pick the one that matches how your assistant connects.
Over the internet — open https://connect.loxonecloud.com/<serial> in a browser, replacing <serial> with your Miniserver's serial number (for example https://connect.loxonecloud.com/504F94AABBCC). Your browser is forwarded to the Miniserver's own .dyndns.loxonecloud.com address, which builds the public relay IP into the name. Copy that address exactly as shown and add /mcp to the end.
On the local network — browse to the Miniserver's local IP address (for example https://192.168.1.50). You are redirected to its .dyndns.loxonecloud.com address, built the same way but from the local IP. Copy it and add /mcp to the end.
Two worked examples for a Miniserver with serial 504F94AABBCC — public address 203.0.113.42, local IP 192.168.1.50:
| How the assistant connects | Address you paste (example) |
|---|---|
| Over the internet | https://203-0-113-42.504f94aabbcc.dyndns.loxonecloud.com/mcp |
| On the local network | https://192-168-1-50.504f94aabbcc.dyndns.loxonecloud.com/mcp |
These addresses are examples — copy the exact host your own browser shows after the redirect.
| To check the addresses the plugin is actually advertising, open its diagnostic page: browse to https://<your-miniserver>/dev/sps/io/<uuid>/hello while signed in with a Loxone account, where <uuid> is the MCP Server object's identifier in Loxone Config. It lists the effective internet and local MCP URLs and marks each one as automatic or a custom override. |
Connecting your assistant↑
The steps below cover the most common assistants. In each case you paste the MCP URL from "Finding your MCP URL" above and sign in once with a Loxone user account. Use the internet address for assistants that run in the cloud (such as claude.ai) and the local address for assistants running on the same network. The examples use the internet address https://203-0-113-42.504f94aabbcc.dyndns.loxonecloud.com/mcp — replace it with your own.
| Cloud assistants such as claude.ai — and Claude Desktop's Connectors — connect from the assistant's cloud and only reach the server over standard HTTPS on port 443. Remote Connect publishes the Miniserver on a non-standard port, so a Remote Connect address does not work for these cloud connections; serve the endpoint on port 443 with the reverse proxy or custom domain described in "Reverse proxy or custom domain" below. Assistants that run a local bridge on your own computer — Claude Desktop's Local MCP Server, Claude Code, LM Studio — can use a Remote Connect address directly, on any port. Assistants on your own network can use the local address, which keeps traffic on the LAN. |
Claude (claude.ai, in the browser)
Open Settings and go to Connectors. Choose to add a custom connector, give it a name such as Loxone, and paste your internet MCP URL ending in /mcp. Save it, then open the connector and sign in with your Loxone account to authorise access. A Connector runs from Claude's cloud and only works when your internet address is reachable on standard HTTPS (port 443). A Remote Connect address uses a non-standard port and will not connect this way — serve the endpoint on port 443 with the reverse proxy or custom domain described below. Anthropic's current steps
Claude Desktop
Claude Desktop offers two ways to add a server, and they behave differently here. Its Connectors setting hands the URL to Claude's cloud — the same path as claude.ai in the browser — so it only works on standard HTTPS (port 443) and not with a Remote Connect address on a non-standard port. Add a Local MCP Server instead: under Settings → Developer it runs a small bridge on your own computer, which can reach the Miniserver on any port, including a Remote Connect address. Choose Edit Config and add the server to claude_desktop_config.json (Anthropic's current steps):
{ "mcpServers": { "loxone": { "command": "npx", "args": ["mcp-remote", "https://203-0-113-42.504f94aabbcc.dyndns.loxonecloud.com/mcp"] } } }
Restart Claude Desktop; a browser window opens for the Loxone sign-in.
Claude Code (command line)
Add the server with the Claude Code CLI:
claude mcp add --transport http loxone https://203-0-113-42.504f94aabbcc.dyndns.loxonecloud.com/mcp
Then run /mcp inside Claude Code and complete the Loxone sign-in in your browser.
LM Studio
Open the Program tab and choose Edit mcp.json, then add the server under mcpServers with a url field:
{ "mcpServers": { "loxone": { "url": "https://203-0-113-42.504f94aabbcc.dyndns.loxonecloud.com/mcp" } } }
Save the file; LM Studio prompts you to sign in with your Loxone account.
Reverse proxy or custom domain↑
Most installations need nothing here — by default the plugin works out and advertises its own addresses. A reverse proxy or custom domain is mainly needed for cloud assistants: clients such as claude.ai (and Claude Desktop's Connectors) connect over standard HTTPS on port 443 with a publicly trusted certificate, while Remote Connect publishes the Miniserver on a non-standard port, so a Remote Connect address cannot be used for them. Putting the Miniserver behind a reverse proxy or custom domain that serves the endpoint on port 443 (for example a Cloudflare tunnel or nginx) makes it reachable — this is also the route if you simply want to use your own domain and certificate.
When you use one, tell the plugin which public address to advertise. Otherwise the automatic address points at the Miniserver behind the proxy instead of the proxy itself, and sign-in fails.
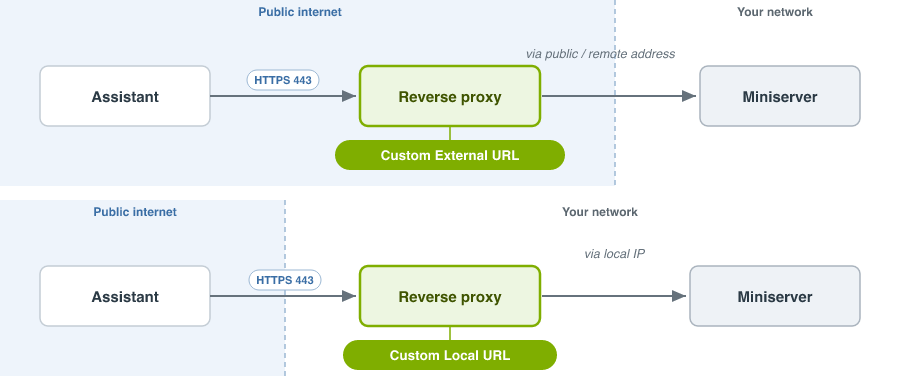
Which field you fill in depends on how your proxy reaches the Miniserver — not on where the assistant runs:
Custom External URL — set this when your proxy reaches the Miniserver via its External Address (public IP or Remote Connect).
Custom Local URL — set this when your proxy reaches the Miniserver via its Local Address on the LAN.
The value you enter is the proxy's own public MCP URL — the address assistants paste — for example https://mcp.example.com/mcp. Only https addresses are accepted. Leave a field empty to keep the automatic address for that path; set one, the other, or both.
| The proxy must forward the whole host, not just /mcp. Both the /mcp paths and the root-level /.well-known paths have to reach the Miniserver. Sign-in uses a discovery address at the root of the host (https://mcp.example.com/.well-known/oauth-authorization-server/mcp), which sits outside /mcp. A proxy that forwards only /mcp lets the assistant find the server but not the login service, so connecting fails. |
Diagnostic Inputs↑
| Summary | Description | Unit | Value Range |
|---|---|---|---|
| Online Status MCP Server | Indicates whether the device can be reached by the Miniserver. Diagnostics for Air devices Diagnostics for Tree devices Diagnostics for Extensions | Digital | 0/1 |
Properties↑
| Summary | Description | Default Value |
|---|---|---|
| Custom External URL | Address agents use to reach this MCP server via the internet when the Miniserver is published behind a reverse proxy or under a custom domain (for example a Cloudflare tunnel). Enter the full https URL, for example https://mcp.example.com/mcp. Leave empty for automatic. | - |
| Custom Local URL | Address agents on the local network use to reach this MCP server when local traffic is routed through a reverse proxy or custom domain. Enter the full https URL, for example https://loxone.local/mcp. Leave empty for automatic. | - |
| Monitor service | If checked, you will be notified by the System Status or Cloud Mailer if this service is no longer available or offline. | - |