The Audio Player block defines an audio zone, usually a room or area of a building where targeted sound reinforcement is required. It works with the stereo outputs of the Audioserver or a Stereo Extension, and with master-client loudspeakers (Master-Client Technology) connected via the Tree Turbo interface of the Audioserver or Miniserver Compact.
In larger rooms, several speaker outputs can be assigned to the same Audio Player block, whether they are passive or Master-Client speakers.
For each speaker, you can set whether it plays the left channel, the right channel, or the sum of both (stereo downmix). The stereo downmix is recommended in most cases, as it provides the most balanced audio quality.
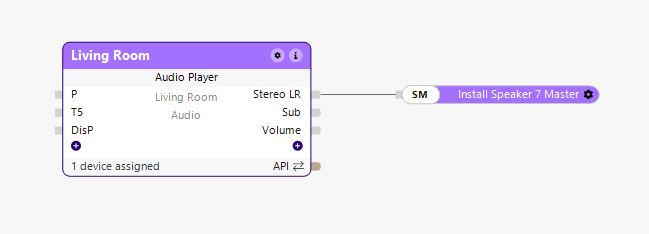
Table of Contents
- Inputs
- Parameters
- Outputs
- Properties
- Programming example
- LOXONE App
- Internet Radio
- Spotify
- Library
- USB
- SMB Access to SD Card
- Network share
- Line In
- AirPlay
- Text to Speech (TTS)
- Event Sounds / Custom Sounds
- Presence Simulation
- History
- Settings
Inputs↑
| Abbreviation | Summary | Description | Unit | Value Range |
|---|---|---|---|---|
| V+ | Volume+ | Increase volume by value set in parameter (Vsts). Double-click selects next favorite. | - | 0/1 |
| V- | Volume- | Decrease volume by value set in parameter (Vsts). Double-click turns off the player. | - | 0/1 |
| V | Set volume | If the player is turned off, playback will start automatically. | % | 0...100 |
| Play | Play | - | 0/1 | |
| Pause | Pause | - | 0/1 | |
| P | Presence | Starts playback when 1. | - | 0/1 |
| Prev | Previous track | - | 0/1 | |
| Next | Next track | - | 0/1 | |
| Fav | Set favorite | Selects a favorite based on its assigned ID number. If the selected ID does not exist, the first favorite is selected. | - | ∞ |
| Alarm | Alarm | Plays alarm sound at volume set in parameter (Va). | - | 0/1 |
| FireAlarm | Fire alarm | Plays fire alarm sound at volume set in parameter (Va). | - | 0/1 |
| Bell | Bell | Plays doorbell sound at volume set in parameter (Vbell). | - | 0/1 |
| Buzzer | Buzzer | Starts alarm clock action as specified in the properties. If the action "Alarm Clock Chime" is selected, the alarm clock sound is played at the volume set in parameter (Vbuzzer). | - | 0/1 |
| LineIn | Set Line In | Selects the Line In of an Audioserver as source based on its Line In ID. | - | 0...∞ |
| Off | Off / Lock | Pulse (< 200 ms): Outputs are reset / switched off. Pulse (> 200 ms): Block is locked. Dominating input. Pulse (> 500 ms): The name of the connected sensor is used in the user interface. | - | 0/1 |
| DisPc | Disable periphery control | Disables inputs V+, V-, V, Play, Pause, Prev, Next, Fav, Bell, Buzzer, T5, TTS, Cs, BTp when On. (e.g child lock, cleaning) Control via user interface is still possible. | - | 0/1 |
| DisP | Disable presence | As long as this input is active, any change in value at input (P) is ignored. | - | 0/1 |
| T5 | T5 control | Button 2: Volume up; double-click selects the next favorite. Button 5: Volume down; double-click pauses playback. A single click on button 2 or 5 starts playback when the player is off. Button 3: Double-click activates (2C); triple-click activates (3C); (Roff) = 0: pauses playback. | - | ∞ |
| TTS | Text to speech | Converts a Text to speech and plays it at the volume set in parameter (Vtts). | - | - |
| Rtd | Reset to default | Resets parameters and settings of the block to the default values as specified in the block preset. | - | 0/1 |
| Tg | Toggle | Toggles between play and pause | - | 0/1 |
| Cs | Custom sound | Plays custom sound [filename] at volume [vol]. E.g. soundcheck.mp3:80 [filename]:[vol] Custom sounds have to be stored on the Audioserver’s SD card in the folder Event_Sounds! Only mp3 files are supported. | - | - |
Parameters↑
| Abbreviation | Summary | Description | Unit | Value Range | Default Value |
|---|---|---|---|---|---|
| Von | Power on volume | Volume when playback is started or resumed. -1 = Saves the last volume setting as the startup volume. | % | -1...100 | 10 |
| Vm | Maximum volume | Setting for maximum volume | % | 0...100 | 100 |
| Vsts | Step size volume | Decrease volume by value set in parameter (Vsts). Double-click turns off the player. | % | 1...100 | 1 |
| Va | Minimum volume alarm sounds | If the current playback volume is higher, it is used instead of the minimum volume. | % | 0...100 | 75 |
| Vbell | Minimum volume doorbell | If the current playback volume is higher, it is used instead of the minimum volume. | % | 0...100 | 40 |
| Vbuzzer | Minimum volume alarm clock | If the current playback volume is higher, it is used instead of the minimum volume. | % | 0...100 | 10 |
| Vtts | Minimum volume TTS and announcements | If the current playback volume is higher, it is used instead of the minimum volume. | % | 0...100 | 20 |
| Tdc | Time double-click | s | 0...10 | 0.35 | |
| Roff | Ignore room off command | Ignore Room Off / House Off via T5 (button 3) | - | 0/1 | 0 |
| BuzzerFav | Alarm clock favorite | Room favorite ID for alarm clock, if the alarm clock action room favorite is used. | - | ∞ | 1 |
| BTp | Bluetooth pairing | As long as this input is active, bluetooth pairing is available. During this time all bluetooth-enabled Loxone devices can be paired with e.g. a smartphone or other bluetooth-enabled devices. This parameter is only visible in certain configurations. | - | 0/1 | 0 |
| Ft | Volume Fading Time | Volume adjustments made via input V are applied within the configured time when the player is already active. The fading time also applies to the Buzzer input. 0 = No fading; volume changes occur immediately. | s | 15...1800 | 0 |
Outputs↑
| Abbreviation | Summary | Description | Value Range |
|---|---|---|---|
| Stereo LR | Stereo Left & Right | Outputs the full stereo signal | 0/1 |
| Play | Play status | 1 when player is currently playing | 0/1 |
| Volume | Current volume | ∞ | |
| 2C | Pulse on double-click | Pulse on a double- or triple-click or pulse on input (Off). | 0/1 |
| 3C | Pulse on triple-click | Pulse on a triple-click. | 0/1 |
| Stereo L | Stereo Left | Outputs the left channel of the stereo signal. | 0/1 |
| Stereo R | Stereo Right | Outputs the right channel of the stereo signal. | 0/1 |
| V+ | Pulse on Volume+ | Functionality is only enabled when Stereo Outputs with external controlled "Volume-Mode" are connected. | 0/1 |
| V- | Pulse on Volume- | Functionality is only enabled when Stereo Outputs with external controlled "Volume-Mode" are connected. | 0/1 |
| Sub | Subwoofer | Outputs the subwoofer channel of the stereo signal. This output can only be used with Master/Client subwoofers. | 0/1 |
| BTp | Bluetooth Pairing | As long as this output is active, Bluetooth pairing is active. During this time all Bluetooth-capable Loxone devices can be paired with a smartphone or other Bluetooth devices. This output is only visible in certain configurations. | 0/1 |
| API | API Connector | Intelligent API based connector. Can link several functions between devices and blocks. API Commands | - |
Properties↑
| Summary | Description | Value Range | Default Value |
|---|---|---|---|
| Alarm Clock Action | Action that is carried out when the alarm goes off | - | - |
| Enable AirPlay | Enable AirPlay for this player. Option is not available if music services are handled by Player-Group. | - | - |
| Enable Spotify Connect | Enable Spotify Connect for this player. Option is not available if music services are handled by Player-Group. | - | - |
| Room Favorite Priority | If checked, the first room favorite will always be used when the player is activated. | - | - |
| Number of activity entries | Number of entries in the activity log. 0: log is disabled The activity log tracks relevant changes since program start. | 0...100 | 20 |
| Player-ID | ID of the player on the Audioserver or audio device | ∞ | - |
| Automatic Highpass-Filter | When a subwoofer is connected to the Audio Player, all other speakers automatically stop reproducing bass frequencies, reducing their load. This behavior can be disabled by unchecking the corresponding checkbox, allowing all connected speakers to play the full frequency range. | - | - |
Programming example↑
Example 1: Audio Player in the living area
The Audio Player sits in the living area, connected to an Install Speaker 7 Master and an Install Speaker Client. It is controlled by presence via the (P) input, so the sound system switches on as soon as presence is detected.
It can also be operated manually with a T5 button (Touch). Night mode disables the presence sensor at night via (DisP), so playback is not triggered during the night.

The (Stereo LR) output is generally recommended: it outputs a stereo downmix for even sound distribution. If the listening position is fixed, individual speakers can be assigned to the left or right channel.
Example 2: Open area with two Audio Players
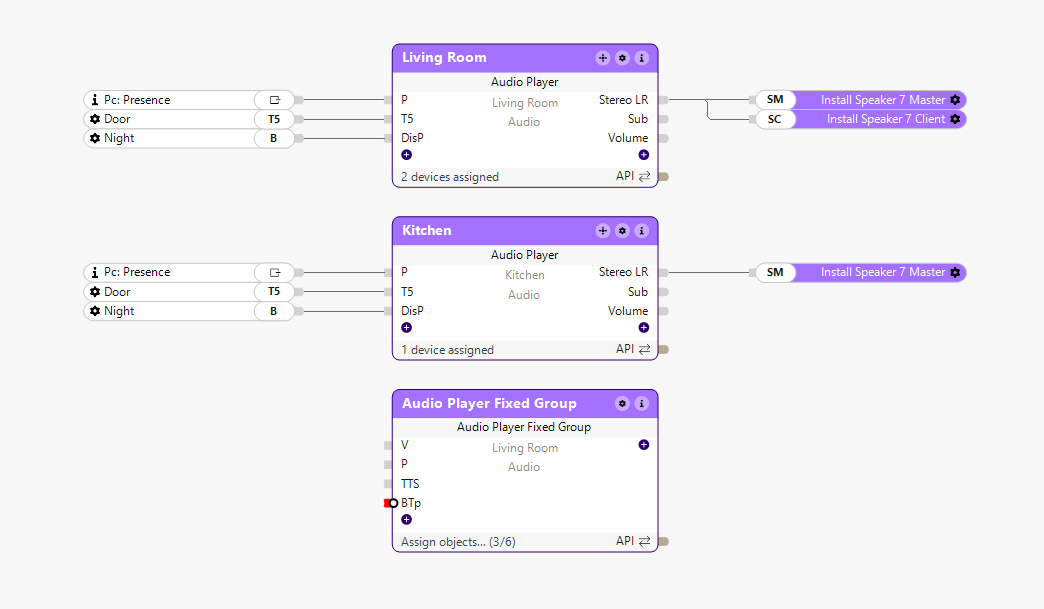
Two Audio Players are used, one for the living room and one for the kitchen, each with its own speakers. As this is an open-plan area, they are combined with the Audio Player Group Fix block: each area is still controlled individually, but the same source is played in both simultaneously.
Example 3: Multiple speakers on one Audio Player
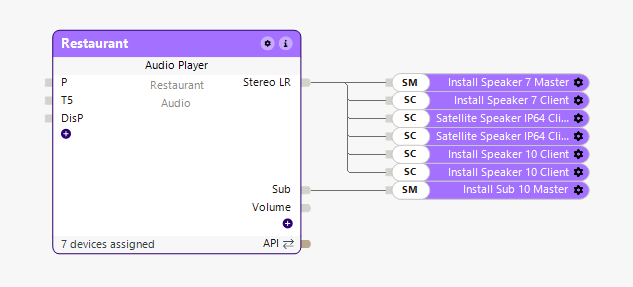
One Audio Player controls several speakers and two subwoofers in a restaurant. The speakers and subwoofers connect directly to the Audio Player, giving even sound distribution and deeper bass throughout the room, suitable for both background music and clear sound reproduction.
LOXONE App↑
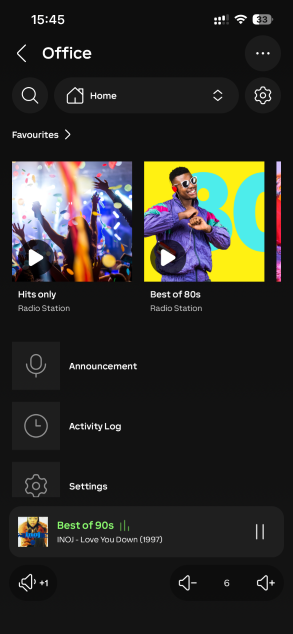
The Audio Player is operated intuitively from the LOXONE App, which acts as the central user interface for audio zones, volume, music sources and groups.
Once an Audio Player is configured in Loxone Config and saved to the Miniserver, it appears in the app automatically, organised by room and category.
The following functions are available:
- Play / Pause
- Volume
- Favourites / Playlists
- Sources
- Dynamic groups
- Announcements
- History
- Settings
Favorites / Playlists
In the LOXONE App you can organize your favorite music sources into Favorites or Playlists, so your music is only one tap away.
Favorites can be cycles through with a double-click, based on the Loxone switch standard.
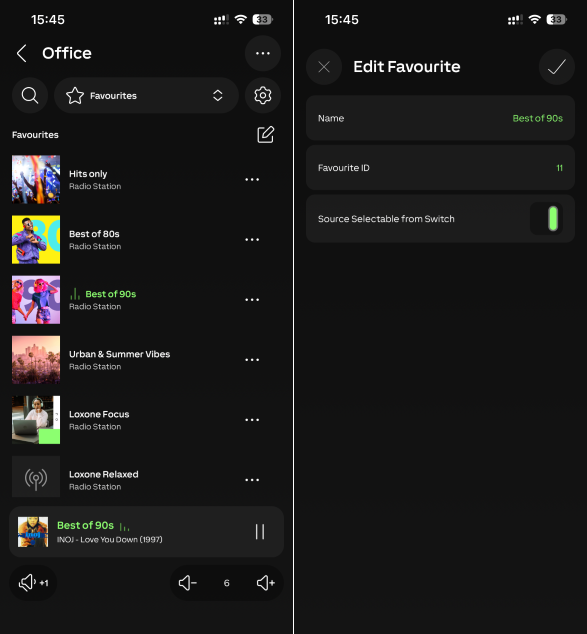
Edit favorites by tapping the edit icon (1); they can also be transferred to other Audio Players.
To edit a favourite you created, tap the ... next to it: change its name, change its ID, and choose whether it can be activated from the keypad.
Announcements
From the LOXONE App you can make a live announcement straight through the Audio Players. This is available only on mobile devices (smartphones or tablets).
Select the room, then start the announcement with the microphone icon. Ideal for short messages at home or work. Playback pauses automatically and resumes afterwards.
Dynamic Groups
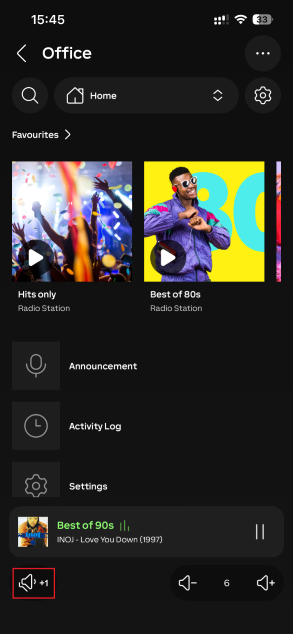
Dynamic grouping in the LOXONE App combines several Audio Players so they play the same content. Tap the speaker icon to form, split, or dissolve a group.
Dynamic groups can also be controlled via the Audioserver WebAPI: API commands created under a Virtual Output let function-block logic create, update and dissolve groups automatically, so audio distribution follows changing room configurations without manual intervention. The following document describes the commands with a configuration example:
Dynamic Audio Grouping WebAPI Documentation
Bluetooth
Here you can allow Bluetooth devices to be paired with the Audio Player, e.g. to play music from a smartphone. Paired devices can be removed with a single click.
 | Available only in combination with Master Speakers or Wireless speaker. |
Equalizer
The Audio Player has a 10-band equalizer, available in the app settings.
No adjustment is usually needed, as Loxone speakers are already optimally tuned. Use the equalizer to fine-tune to personal taste or to compensate for slight acoustic differences in the room.
The settings apply per Audio Player and can be transferred to other players.
Internet Radio↑
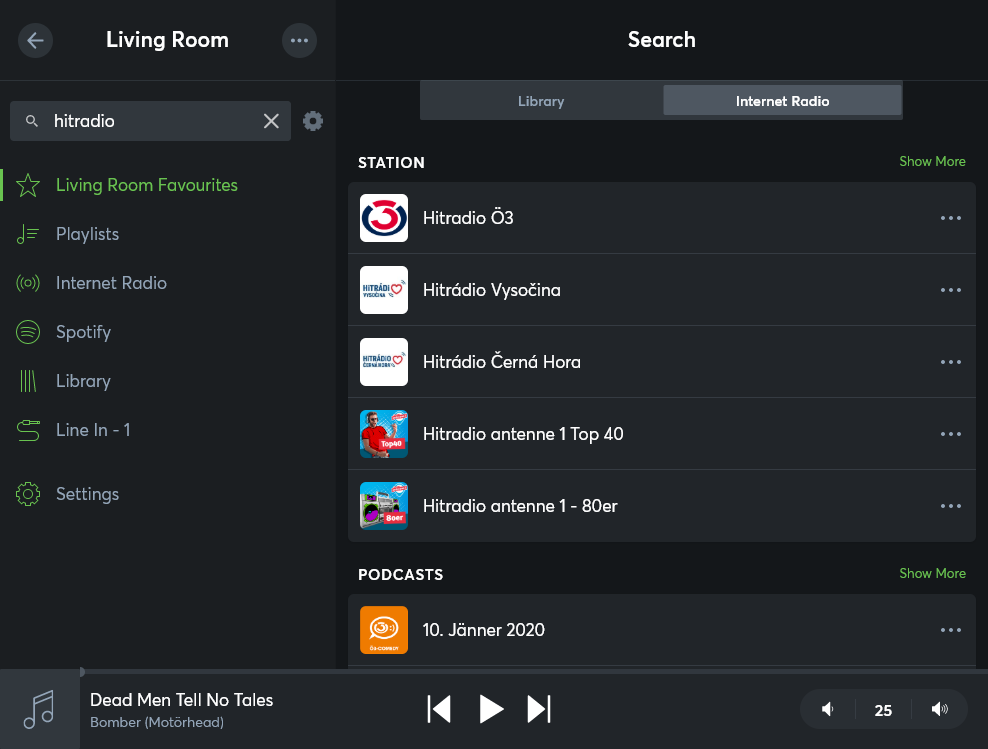
The TuneIn internet radio service gives access to a wide range of radio stations and podcasts. Search for stations in the app or user interface and save them as favourites: open the station's menu (three dots) and select Add as Room Favourite.
Adding a Custom Internet Radio Stream URL
The LOXONE App lets you add custom audio stream URLs directly to the Audio Player, for radio stations not supported by default (e.g. BBC or other online stations). A stable internet connection is required for uninterrupted playback.
Add radio stations:
- Open the desired Audio Player and tap Radio.
- Tap the plus icon to add My Radio Stations.
- Enter the station name, streaming URL and upload a custom image for the station.
- The station then appears under My Radio Stations.
- There you can edit it or add it to your room favorites.
Spotify↑
Spotify integration plays Spotify music or playlists. A Spotify Premium account is required.
A single Premium account can play one stream to one or more zones at once, via fixed or dynamic groups.
To play different content in multiple zones at the same time, multiple Premium accounts are required. These do not need to be part of a Family plan.
In the LOXONE App, tap Spotify, then Add Spotify Account. You are redirected to the Spotify website. Log in and confirm access. The service is then ready to use.
Spotify Connect
By default, all Audio Players appear in the Spotify app. You can disable this in the Audio Player properties.
Library↑
The library plays audio files stored on an SD card, USB stick or network drive (network share), an easy way to manage local audio sources and play them through the Audio Player.
It appears when such files are available; if needed, show it with the gear icon to the right of the search field.
The following sections explain how to add each audio source.
USB↑
USB data carriers with audio files can be connected to the USB port of the Audioserver or Miniserver Compact.
USB sticks: FAT32/NTFS, one partition, max. 2 TB.
USB hard drives: FAT32/NTFS, one partition, max. 2 TB, max. 500 mA power consumption. Drives that draw more than 500 mA need an external power supply.
Once plugged in, the audio files appear in the Library in the app or user interface.
Local files on a USB drive are only available on Audio Player blocks linked to the Audioserver/Miniserver Compact it is connected to. For access from several Audioservers/Miniserver Compact, add the files via a central network share, e.g. a NAS.
Supported formats: MP3, AAC, ALAC, FLAC, WMA, WMA lossless, WAV, M4A, OGG
SMB Access to SD Card↑
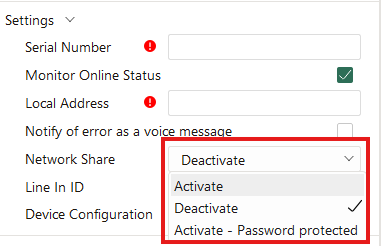
Audio files can be stored on the SD card of the Audioserver or Miniserver Compact. The folders are accessed via an SMB network share provided by the device.
In Windows, open them by entering the device's IP address or hostname in File Explorer, e.g. \\192.168.1.7 or \\hostname
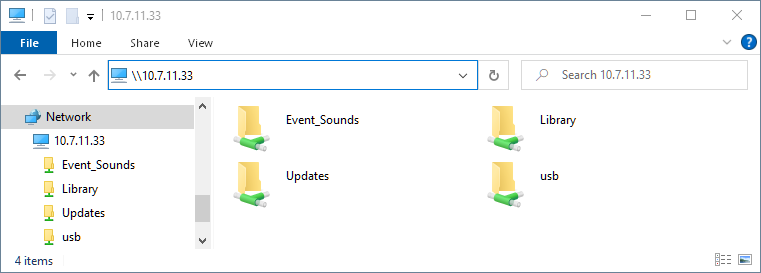
SMB access is disabled by default and must be enabled in Loxone Config → Audioserver → Settings.
Additionally, a password can be set for added security; the username for this is then "audio".
Store audio files in the Library folder to play them from the library. The SD card is limited in size and speed, so use a USB drive or network share for larger collections.
The usb folder appears when a USB device is connected, letting you add or replace files on it.
These folders are for easy file management and maintenance, not for use as network shares on other Audioservers/Miniserver Compact. Local files on the SD card are only available on Audio Player blocks linked to that device; for access from several devices, use a central network share, e.g. a NAS.
The SD card folders use the SMB1 protocol, which is no longer enabled by default in Windows 10 and 11. Enable it in the Control Panel under Programmes > Turn Windows features on or off, tick Support for SMB 1.0/CIFS file sharing, confirm with OK, and restart if prompted.
Network share↑
SMB network shares can be added to the library. Once added, a share is available to all Audioservers and Audio Players.
In the app, open Library, tap the menu icon (three dots) in the top right corner, and select Add Network Folder.
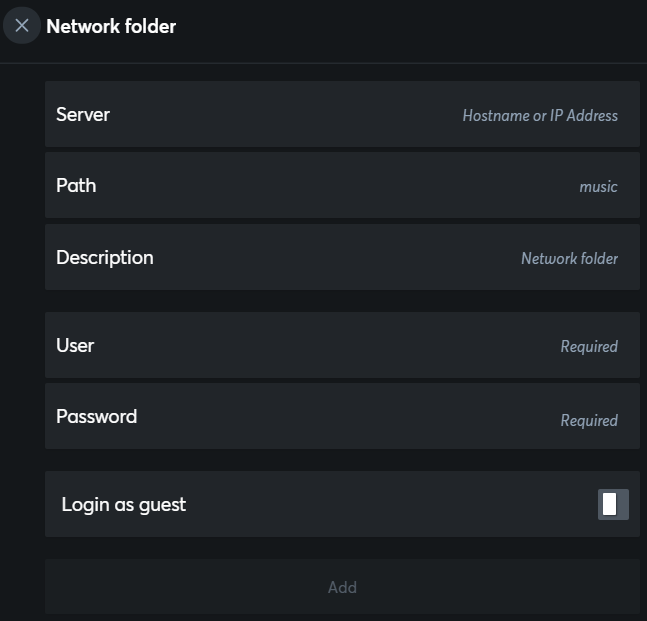
Enter the server name or IP address, path, description, username and password. The audio files are then available in the library.
The outdated SMB1 protocol is not supported for network shares.
Line In↑
The line-in of the Audioserver can be selected as a source across all Audio Players. Show it with the gear icon to the right of the search field and activate it; it is then available as a source.
AirPlay↑
As of version 2.5.01.11, the Audioserver supports audio playback via AirPlay 2.
Each output will be available as an AirPlay receiver, and can be selected as a streaming device on Apple devices.
Streaming via AirPlay is independent of the Audio Player function block and takes priority as long as the Apple device is connected. Any playback from another source that is already in progress will be interrupted when AirPlay streaming is started.
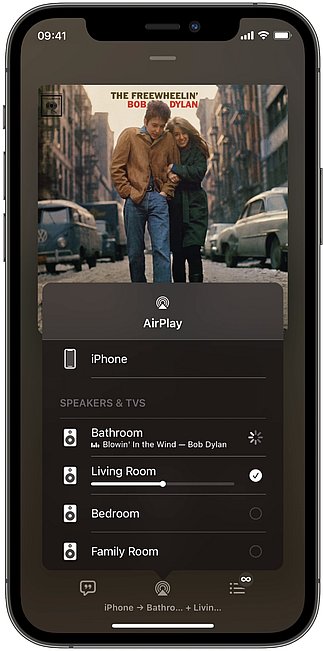
If there is only one Audio Player in a room, the Audio Player is named after the room, otherwise after the respective block.
These zone names are used in AirPlay as well as in Spotify Connect.
Within an installation, the naming of Apple devices and Audio Zones must be unique.
For more information on how to use AirPlay and the system requirements, please refer to the Apple guide.
Block operation during AirPlay playback:
The Audio Player block's functionality is limited during AirPlay playback, as AirPlay is controlling the playback during this time. This results in the following special properties:
When AirPlay playback is started on one output, playback on other outputs linked to that output is stopped and the link is temporarily broken, regardless of whether multiple outputs are linked to one Audio Player block, or multiple Audio Player blocks are grouped by the Audio Player Fixed Group block. Outputs that are not linked will continue to run normally.
This is necessary because each individual output can be selected as an AirPlay streaming receiver. Audio groups are then managed by AirPlay, and can be created by manually selecting the desired outputs (speakers) in the app of the respective AirPlay device.
The following functions are also available during AirPlay playback:
Pausing playback
Changing volume
Events such as doorbell, alarm clock, and alarms.
Other functions are not available during AirPlay playback, regardless of whether they are triggered from the App, by a button press, or logic.
Stop AirPlay playback or disconnect on the respective device to restore the previous functions and groups.
Text to Speech (TTS)↑
The Text-to-Speech function enables texts to be converted into audible speech.
To achieve this, a text is input to the function block (TTS) input, which is then output through the assigned audio outputs.
| An Internet connection is required for the TTS function. Texts of up to 400 characters each (including spaces) are supported. |
By default, a TTS output is generated in the system language.
To use a different language, specify a prefix at the beginning of the text, separated by the pipe symbol.
Examples:
de|Das ist ein deutscher Text
en|Now the text is English
Supported languages:
de German
en British English
us American English
es Spanish
ca Catalan
cz Czech
sk Slovakian
pl Polish
fr French
nl Dutch
be Flemish
it Italian
cn Chinese
hu Hungarian
ru Russian
bg Bulgarian
fi Finnish
se Swedish
nb Norwegian
pt Portuguese
tr Turkish
ja Japanese
Event Sounds / Custom Sounds↑
The Audio Player has several inputs that trigger defined event sounds to flag important events:
- Alarm: warning sound for danger or burglary
- FireAlarm: fire-alarm tone
- Bell: doorbell ring
- Buzzer: alarm clock sound
- Custom sound: a user-defined sound for individual notifications
The matching audio file plays when its input is activated. When the event sound ends, the Audio Player returns to the previous playback.
Built-in event sounds can be replaced: put files with the same name and format in the Event_Sounds folder on the Audioserver, Miniserver Compact or Wireless speaker, accessible at \\{ip-address}\Event_Sounds.
To play your own sound, add the file to the same folder and trigger it with the (Cs) input or with logic in Loxone Config (e.g. a Status block or Text Generator block). Set the volume by appending it to the file path as [filename]:[volume], e.g. soundcheck.mp3:80.
Use the logic to trigger a custom sound, for example linking an Intercom's bell output to play a specific sound in a specific room.
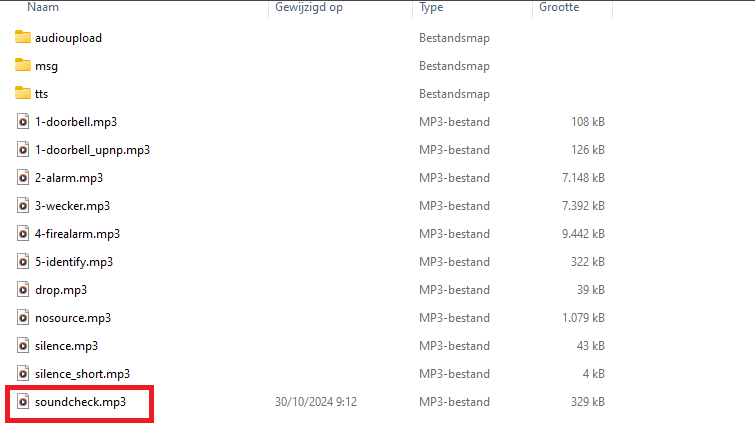

Note: a custom sound plays in full and cannot be stopped.
Note: all custom sounds have a 2-second delay, due to the required on-sync time before playback.
Up to 8 Eventer sources can be used simultaneously: a maximum of 8 different events (grouped or ungrouped) can play in parallel.
A grouped event, a grouped command sent to several players at once, uses only 1 Eventer source for the whole group. An ungrouped event uses 1 source each.
Presence Simulation↑
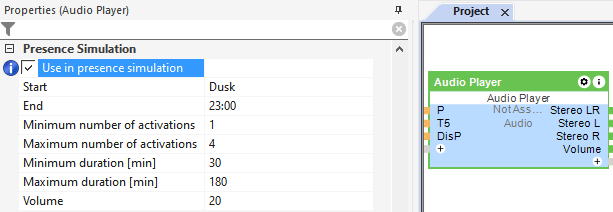
This function block has a presence simulation.
Activate and define the presence simulation in the properties window:
History↑
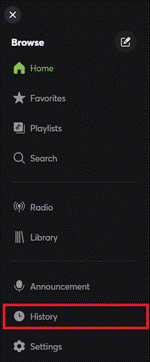
In the user interface, the history of the function block can be displayed.
A maximum of 100 entries can be shown.
When you restart or save to the Miniserver, the history is cleared.
Settings↑
In the settings you can set the volumes for the various audio functions: the start-up volume for music, and the volumes for text-to-speech, the alarm clock, the doorbell and the alarm. Playback starts at the selected volume so you can assess it right away.
The start-up volume follows parameter (Von). With the Variable start-up volume option (or by setting (Von) to -1), the Audio Player saves the last volume used and starts with it.