Loxone AC Control Air is a compact interface module for integrating air conditioning units.
For this purpose, a suitable product variant for supported air conditioning systems must be selected.
The different variants vary in the interface used, the connecting cable and the firmware. The AC Control Air takes over the control of the air conditioning in a Loxone installation instead of a conventional remote control.
For this reason, original remote controls of the AC unit (also IR) can no longer be used.
When adding the AC Control Air to Loxone Config, some modes, airflow settings, and fan speeds may not be available for certain AC Control Air models.
Datasheet AC Control Air for Panasonic
Table of Contents
- Mounting
- Commissioning
- Programming
- Supported Features
- Diagnostics
- Inputs, Outputs, Properties
- Safety Instructions
- Documents
Mounting↑
First switch off the air conditioner and then disconnect the mains power supply.
For installation, you need access to electrical connections in the indoor unit of the air conditioner. Refer to the installation or service manual for the air conditioner you are using to determine how to remove the covers and where the various terminals and connectors are located.
On the circuit board of the Panasonic indoor unit, locate the CN-CNT connector. If an external communication module or accessory is connected here, it must be unplugged and can no longer be used.

|
Every Panasonic AC with a CN-CNT connector will work. There may be limitations in certain features, depending on the type of AC Unit – you can find the list of supported features here. To identify if your model can be supported: - Check the Wiring Diagram or the Service Manual of the unit. - Some units have a CN-CNT connector on the main board, for those CN-CNT will show up in the Wiring Diagram. - Units without CN-CNT on the main board, may still be supportable, please also check the Service Manual of the unit for CN-CNT availability. |
Connect the AC Control Air to the terminals with the enclosed connecting cable as follows:
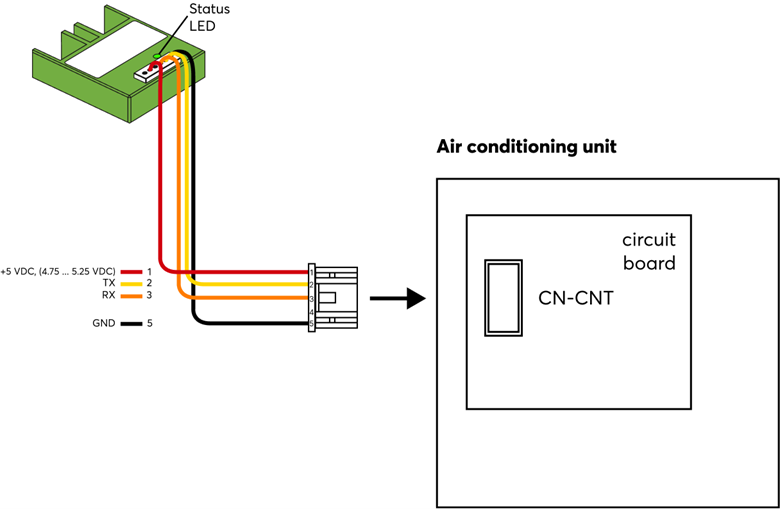
Fasten the AC Control Air to a suitable place in the device, e.g. with a cable tie.
Make sure that the device cannot come into contact with mains voltage, hot, cold or moving components, or moisture.
For best reception, the AC Control Air has to be placed outside of metal covers. The supplied connecting cable must not be extended.
Finally, reinstall the housing covers and turn on the mains supply and the air conditioner.
The AC Control Air is now supplied with voltage from the air conditioner and can be paired in the next step.
Remember to remove or disable any existing AC unit remote controls as they can no longer be used.
Commissioning↑
In delivery state, pairing mode will be active after the power supply has been established. This is indicated by the status LED flashing red/green/orange.
Then follow the pairing procedure on the Air Interface.
To activate the pairing mode manually, switch off the power for 10 seconds, then switch it back on. If no connection to a Miniserver can be established for two minutes, then pairing mode is activated for 5 minutes.
Programming↑
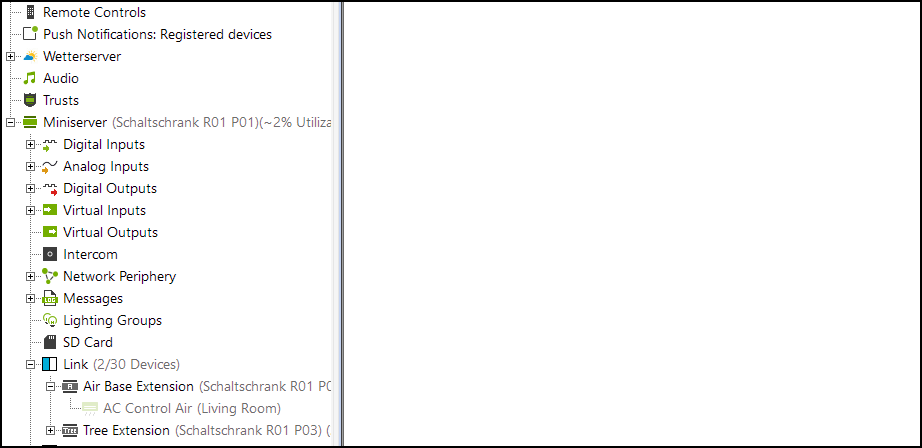
Loxone AC Control Air is programmed and set up using the AC Control function block in Loxone Config:
Supported Features↑
The following is a list of supported features:
-
AC Modes:
- Auto
- Heat
- Cool
- Dry
- Fan -
Fan Speeds:
- Auto
- Low-
- Low
- Medium
- Medium+
- High -
Vane Direction (up/down):
- Auto
- Position 1
- Position 2
- Position 3
- Position 4
- Position 5
- Swing
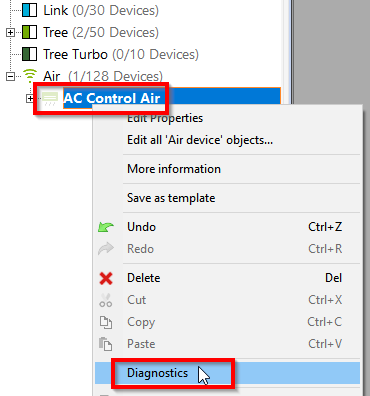
Diagnostics↑
In case the communication with an air conditioner does not work (correctly), a diagnostic analysis can be started in the context menu of an AC Control Air. This enables communication data to be displayed and recorded:
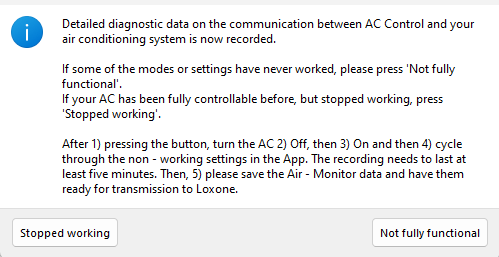
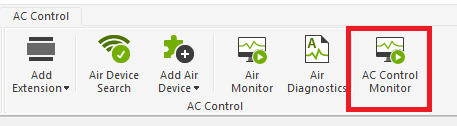
Additionally, you can also start the AC Control Monitor for diagnostic purposes.
1) Activate the AC Control Monitor. 2) Turn the AC unit off. 3) Turn the AC unit on. 4) Cycle through the non-working functions. The recording needs to be at least five minutes. 5) Save the AC Control Monitor data and have them ready for transmission to Loxone.
Actuators↑
| Summary | Description |
|---|---|
| API Connector | Intelligent API based connector. API Commands |
Diagnostic Inputs↑
| Summary | Description | Unit | Value Range |
|---|---|---|---|
| Online Status AC Control Air | Indicates whether the device can be reached by the Miniserver. Diagnostics for Air devices Diagnostics for Tree devices Diagnostics for Extensions |
Digital | 0/1 |
Properties↑
| Summary | Description | Default Value |
|---|---|---|
| Monitor online status | If checked, you will be notified via System Status or the Mailer if the device is no longer available or goes offline. | - |
| Serial number | Serial number of Air device. Automatic pairing can be enabled on the Air Base. Automatic pairing can be enabled on the Airbase for a set time. |
- |
Safety Instructions↑
Installation must be carried out by a qualified electrician in accordance with the applicable regulations.
Documents↑
Datasheet AC Control Air for Panasonic