INTRODUCTION
The virtual inputs and outputs allow you to mimic switches on the user interface, control devices over the network such as Sonos boxes and the Loxone Music Server. You can also use the virtual outputs and inputs for UDP commands, and you can use virtual text inputs to send text.
VIRTUAL INPUTS
With the virtual inputs various different types of input options can be set. That is, the inputs can be configured to show up differently in the visualisation whether it be on an iPhone, iPod, iPad, Android phone, or browser. The options are switch, push button, left-right buttons, and up-down buttons.
Virtual inputs can either be digital or analog, this is set in the Properties window of the connector. If analogue is selected a slider bar will show in the visualisation.
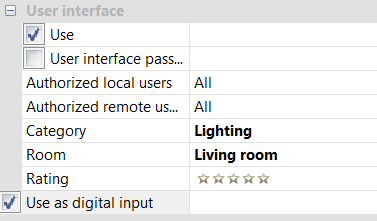
OPTION 1. USE AS A DIGITAL INPUT
Applications: control of lighting, blinds, music, etc. The virtual equivalent of a single retractive switch on the wall.
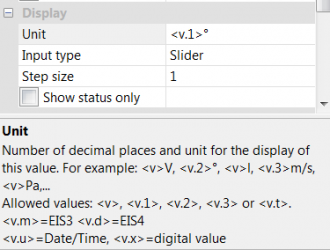
Display
Under the properties section Display for both digital and analogue virtual inputs, you can enter the desired digits, input type and unit for displaying and setting the value. Please always the use the help window in Loxone Config, as shown below:
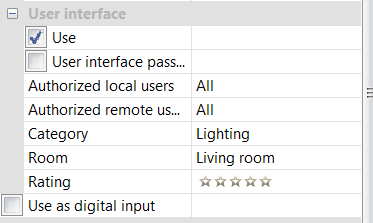
OPTION 2: USE AS AN ANALOGUE INPUT
Unticking the ‘Use as digital input’ box means the virtual input will be used as an analogue input. You can set a minimum and maximum value and select the default value (the value on startup). This is useful for editing run times of fans, target flow temperatures etc on the user interface.
Validation
Validation allows the analogue input to be limited to the defined range of values. For example this could be used to set a user specified target temperature. The range is from the smallest defined value to the maximum defined value. This is provided as an analog output value at the top of the virtual input connector for further use. If the set minimum – maximum value is exceeded the output (Q) will send a short pulse. At the output (Q) you can connect for example a mailer and get notified by doing so. Validation is automatically enabled on virtual analogue inputs.
OPTION 3: VIRTUAL TEXT INPUTS
You can use virtual inputs to send text. You can either enter the default text that the virtual text input outputs on startup or you can set the value by using a httpget request. So for example you could set a virtual text input named ‘Test’ to a string by this command:
http://User:Password@MiniserverIP/dev/sps/io/Test/Hello World
This can be very useful because you can use this input in PicoC programs or to send words to RS-232/485 outputs.
OPTION 4: VIRTUAL UDP INPUTS
For information on how to use the virtual inputs and outputs for communicating with UDP please go to our documentation page on communication with UDP.
VIRTUAL OUTPUTS
A virtual output connector is used to control network devices. The device should be controlled using a Miniserver master server compatible protocol (tcp, udp, http, wol).
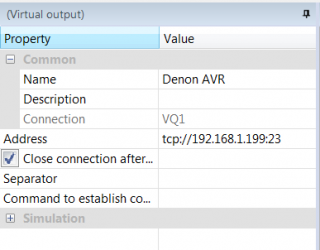
STEP 1: ADD VIRTUAL OUTPUT CONNECTOR
In the periphery window click on virtual outputs and then from the drop down list ‘Virtual I/O’ select virtual output connector.
In the Properties window of the virtual output connector the protocol, address and port of the device to be controlled can be entered. For http, tcp and udp you need to include the protocol before the address is entered (e.g. tcp://192.168.1.199:23).
![]() Please note that Telnet connections that require authentication are not supported.
Please note that Telnet connections that require authentication are not supported.
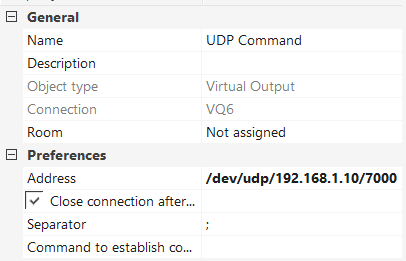
STEP 2: VIRTUAL OUTPUT CONNECTOR FOR UDP
If UDP capable devices are being controlled, the protocol must be entered into the address box in the Properties window. See our documentation on communication with UDP for more information.
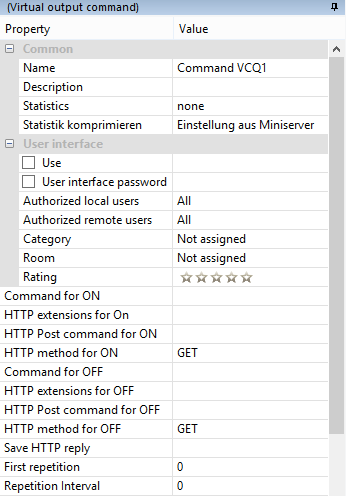
STEP 3: ADD VIRTUAL OUTPUT COMMAND
Now you can add virtual output commands to the virtual output connector you just created. If you click on the virtual output connector in the periphery window and then click on the ‘Virtual I/O’ drop down list button you can add in a virtual output command. This is then listed underneath the connector.
In the properties of the command you will see several fields for the command. Where you enter information depends on the device you are trying to control.
![]() Tip: You can use the program Hercules to mimic a device receiving commands so you can check the command you are sending from Loxone is sending the correct information.
Tip: You can use the program Hercules to mimic a device receiving commands so you can check the command you are sending from Loxone is sending the correct information.
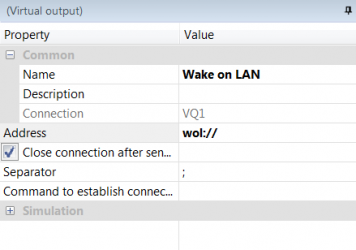
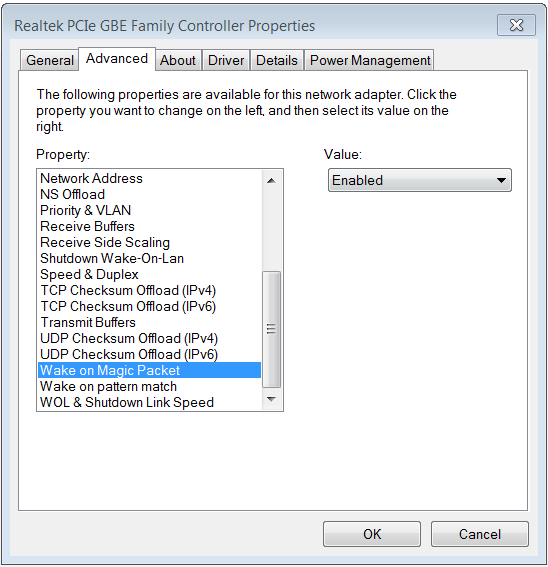
EXAMPLE 1: WAKE ON LAN
With the Miniserver, you can also start your computer using Wake on LAN. To do this, create a virtual output connector with the address ‘wol://’.
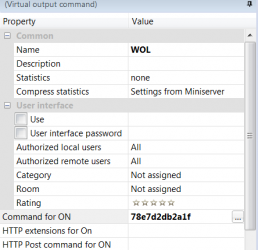
Now create a virtual command for the output connector and enter the MAC address of your network interface in the ‘Command when ON’ section.
Before the computer using Wake on LAN can be started, this function must be set in the bios of the computer or enabled in the driver properties:
EXAMPLE 2: SNMP TRAPS
SNMP is mainly used in data centers for the monitoring and management of a group of hosts or devices on a computer network. The Miniserver is capable of sending SNMP traps to the manager. These are sent via UDP protocol on port 162.
Put the address of the SNMP manager device (such as an access server) into the address box of a virtual output connector in this format:
snmp://<managerdeviceIP> or /dev/snmp/<managerdeviceIP>
Then use a virtual output command to specify the particular notification you want to send to the manager.
Please note that receiving SNMP messages is not currently supported.
![]() You can find out more about SNMP on this Wikipedia page.
You can find out more about SNMP on this Wikipedia page.