
The next dimension in Project Planning
With the new version of Loxone Config, we’re introducing the next level of our project planning tool. We’ve introduced a number of new features for this release to make your planning stage that much easier. The video at the bottom of this page covers all of the existing functionality within the Project Planning Tool.
Project Planning
Opening Project Planning
When you open Loxone Config, you will likely be greeted with a window that looks similar to this. To start a new project plan, simply select Project Planning.
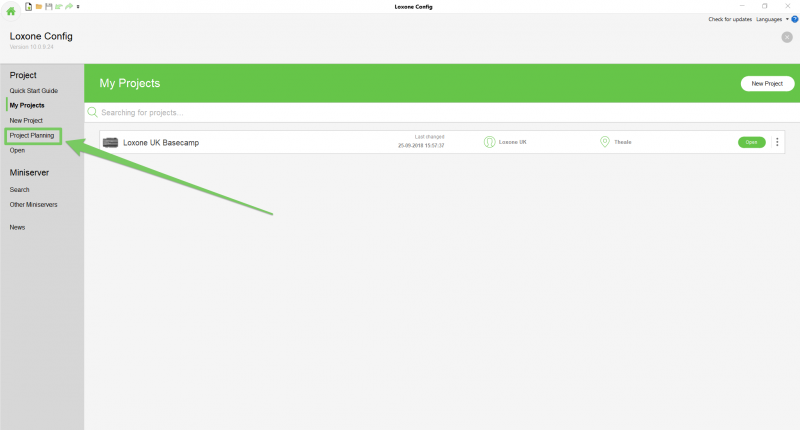
Creating a New Project
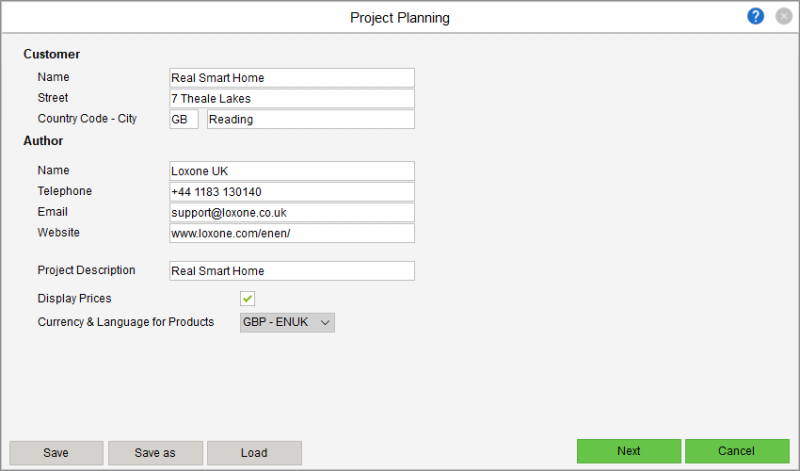
The first screen you will be greeted with is where you set the various contact details and project details. In the customer section you would fill in the details of the Project Name and its location.
The author details are your details. These details will be visible within Loxone Config and on the various User Interfaces. The customer, in some cases, will also be able to use these details directly to contact you so make sure they’re correct.
The project description is the name of the project as it appears in the User Interface. When you see a Miniserver that is named ’10 Park Lane’, that information is set here.
Additionally, ‘Display Prices’ simply dictates whether you want to see the prices for products when you are given the option to add them into the plan.
Finally, Currency & Language dictates the shop from which prices are retrieved, the currency, and the general language for the plan itself.
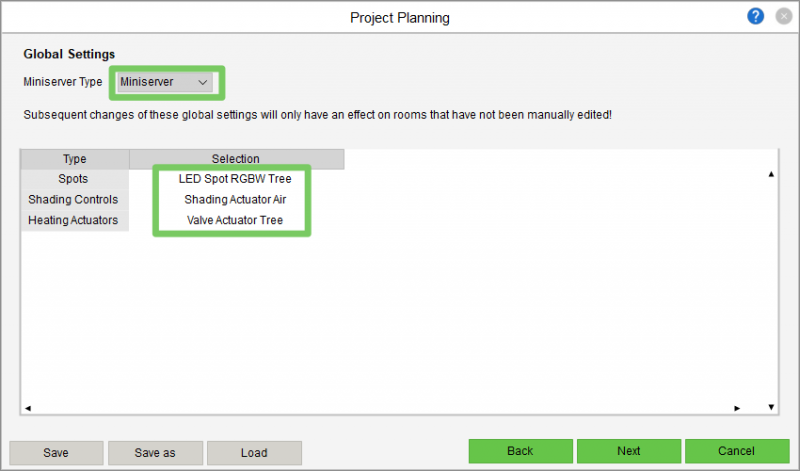
Global Settings
In this dialogue you can set some default expectations for the project plan. The first option you are given is to select either a Miniserver or Miniserver Go.
There are three options; Spots, Shading Controls, and Heating Actuators. Using these three options, you can dictate which products will be automatically added to each room based on its parameters.
Spots: You can select between RGBW Ceiling Spots and RGBW Recessed Spots.
Shading Actuators: You can select between Shading Actuator Air devices, GEIGER SOLIDline devices, Centrally Wired Blinds (Relays), or no shading control.
Heating Actuators: You can either select Valve Actuators Air or Tree.
Project Planning Room Overview
On this screen you are greeted with a lot of information but it’s simpler than you may think.
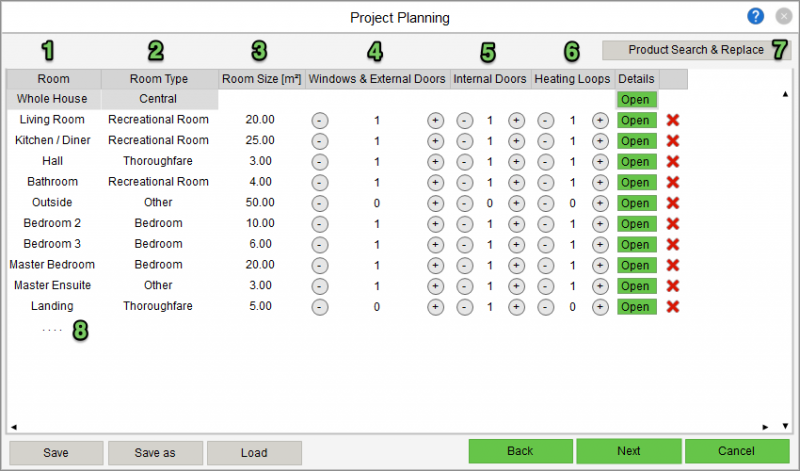
1: This is simply the name of the Room, this is how it will appear in both Loxone Config and on the various visualisations.
2: This is the type of room. This is more important than you may think.
| Room Type | Description | Examples |
| Recreational | This is the type of room that you are likely to spend any prolonged time in. | Living Room, Kitchen, Dining Room, Primary Bathroom, etc. |
| Thoroughfare | This is a room that you are likely to just pass through to get to another room. | Entrance, Lobby, Utility Room, Landing, etc. |
| Bedroom | This designated for any bedrooms in the plan. | N/A |
| Other | This for any room that doesn’t fall into one of the the other categories. | Ensuites, Outside, Cupboard, Walk-in Wardrobe. |
Default Specification per Room Type
| Room Type | Lighting | Multimedia | Sensors | Controls | Monitoring |
| Recreational | Loxone Speaker
Speaker Backbox for Suspended Ceilings |
Motion Sensor Tree White | Touch Pure Tree White | Smoke Detector Air
Door & Window Contact Air White |
|
| Thoroughfare | LED Ceiling Light RGBW Air White | Touch Pure Tree White | Smoke Detector Air
Door & Window Contact Air White |
||
| Bedroom | RGBW LED Strip 5m IP20 | Loxone Speaker
Speaker Backbox for Suspended Ceilings |
Motion Sensor Tree White (Ceiling)
Motion Sensor Tree White (Bed) |
Touch Pure Tree White (Door)
Touch Pure Tree White (Bed) |
Smoke Detector Air
Door & Window Contact Air White |
| Other | Motion Sensor Tree White | Touch Pure Tree White | Smoke Detector Air
Door & Window Contact Air White |
3: This is where you input the (approximate) size of each room (in m2). This is used for a number of calculations so try and keep the approximations accurate.
| Calculation Typm | Description | Examples |
| Heating | 1 Valve Actuator every 13m2 | 26m2 = 2 Actuators
27m2 = 3 Actuators |
| Speaker | Room Size / 15 = No. of Speakers [Rounded Up] | 15m2 = 1 Speaker
23m2 = 2 Speakers 38m2 = 3 Speakers |
| Lighting (Ceiling Spot) | LED Ceiling Spot RGBW = Room Size / 3 [Rounded Up]
LED Ceiling Spot WW = Room Size / 4 [Rounded Up] |
13m2 = 4 Spots
14m2 = 5 Spots 12m2 = 3 Spots 14m2 = 4 Spots |
| Lighting (Recessed Spot) | LED Spot RGBW = Room Size / 2 [Rounded Up]
LED Spot WW = Room Size / 3 [Rounded Up] |
10m2 = 5 Spots
11m2 = 6 Spots 15m2 = 5 Spots 17m2 = 6 Spots |
4: This is where you input the number of external Windows/Doors. This directly correlates with the number of Door & Window contacts and Shading Actuator Air devices specified for that room. (I.e. 4 Windows & External Doors = 4 Door & Window Contacts and 4 Shading Actuator Air Devices)
5: This is where you input the number internal doors. This directly correlates with the number of Touch Switches specified for that room. (I.e. 2 Doors = 2 Switches)
6: This is where you can modify the number of heating loops in the room. This directly correlates to the number of valve actuators specified. (I.e. 2 Heating Loops = 2 Valve Actuators)
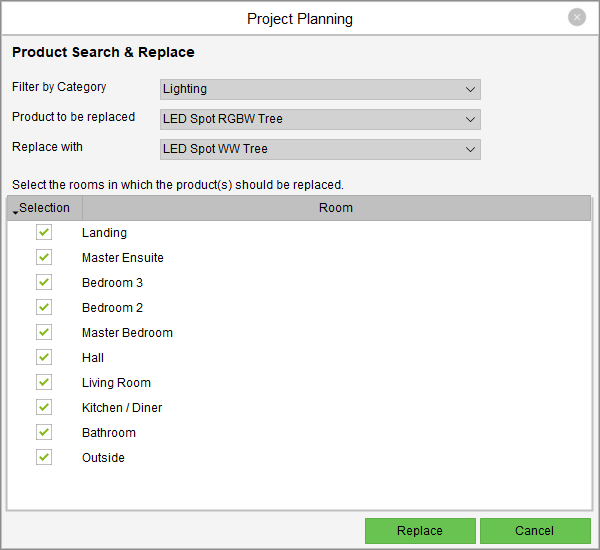
7: This menu allows to swap out any given product for any other product available. You can filter by category, pick the device you want to swap, the device you want to swap it with, and finally you can select the rooms in which you want the swap to occur.
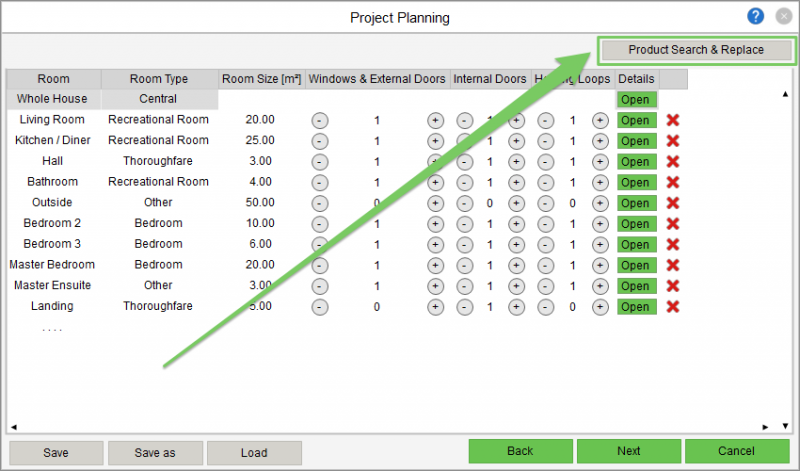
8: In order to add a new room to the list, simply double-click the triple dot box, enter a name and then press enter.
Room Breakdown
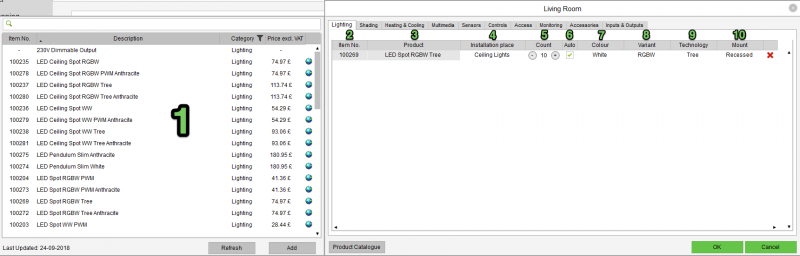
1: List of all product available for the selected type. In this example it is lighting.
2: Item number for the product as it exists on the chosen web shop.
3: Name of the Product.
4: Installation location is the same location information you would assign to a device when adding it to Loxone Config. This field is used by Auto Configuration so It’s important to fill it out if applicable.
5: This is the quantity of the given product which has been specified for the room.
6: This tick box allows you to set the quantity of the item to match the calculation for its room size. If you change the quantity but want to go back to the number specified by the room size calculation, simply tick this box again.
7: For product that have a colour variation (White/Anthracite), you can select which colour you want here.
8: For product that have simple variation (i.e. LED Spot RGBW or WW), you can switch between the variations here.
9: If the product has multiple technology versions (Tree/PWM or Tree/Air), you can switch between the variations here.
10: This option is only used by Lighting devices as they can either be surface mounted or recessed. You can switch between the variations here.
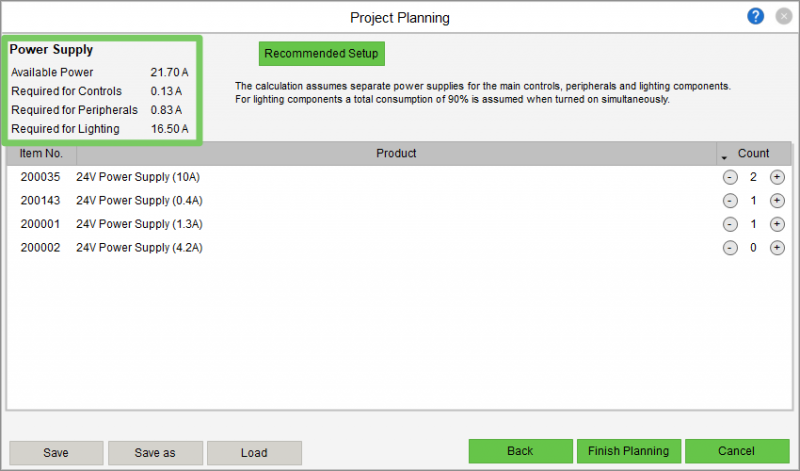
Power Supply Calculator
Any Loxone product which draws power has its average power draw stored within Project Planning, this data is then used at this stage in Project Planing to estimate how many power supplies you will need for the project and which type of power supply. Note: This cannot take into account the power draw for any devices that are not Loxone (i.e. Third-Party switches).
The calculation is broken down to show the total available power, the requirement for the controls, the requirement for the peripherals, and the requirement for the Lighting.
For more information on Power Supplies and panel layout, see here.
Finalising
On the final page of the Project Planning dialogue, you are presented with 4 options.
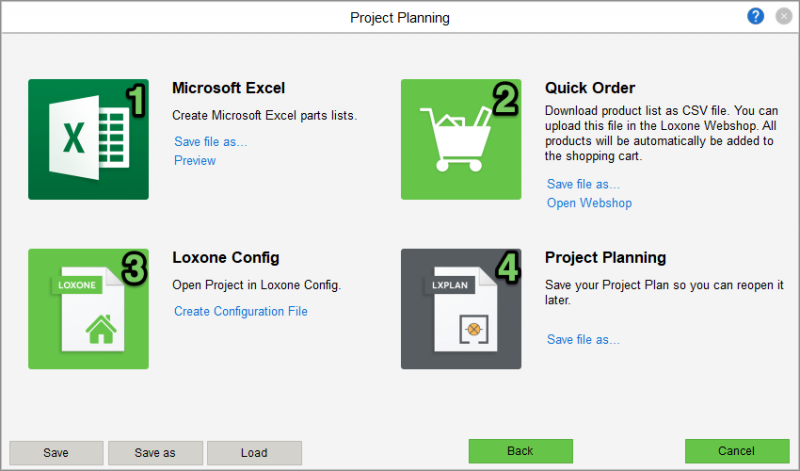
Option 1: This option allows you to export your full parts list as an excel spreadsheet. This is saved as a full list of parts as well as a room-by-room breakdown.
Option 2: This option allows you to easily download your parts list and upload it to the webshop ready for order. For more information, see the documentation page here.
Option 3: This option allows you to generate a config file from the project plan which has all of the rooms, and devices pre-allocated. You then have the option of running auto-config, this would take the full project plan and make it into a function program. The only step remaining would be to commission your extensions and Pair your Air/Tree devices.
Option 4: This final option reminds you to save the project planning file so you can later edit the plan or view it.