APPLICATION
This setup is suitable for smaller hotels, large hotels, and care homes. Anywhere there is a large quantity of rooms that might also be different from each other – this is suitable.
BASIC PROGRAMMING
The basic structure of how you setup your Fidelio server and Miniserver is through the Client-Gateway structure (without a concentrator). In this instance, the Fidelio server will be the Gateway and therefore regulate everything and pass on information to the Miniserver that will be a client.
The reason for the Fidelio being the Gateway is because each room will have a miniserver in it controlling that specific room. In the Client-Gateway structure, you can set the room type for each Miniserver, allowing the Fidelio server to send the correct programs to each room, via the IP/MAC address being assigned to certain room types.
Some information about Client-Gateways (with concentrators) can be found here:
*note we are not using concentrators for this*: Client-Gateway
BUILDING THE CLIENT-GATEWAY
Gateway
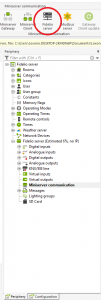
In order to setup the Gateway part of our Client-Gateway you have to navigate to the periphery tree and on the “Miniserver communication” tab select “Fidelio server” from the ribbon.
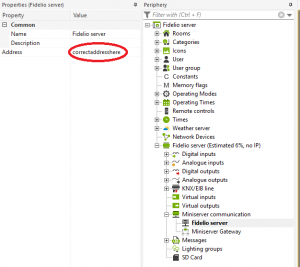
Once the Fidelio server has been added, ensure that the correct address has been set in the property tab on the far left. This has to be the Fidelio server’s IP.#
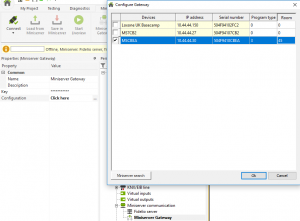
In the Periphery tab, under the Fidelio server, another item would have appeared: Miniserver-gateway. Clicking on that will allow you to search for Miniservers on the left-hand side to add as a client into your Client-Gateway structure. This will list all Miniservers currently connected to the network. You can set the room number they are in here as well as the program type they will be using (set via a number). In the screenshot below I have set room 45 to use program 3 which could be for single bed rooms.
![]() It is important to note that on the client side of things, you can only have 1 of each extension type. This is because serial numbers can’t be stored and so if you were to use two of the same then the server won’t be able to distinguish and it will cause problems. When naming your Miniserver try to give it an obvious name such as Room 1, Suite 103 etc.
It is important to note that on the client side of things, you can only have 1 of each extension type. This is because serial numbers can’t be stored and so if you were to use two of the same then the server won’t be able to distinguish and it will cause problems. When naming your Miniserver try to give it an obvious name such as Room 1, Suite 103 etc.
Distributing the programs
The program each client will be running has to be imported to the servers at least once before going further. Under the “Miniserver communication” tab the Miniserver clients will be stored with their appropriate keys, a serial number of the gateway and the program type. Once this has been setup, you can then distribute the programs through the Gateway server. In order to allow this, the client programs must be stored in the Gateway server so that it has them to give. If you store multiple program types there will be a distinguishing feature between each program so they don’t go to the wrong place.This also prevents the Gateway program from being overwritten (the program the Gateway uses, crucial for this system to work).
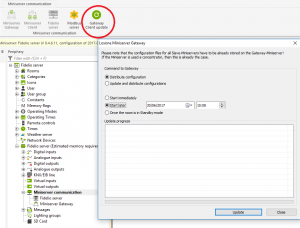
Under the “Miniserver communication” tab in the periphery tree, you will have a button named “Gateway Client Update” that can be used to state when the client servers will receive their updates/config files. In order for this to actually work, the files have to be stored on the Gateway server. On top of this, this can also start a firmware update of all the Miniservers, updating them to the latest firmware versions.
SETTING UP FIDELIO COMMUNICATIONS
Client
Each Miniserver must send data to be synchronized to the gateway. The following command is utilized by the client to do so:
miniserver: //[IP of Gateway]/ dev / Fidelio / io / [name] / [value]
Virtual home
address: miniserver: // [IP of Gateway]
Output command
Analog actuator (used as a digital actuator)
Command at: / dev / fidelio / io / [name] / \ v
[name] is the virtual input in the gateway server.
Gateway
Each room will have its own virtual input and rooms with the same program type will have to be distinguished properly. In order to do this, you will have to right-click the virtual input and click “clone with space number”. Here you can create a new virtual input that will have the same name as defined in the client program at the virtual output with the [name] field. Then right click on the virtual input and click “clone with the room number”. This then inserts virtual inputs for each individual Miniserver that has a defined room number. These names will be “[name] _ [room number]”.
Sending information from the gateway to specific places
Specific Rooms
Miniserver: //192.168.1.255 / env / sps / io / [name] / [datatosend]
This IP is the one for the Miniserver in the room. The room on the receiving end needs a virtual input defined with the name [name] must be present.
Room of the specific program type
Miniserver: //192.168.1.255 / dev / sps / io / [name] / [value]
The command is sent to the addresses ending with (xxx255). In all rooms this gets sent to, a virtual input defined with the name [name] must be present.
To all rooms
Miniserver: //192.168.1.255 / dev / sps / io / [name] / [value]
The command is sent over xxx255 (like before) so ensure the IP ends with 255. In all rooms, a virtual input defined with the name [name] must be present
Implemented commands
The following commands were implemented:
- Room locked
- Room bookable
- Room booked / reserved
- Room checked in
- Rooms checked out