The Wallbox function block is used to control and visualize a charging station for electric vehicles.
It is possible to use the object inputs or a network connected device.
The following charging stations are supported:
Keba KeContact P20
Keba KeContact P30 C/X
BMW Wallbox Pro
Table of Contents
- Inputs
- Outputs
- Parameters
- Properties
- Charging station with supported wallbox
- Charging station without supported wallbox
- Keba KeContact P20 Socket ETH Wallbox
Inputs↑
| Abbreviation | Summary | Description | Unit | Value Range |
|---|---|---|---|---|
| Act | Activates charging process | - | 0/1 | |
| Vc | Vehicle connected | This input is only visible in certain configurations. | - | 0/1 |
| Cp | Current charging power | This input is only visible in certain configurations. | kW | ∞ |
| E | Charged energy | Energy Input (Absolute). This input is only visible in certain configurations. | kWh | 0...∞ |
| Cpl | Charging power limit | Allows limiting the charging power to this value, when Charging power limit mode (M) is 2. | kW | 1.38...22.08 |
| R | Reset | Resets all counters The name of the connected sensor is used in the user interface. | - | 0/1 |
Outputs↑
| Abbreviation | Summary | Description | Unit | Value Range |
|---|---|---|---|---|
| Ac | Active charging | - | 0/1 | |
| Vc | Vehicle connected | - | 0/1 | |
| Cp | Current charging power | kW | ∞ | |
| Ecs | Energy current session | kWh | ∞ | |
| E1 | Total Energy consumed profile 1 | kWh | 0...∞ | |
| E2 | Total Energy consumed profile 2 | kWh | 0...∞ | |
| Cpl | Charging power limit | kW | 1.38...22.08 | |
| Error | Error codes | - | - | |
| API | API Connector | Intelligent API based connector. Can link several functions between devices and blocks. API Commands | - | - |
Parameters↑
| Abbreviation | Summary | Description | Value Range | Default Value |
|---|---|---|---|---|
| M | Charging power limit mode | 0 = No limit 1 = Manual - Limit set via user interface 2 = Automatic - Limit set via input (Cpl) | 0...2 | 2 |
| Mr | Remember mode | 0 = Set mode to 'Automatic' when unplugging the vehicle. 1 = Remember mode when unplugging the vehicle. | 0/1 | 0 |
| Sc | Start of charging process | Defines when charging process should start: 0 = Use Wallbox settings 1 = Start / Pause depending on input (Act). This parameter is only visible in certain configurations. | 0/1 | 0 |
| Profile | Select profile | 0 = Profile 1 1 = Profile 2 This parameter is only visible in certain configurations. | 0...1 | 0 |
Properties↑
| Summary | Description | Default Value |
|---|---|---|
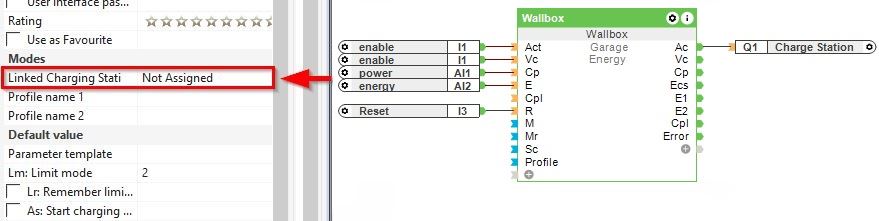
| Linked Charging Station | If the block is configured with an actual charging station, then the information is loaded accordingly from the device If this is not the case the block inputs are passed on to the outputs. | - |
| Profile name 1 | Name of profile 1 (Max 12 characters) | - |
| Profile name 2 | Name of profile 2 (Max 12 characters) | - |
Charging station with supported wallbox↑
For supported charging stations the data exchange with the Miniserver is done via the local network.
The maximum possible charging current of the charging station is set in the properties. It varies depending on the connection type of the respective charging station.
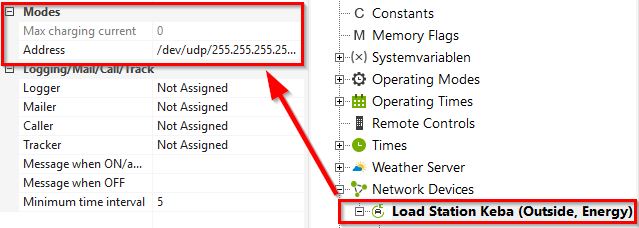
If the charging station is integrated over the network, only the inputs (Act) (Activate charging process), (Cpl) (Charging power limit), and (R) (Reset) are used.
Charging station without supported wallbox↑
If an unsupported charging station is used, it can still be integrated into the Loxone System. In this case no charging station device is assigned in the properties of the function block.
Charging is active when a vehicle is connected and the (Act) input is On. In addition, the inputs (Cp) (Current charging power) and (E) (Charged energy) are now also used. These are required for the statistics.
Keba KeContact P20 Socket ETH Wallbox↑
The Keba KeContact P20 Socket ETH Wallbox is an intelligent charging station for your electric vehicle, ideal for integration into the Loxone system. By communicating with the Miniserver (via Ethernet), the Wallbox is easy to operate and the loading data is always in the field of vision.