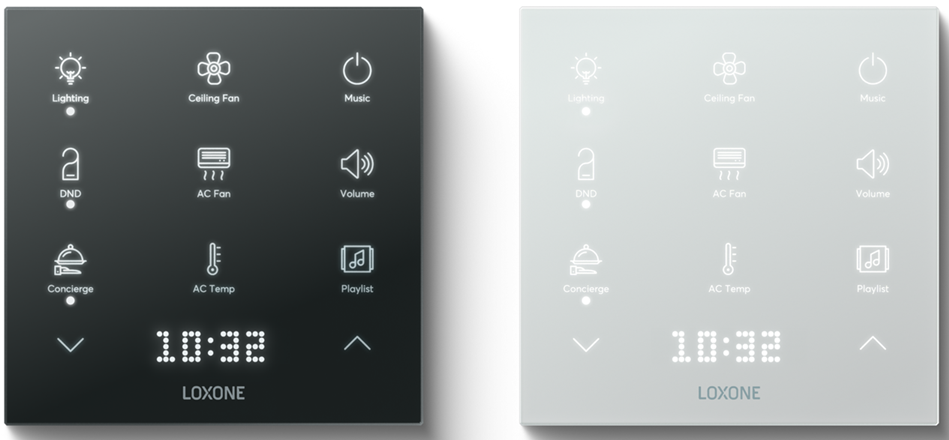
The Touch Pure Flex is your 100% personalized control device with up to 12 freely definable and positionable touch points.
With the integrated LED matrix display, as well as 3 status LEDs (which you can find on the left), menus, values, texts and states can be displayed.
The integrated lighting makes the Touch Pure Flex ideal for operation in low-light conditions or complete darkness.
Datasheet Touch Pure Flex 24V IP44 Air
Datasheet Touch Pure Flex 24V Air
Datasheet Touch Pure Flex 24V CO2 Air
Datasheet Touch Pure Flex Battery Air
Table of Contents
- Mounting
- Commissioning
- Programming Example
- Gen.1: Limitations when battery powered
- Buttons Not Responsive
- Calibrate CO2 Sensor
- Inputs, Outputs, Properties
- Documents
Mounting↑
Fasten the included plastic mounting frame to a flat surface or to a installation box. Alternatively, the aluminum frame can be used, available separately.
A junction box is not required, but highly recommended, as it makes it much easier to tuck away connecting wires or a spare loop behind the device.
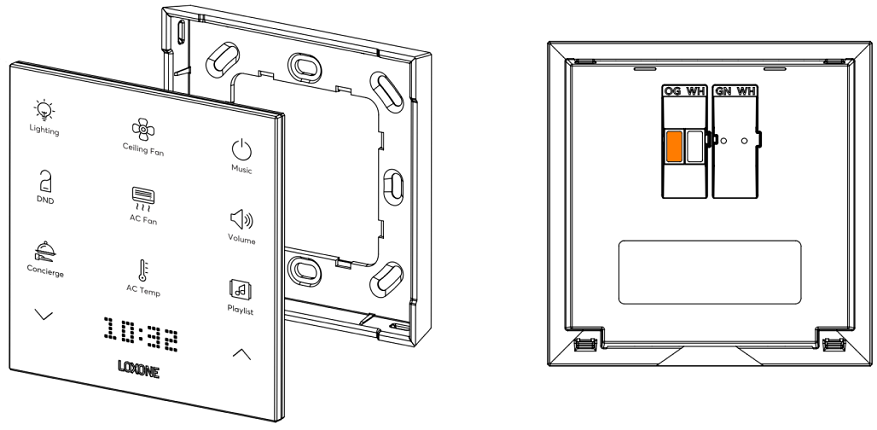
Connect the power supply (orange/white plug-in terminal).
Gen.1: For battery operation, remove the orange/white plug-in terminal and insert two AAA batteries.

A self-adhesive cover is included in the delivery to protect against water. It must be attached above the terminals once connected.
Two markings at the top edge of the housing help with positioning:
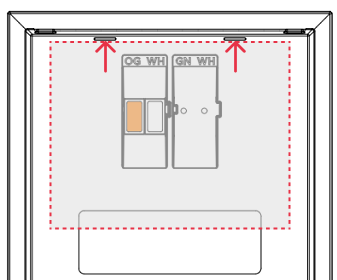
The Touch Pure Flex is first inserted into the top of the frame and then snapped into place at the bottom. To release the device, pull firmly on the bottom to disengage the latch.
A suction cup can be used to detach the device from the aluminum frame.
Commissioning↑
In delivery state, pairing mode will be active after the power supply has been established. This is indicated on the display.
Then follow the pairing procedure on the Air Interface.
To activate the pairing mode manually, switch off the power for 10 seconds, then switch it back on. If no connection to a Miniserver can be established for five minutes, pairing mode will be activated for a limited time.
Gen.1: The available functions differ depending on whether the device is battery operated or connected to an external power supply. This is determined during pairing. The device must therefore be paired in the same supply method in which it is to be operated later.
If the supply method is changed later, the device must be deleted from the programming and paired again.
Programming Example↑
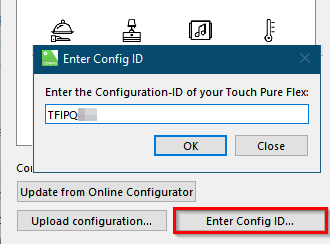
Via "View/Configure button assignment" a window opens, here the respective Config ID (from the label of the Touch Pure Flex) is entered.
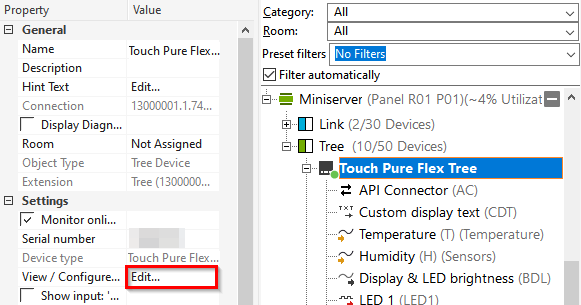
After that, the Touch Pure Flex configuration is downloaded from Loxone and the button icons are visible in the dialog.
If commands were defined in the Online Configurator, these are now also assigned to the device.
Alternatively, the individual button inputs are available after downloading the configuration.
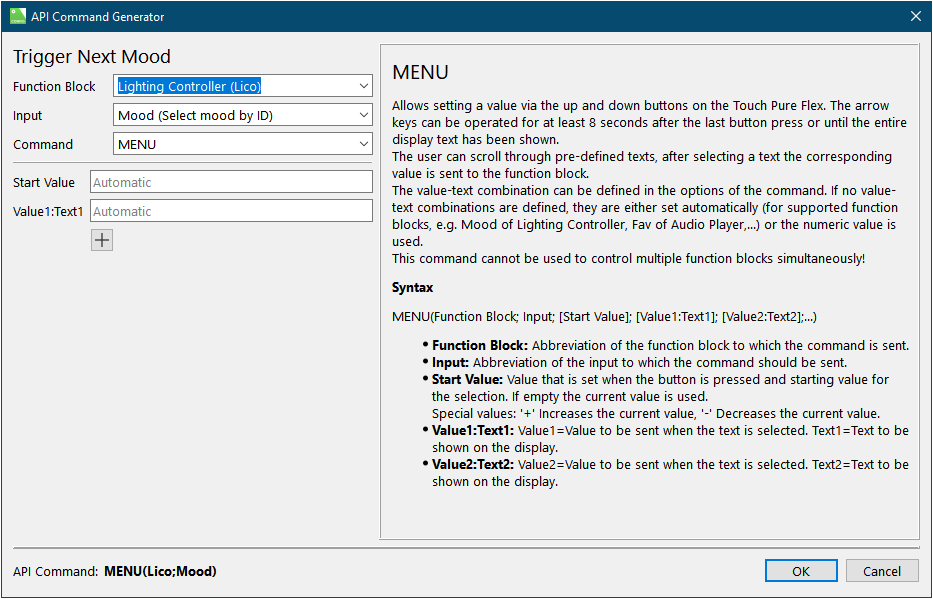
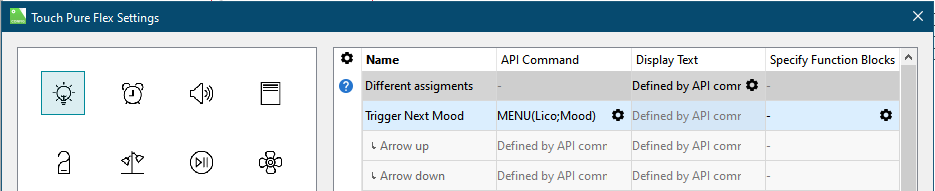
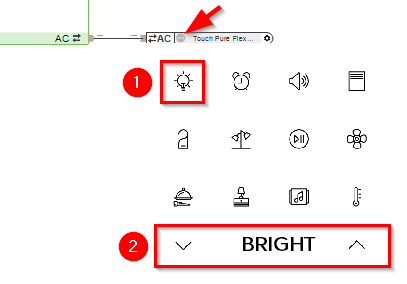
To change or create new commands, click on the respective button and open the API Command Generator in the corresponding line via the cogwheel:
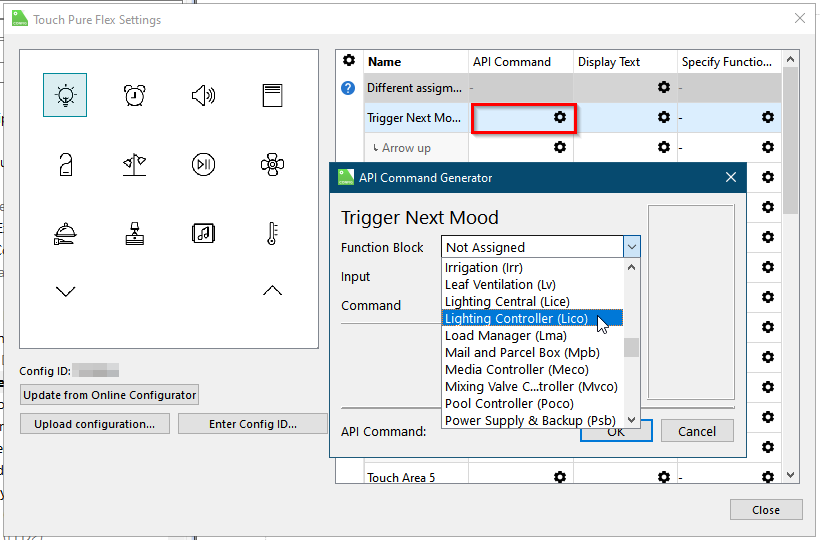
In the following example, we select a lighting controller and the input for selecting the mood. The "MENU" command then enables a menu selection of the moods on the Touch Pure Flex via the display and the arrow keys.
The Touch Pure Flex can now be dropped on the desired Lighting Controller; the API Connector is created automatically. A separate API Connector is required for each function block:

In the Simulation/Liveview a representation of the Touch Pure Flex can be opened.
This way the created commands can be tested:
Commands for numerous blocks can be created according to the same principle. The following document contains a list and explanation of the possible commands:
Gen.1: Limitations when battery powered↑
After inserting the battery, the device performs a calibration of the keypad. The device needs about 30 seconds to calibrate and should not be touched. Afterwards, the buttons are fully functional.
When battery powered, the display and status LEDs cannot be controlled because the device is in idle state.
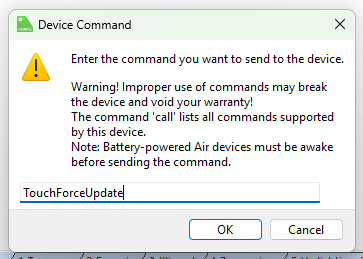
Buttons Not Responsive↑
If the buttons on the Touch Pure Flex are unresponsive or not functioning correctly, execute the device command TouchForceUpdate. After sending the command, wait a few seconds and check if the buttons are functioning properly.
For battery-operated Touch Pure Flex Air devices, ensure the device is awake before sending the command.
Calibrate CO2 Sensor↑
The CO2 sensor automatically calibrates itself weekly if it is in continuous operation for this period.
Manual calibration of the CO2 sensor is not necessary, but can be performed for special applications.
To do this, first ensure that the CO2 value at the measuring point is as low and constant as possible.
Now measure the CO2 value at the measuring point with a suitable measuring device.
Immediately afterwards, assign the measured value to the sensor via a device command or webservice command, in the following example 450ppm:
miniserver/dev/sys/wsdevice/devicename-or-serialnr/ForceRecalibration/450
Sensors↑
| Summary | Description | Unit | Value Range |
|---|---|---|---|
| Temperature | Measured value of the temperature sensor. For plausible values even with the display always on, its brightness must not be set higher than 70%. | ° | -40...125 |
| Humidity | Measured value of the humidity sensor. For plausible values even with the display always on, its brightness must not be set higher than 70%. | % | 0...100 |
| Button 1-x | Button can be used as digital input. | - | - |
Actuators↑
| Summary | Description | Unit | Value Range |
|---|---|---|---|
| LED 1 | Output to control the status LED. | - | 0/1 |
| LED 2 | Output to control the status LED. | - | 0/1 |
| LED 3 | Output to control the status LED. | - | 0/1 |
| Display always on | As long as the output is active the display will stay on, even if the device is idle. Can be overwritten by the output Disable display when idle (DisD). | - | 0/1 |
| Disable display when idle | As long as the output is active the display will stay off when the device is idle. Overrides the output Display always on (Don) if used. | - | 0/1 |
| Custom display text | Output can be used to show custom information on the display when the device is idle. Output needs to be checked in the setting “Idle display output” in order to work. Keep the update interval of the value low to save communication bandwidth. Allowed characters: A B C D E F G H I J K L M N O P Q R S T U V W X Y Z 0 1 2 3 4 5 6 7 8 9 ? ! . , - + / * ( ) @ < > : % = ° ' A maximum of 100 characters can be used. Non-Latin writing systems are transcribed phonetically. Every change sent will reset the scrolling of the set text. | - | 0/1 |
| Display & LED Brightness | Defines the brightness of the display and the 3 status LEDs. It is highly recommended to set a lower value when the device is battery powered to extend battery life. | % | 0...100 |
| Backlight | Output to control the backlight. Not available for Touch Pure Flex Gen.1 | - | 0/1 |
| API Connector | Intelligent API based connector. API Commands | - | - |
Diagnostic Inputs↑
| Summary | Description | Unit | Value Range |
|---|---|---|---|
| Online Status Touch Pure Flex Air | Indicates whether the device can be reached by the Miniserver. Diagnostics for Air devices Diagnostics for Tree devices Diagnostics for Extensions | Digital | 0/1 |
| Battery Low | This input activates when the battery level is <= 12%. The device only supplies values to this sensor when it is powered by batteries. | Digital | 0/1 |
| Battery Level | This sensor indicates the current battery level. If the device is externally supplied with 24v, the value of 100 is constantly shown. | % | ∞ |
Properties↑
| Summary | Description | Unit | Value Range | Default Value |
|---|---|---|---|---|
| Monitor Online Status | If checked, you will be notified via System Status or the Mailer if the device is no longer available or goes offline. | - | - | - |
| Serial Number | Serial number of Air device. Automatic pairing can be enabled on the Air Base. Automatic pairing can be enabled on the Airbase for a set time. | - | - | - |
| View / Configure button assignment | Click here to view and configure the button assignment. | - | - | - |
| Config ID | Config ID of the Touch Pure Flex | - | - | - |
| Temperature & humidity transmission cycle | Polling or transmission cycle for temperature and humidity. (0 = Off). This setting applies only when battery powered! | min | 0...120 | 15 |
| Brightness | Specifies the brightness of the display and the 3 status LEDs on the front. (0 = Display OFF) When used with the Touch Pure Flex Controller, the display and backlight brightness are controlled by the function block. It is highly recommended to set a lower value when the device is battery powered to extend battery life. | % | 0...100 | 30 |
| Display duration after last input | Display will remain active for this duration after the last input and then switch to idle. It is highly recommended to set a lower value when the device is battery powered to extend battery life. | s | 0...900 | 15 |
| Idle display output | Specifies the information that is shown on the display when the device is idle. Temperature and humidity values uncorrected, as measured by Touch Pure Flex. The text output Custom display text (CDT) can be used to display custom information. | - | - | - |
| Audible acknowledgement | Audible acknowledgement on button press | - | - | - |
| Button Behaviour | Specifies the behavior when a button is pressed. Pulse: Sends a pulse on rising edge OnOff : Sends ON on rising edge and OFF on falling edge, used for long click | - | - | - |
Documents↑
Datasheet Touch Pure Flex 24V IP44 Air
Datasheet Touch Pure Flex 24V Air
Datasheet Touch Pure Flex 24V CO2 Air
Datasheet Touch Pure Flex Battery Air