Why?
The integration of your existing alarm system into Loxone can bring a wealth of benefits. Your existing alarm can be used to trigger the Burglar Alarm feature in Loxone, which can then in turn cause your lights to flash, play a siren over your audio system, and/or send you an email or notification through the Loxone app. Loxone can also arm and disarm your alarm, as well as know when the alarm is armed or disarmed, ensuring that the two systems are working in harmony with one another. You can even use the PIRs in your alarm zones to trigger presence!
Hardware:
- Loxone Miniserver (any version)
- RS232 Extension
- Appropriate power supply
- Texecom Premier Elite alarm
- Texecom Com lead (JAA-0001)
- Serial lead with DB9 connectors, male-male or male-female or
- Cat cable (preferably shielded) with one end terminated to an RJ45 plug and Male DB9 RS232 to Female RJ45 Adaptor
How:
This guide will assume you are comfortable with the installation, commissioning, and configuration of the Miniserver and Extensions, and the Texecom alarm system.
Hardware Setup:
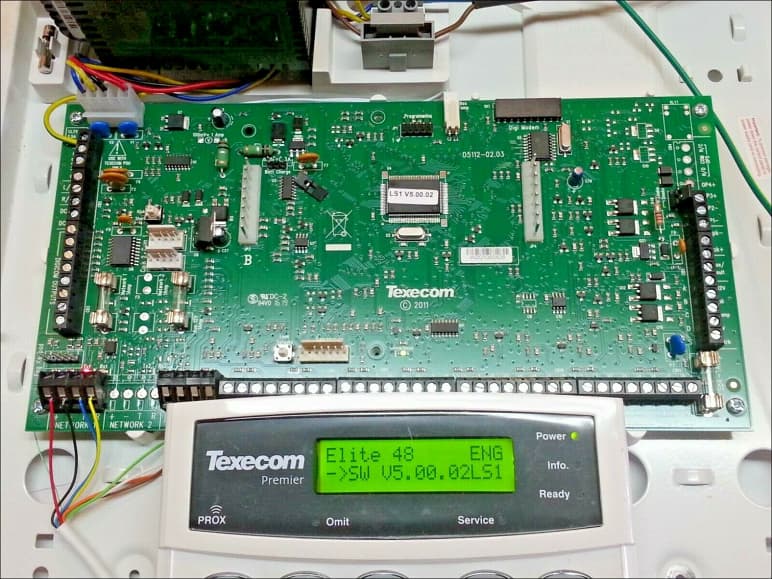
Remove the front cover from the Texecom panel so that the board can be accessed. It is recommended to put the panel into engineer mode before doing this otherwise the alarm will sound.
Connect the Com lead to one of the Com Ports of the panel. Com Port 2 is recommended as Com Port 1 is typically used by the alarm engineer. The rest of this document will assume Com Port 2 is used.
If using a second serial lead:
Cut off one end of the second lead (assuring you leave an end with a male plug intact) and terminate the appropriate wires from the cut-off end to the RS232 extension. Then connect this lead to the Texecom Com lead
If using a cat cable terminated with an RJ45 plug and a DB9 to RJ45 adaptor:
Connect the cat cable and the Texecom Com lead to the adaptor, then terminate the appropriate wires from the cat cable to the RS232 Extension.
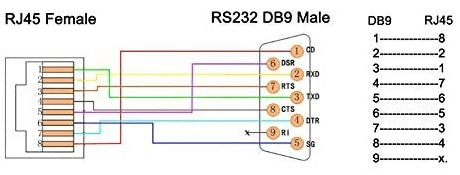
IMPORTANT: The above is for guidance only, pin assignment may differ between adaptor manufacturers.
IMPORTANT: Whichever method you use, please keep in mind the following points:
- Do not cut off the female serial connector on the Texecom Com lead. This contains a TTL to RS232 converter. If this is cut off the communications will not work.
- As RS232 is a send and receive signal, then for correct communications the Rx and Tx wires need to be reversed between devices.
- Ensure you also connect the GNDs between the Loxone RS232 Extension and Texecom Com Lead to account for potential differences
Configuration of the Texecom Panel
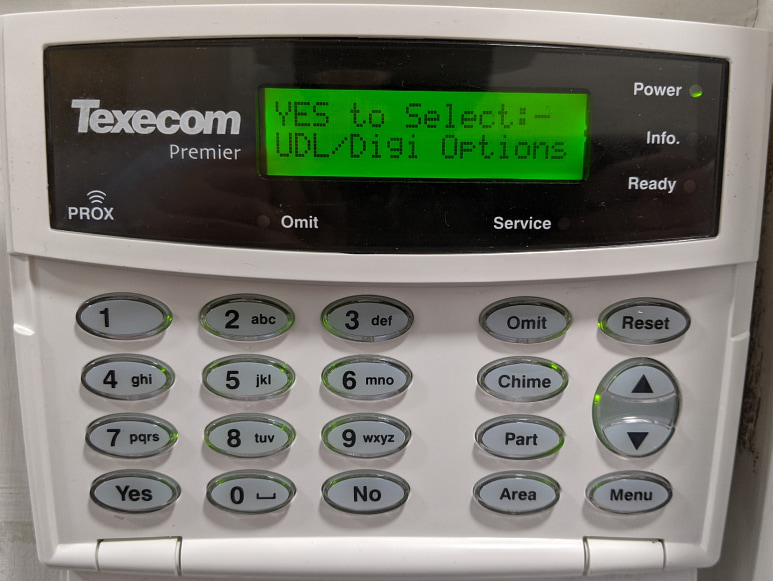
The alarm panel needs to be configured so that Com Port 2 is set to the correct Baud rate and communication type to allow it to work with Loxone. The instructions below are to do this through the keypad, however this can also be done through Wintex software if you are familiar with this.
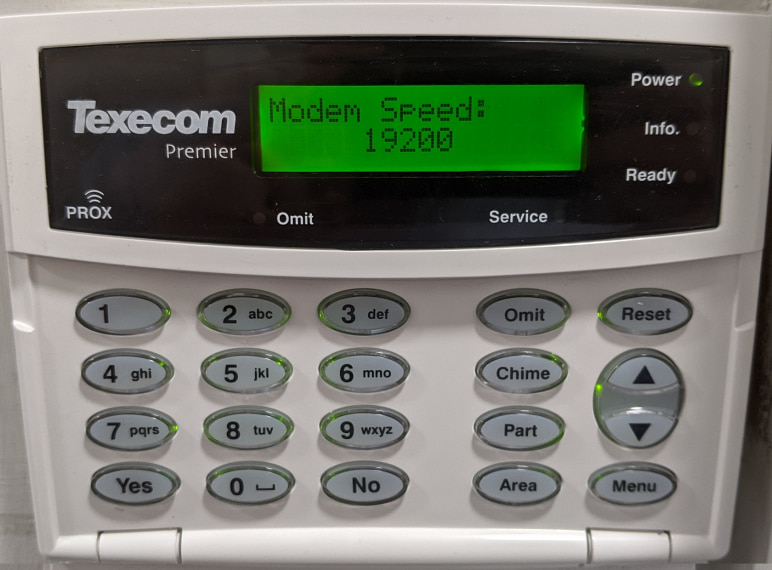
- Enter the engineer code, press key 7 to go to UDL/Digi Options and press Yes
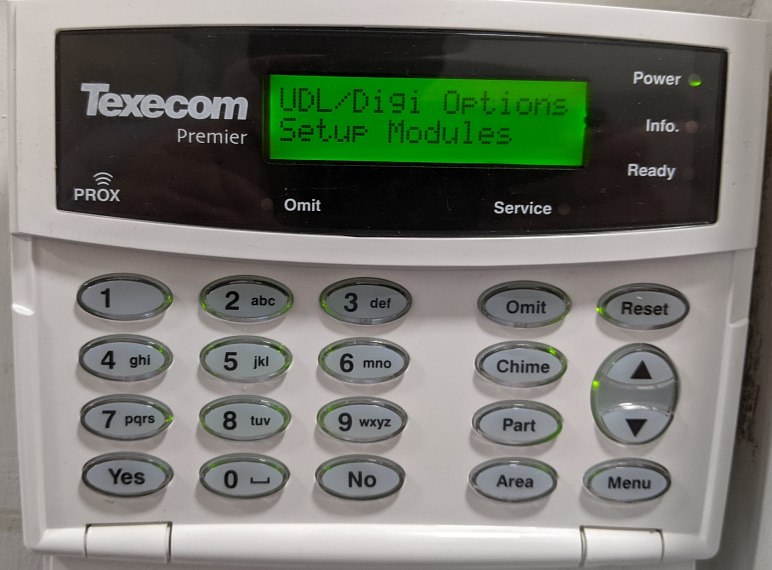
- Select option 7 to go to Setup Modules and Press Yes
- Navigate to Modem Speed, and change this to your required value (this is the baud rate of Com Port 2). The longer the cable from the alarm panel to the Loxone hardware, then the lower the baud rate should be. For this example, we have set it to 19200 Baud
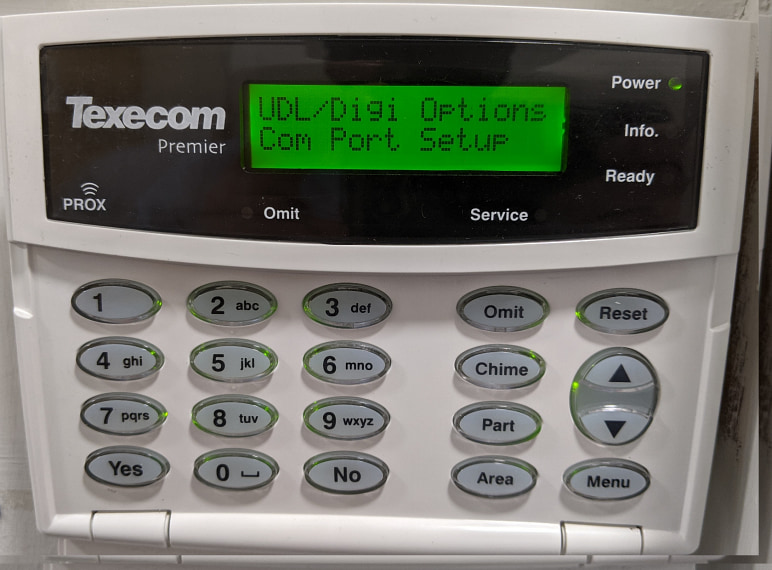
- Press Menu until you return to the UDL/Digi Options, then select option 8 Com Port Setup and press Yes
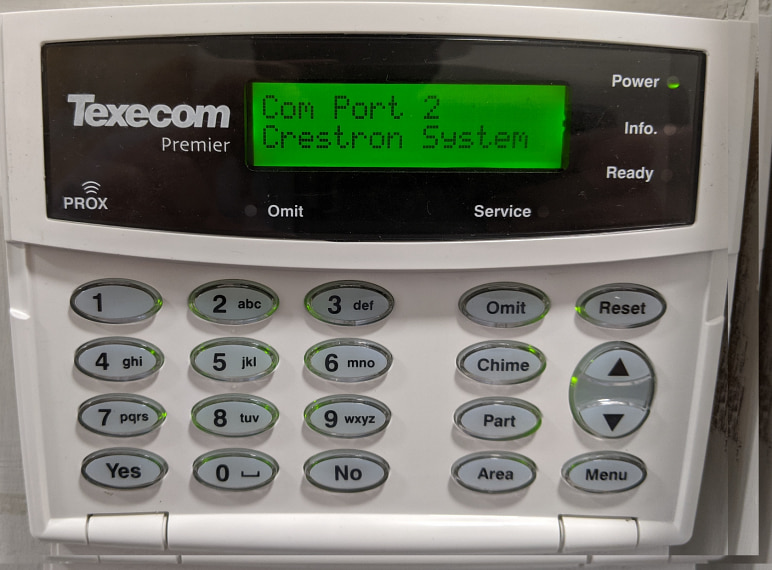
- Navigate to Com Port 2, and change this to Crestron System (Choose No to edit the selection)
Software Setup:
Adding the device in Loxone Config
As mentioned earlier, this guide assumes familiarity with commissioning and configuring extensions in a Loxone project. The guide will continue from the point of adding the device template and configuration of this to read the state of the alarm
- Navigate to https://library.loxone.com/detail/texecom-premier-elite-48-48/overview, and click the Download button in the top-right to download the template
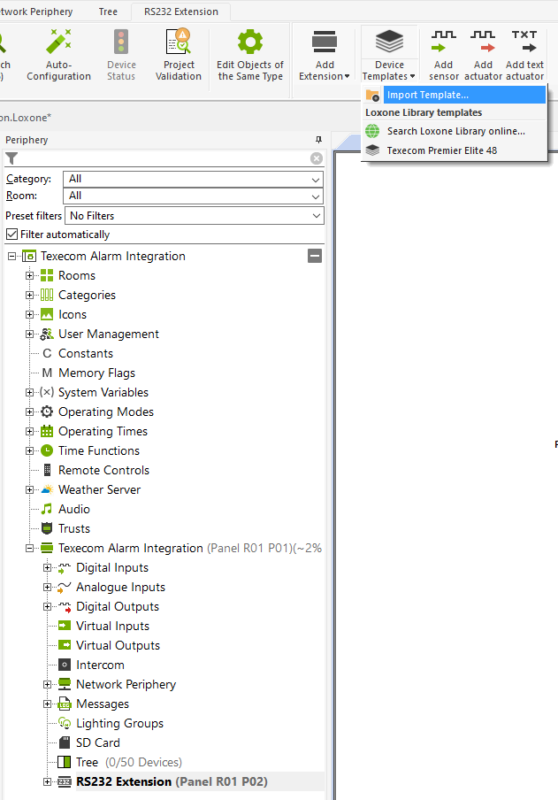
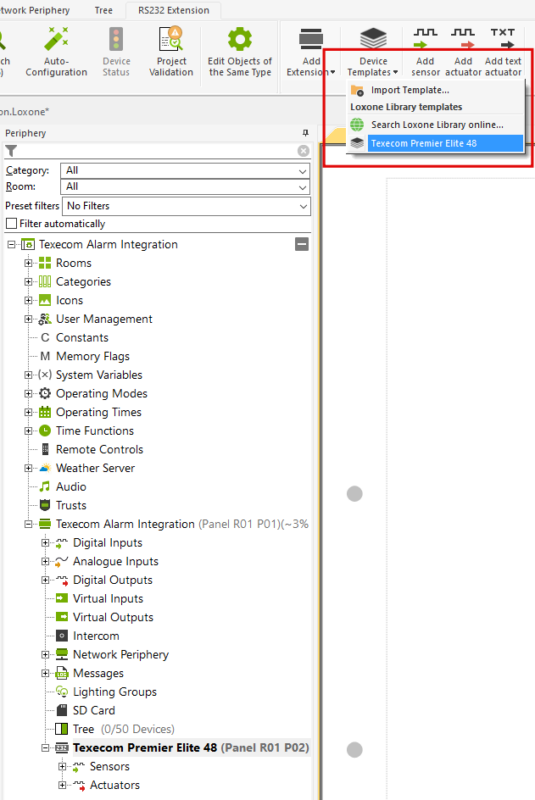
- In Loxone Config, select the RS232 Extension, and in the top toolbar, click the drop-down beneath Device Templates, and then select Import Template
- In the window that pops up, navigate to and open the file you just downloaded from the Loxone Library. You should then receive the following message:
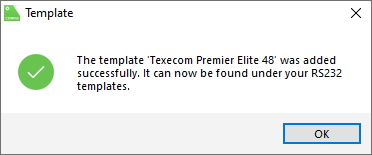
- Click the drop-down beneath Device Templates again, and select Texecom Premier Elite 48 from the list
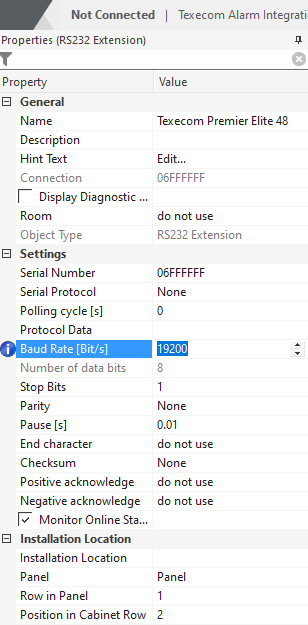
- In the parameters of the RS232 Extension, set the correct Baud Rate of the device to the same as configured on the alarm control panel earlier:
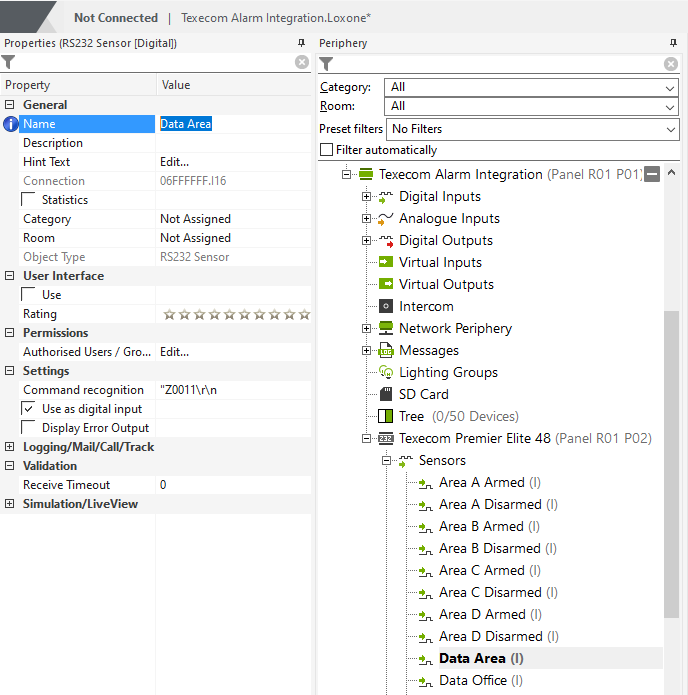
- Re-name the sensors to match the zone names configured on the alarm panel
Configuring the Zones in Loxone Config
IMPORTANT: You may need to add “\d” to the end of the command recognition for the arming and disarming of the areas. For example, for the arming of area A, you may need to change the command recognition to read “ “A001\d “
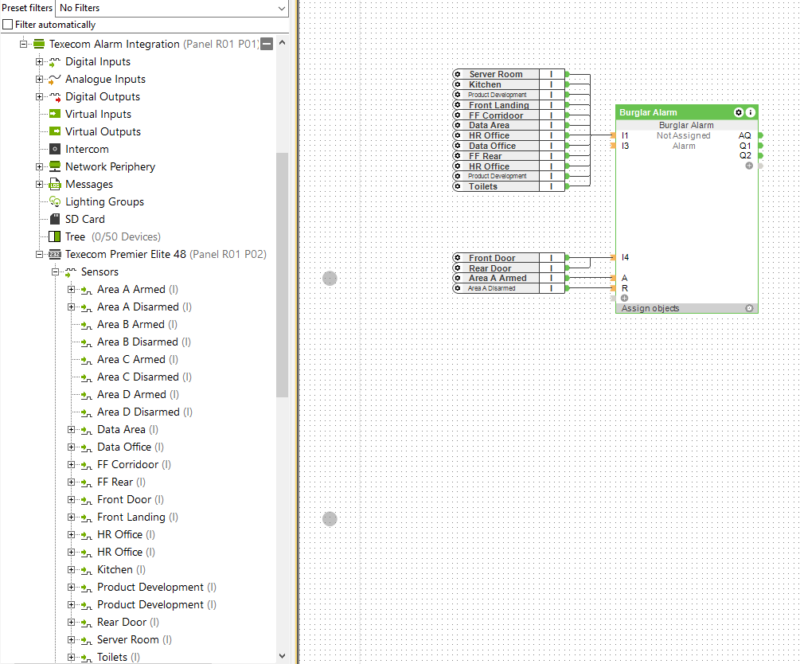
Areas are the areas of the alarm that can be armed or disarmed. The default Area in use is A. Using these outputs, we can arm and disarm the Loxone Burglar Alarm block based on the state of the building alarm.
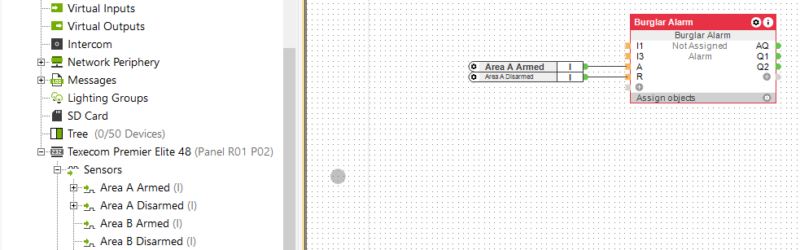
Add in the zones as inputs – These will then inform us in the Burglar Alarm block if a zone activates when the alarm is armed.
Additional Functionality
Arming and disarming the alarm through Loxone
You can use the Actuators to simulate key presses on the alarm panel, and this can be used for many purposes, but the most useful is to arm and disarm the alarm from Loxone
- Key presses must be sent with a delay between each. This will need to be around 500ms on number keys, and as much as 2s on the Yes key.
- The Sequential Controller block in config is ideal for sending these long combinations of button inputs
- If the Yes or No key is required, then the command is KEYY and KEYN and can be added using the same commands as the other Actuators.
- It is recommended to create a new user in the alarm panel for this so that the logs can accurately show this.
- Please seek the advice of an alarm professional to ensure this function would not affect the grading of the alarm system.
Using the alarm zones for Presence
The zone sensors will report their state regardless of the arming state of the alarm, so these can in principle be used for presence, i.e. to automate lighting and heating.
- For ease of configuration and tracking the Presence Block is recommended – assign the sensors to IAct
- If a number of zones trigger concurrently then signals may be missed due to dropped packets
- As RS232 communications can be subject to interference zone signals may be delayed coming through. This could, for instance, cause a delay before lighting turns on in a room
- Intruder alarm PIRs are designed to detect intrusion rather than presence, so please set appropriate overrun times to prevent lights from turning off while occupants are still in the area