CONTENTS
- Starting a configuration
- Edit the function blocks
- Simulate
- Saving and using a configuration
- Testing with Liveview
INTRODUCTION TO LOXONE CONFIG
This video shows you how to get started with Loxone Config, how to find your way around and all the basics.
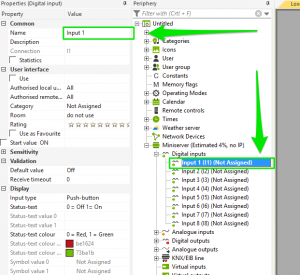
LABEL THE INPUTS AND OUTPUTS
It is useful for the inputs and outputs to have meaningful names as it will make life a lot easier later down the line. To change the name of an object, click on it and change the ‘Name’ field in the Properties window.
If you want to use a different name for the user interface, enter this name in ‘Description’ field. If this field is left blank, then the ‘Name’ field will be displayed in the user interface.
![]() Avoid special characters when choosing a name, as they may not be supported in the web interface.
Avoid special characters when choosing a name, as they may not be supported in the web interface.
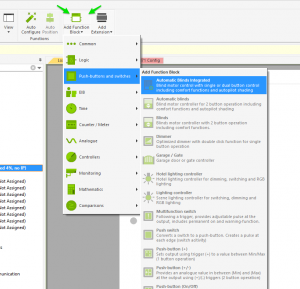
INSERTING FUNCTION BLOCKS
You can add inputs and outputs to the configuration pages simply by dragging and dropping them on the page.
You can now insert function blocks – these can be found in the ribbon. Just click the desired groups and function block and it will be inserted.
![]() F5 Shortcut
F5 Shortcut
A quick way to add a function block is by pressing ‘F5’, typing its name and pressing enter.
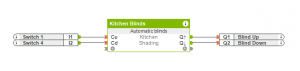
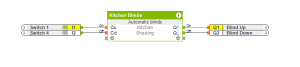
CONNECT INPUTS AND OUTPUTS
To connect an input to a function block, click the green arrow on the input, and drag it (click and hold down mouse button) to a red square shaped connector. The same applies for connecting function blocks to outputs.
To remove a connection between two objects, simply click the green arrow or red input symbol.
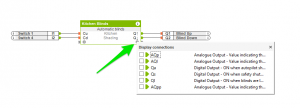
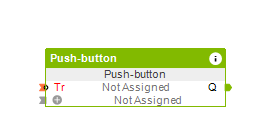
ADDING INPUTS, OUTPUTS AND PARAMETERS
To add in the hidden inputs and outputs to your function block simply click the Plus “+” icon in the bottom left or bottom right of the block for either Inputs & Parameter or Outputs respectively.
EDIT THE PROPERTIES OF FUNCTION BLOCKS
After successful configuring your function blocks, you should edit the properties.
PROPERTIES WINDOW
Clicking on an item will bring up its properties window. If you highlight a property in the Properties window, a summary will appear in the grey box at the bottom of the Properties window.
The properties of function blocks and inputs/outputs are automatically assigned default values which you can (and should) tailor to your individual configuration. Please refer to the descriptions in the object settings for more information.
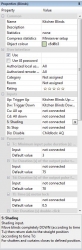
![]() The properties window should be big enough for you to edit things easily. If you want to move the properties window around (e.g. to a second screen) you must first enable ‘Custom Positioning’ by ticking the box on the ‘Home’ tab.
The properties window should be big enough for you to edit things easily. If you want to move the properties window around (e.g. to a second screen) you must first enable ‘Custom Positioning’ by ticking the box on the ‘Home’ tab.
EXAMPLE: SETTING SIMULATION PROPERTIES
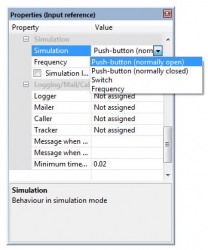
When doing a simulation in the software, it is clearly impossible to click two inputs simultaneously as you only have one mouse! That is why you can adjust the input type in the ‘Simulation’ section of the properties window to several different options.
- Push-button (normally open)
- Push-button (normally closed)
- Switch
- Frequency
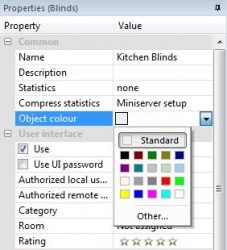
EXAMPLE: CHANGING THE COLOUR OF AN OBJECT
If you find it helpful, then the colour of any object in your configuration can be changed. Simply select ‘Object Colour’ in the properties window.
NEGATING INPUTS AND OUTPUTS
To negate the input of a function block, click on the input’s abbreviation (e.g. ‘Tr’, ‘R’, ‘O’ etc.) when the black dot appea. You will then see a green diamond appear by the input and the input text will go red.
![]() Negating an input or output inverts the signal, so ON becomes OFF,
Negating an input or output inverts the signal, so ON becomes OFF,
(1 becomes 0) and OFF becomes ON, (0 becomes 1).
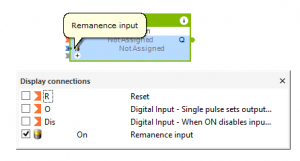
REMANENCE ON FUNCTION BLOCKS
The remanence parameter will ensure that a function block will return to the same state after loss of power or a reboot of the Miniserver. To activate remanence of a block click on the battery icon so the parameter is negated, or you can connect to the parameter a constant with a value of 1. Connections with other function blocks are not possible.
SIMULATING A CONFIGURATION
You will usually want to check a configuration before the testing it out on your actual system. For this you can use the simulation function.
To start simulation mode, go to the ‘Testing’ tab ‘Start simulation on PC’.
![]()
SIMULATE CONFIGURATION
By clicking on the inputs you can simulate switches being pressed, and thus test your configuration.
For analogue inputs, you can move the values by changing the slider bar at the input.
SAVING AND USING A CONFIGURATION
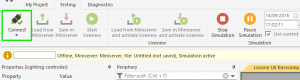
CONNECT TO THE MINISERVER
To save the configuration you have just made to the Loxone Miniserver, you first need to connect.
In the menu ribbon, click on connect.
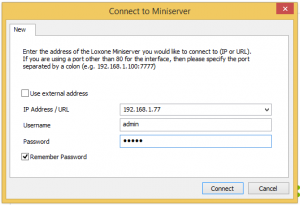
ENTER USERNAME AND PASSWORD
A dialogue box will appear asking for the Miniserver address, together with your username and password. In the address field, enter either the host name (for example “mini server-og”) or the IP address (e.g. 192.168.1.7) . If you use a different port to the default (80), then you must specify this explicitly (for example mini server-og:8080 or 192.168.1.7:8080).
![]()
The default user name and password are both ‘admin’. In the Periphery window you can select the admin user and change the password. To use the Loxone DNS service you will need to change the admin user credentials to something more secure.
SAVE THE CONFIGURATION IN THE MINISERVER
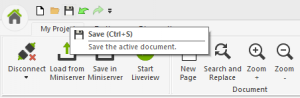
You can now save your configuration to the Miniserver. Click ‘Save in Miniserver’ in the Miniserver tab.
This function sends the program to your Miniserver. By default, the Miniserver will reboot and start using the new configuration immediately.
![]()
SAVE THE CONFIG FILE ON THE COMPUTER
It is also possible to save the configuration locally (even whilst still connected to the Miniserver). If you save a new program on the Miniserver the configuration before is not saved it is overwritten therefore remember to back up previous versions to your computer.
![]() In the Property field of the document under ‘Auto save’ you can set the time interval for automatic saving.
In the Property field of the document under ‘Auto save’ you can set the time interval for automatic saving.
TESTING WITH LIVEVIEW
USING LIVEVIEW
To test your program in action, click ‘Start Liveview’ in the Testing tab (you must be connected to the Miniserver for this to work).
With this live simulation you can see the current state of all the inputs and outputs, as well as how the different function blocks behave. If you use analogue inputs and outputs or analogue KNX sensors the analogue values will be displayed.
![]()