The Remote Air is a wireless remote control with 12 buttons, including 5 buttons that follow the Loxone switch standard.
Table of Contents
- Commissioning
- Programming
- T5 buttons as separate inputs
- Inputs, Outputs, Properties
- Safety Instructions
- Documents
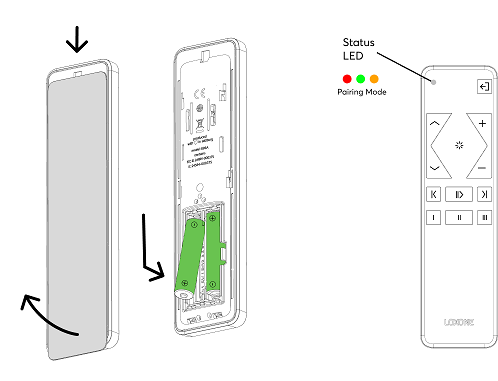
Commissioning↑
In delivery state, pairing mode will be active after inserting the battery. This is indicated by the status LED flashing red/green/orange.
Then follow the pairing procedure on the Air Interface.
To activate the pairing mode manually, hold down any button for at least 5 seconds immediately after inserting the batteries.
Programming↑
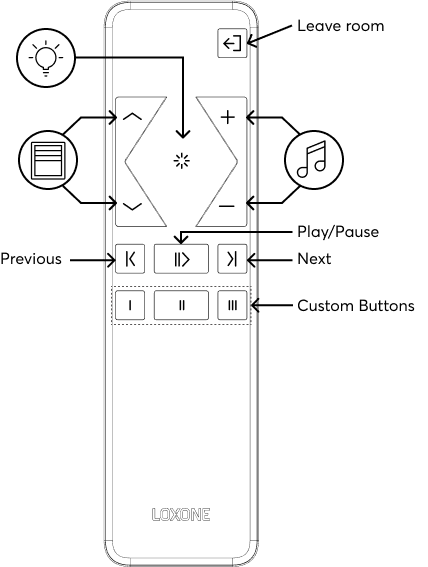
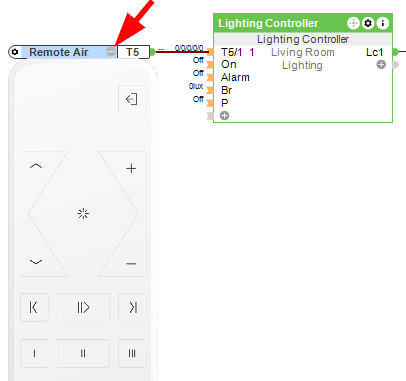
Once the Remote Air has been paired, the T5 input can be dragged onto the Automatic Shading, Lighting Controller and Audio Player.
Additionally, there are three buttons for audio configuration, one button dedicated to the Leave room function, and three freely configurable buttons.
In Simulation/LiveView a representation of the Remote Air can be opened.
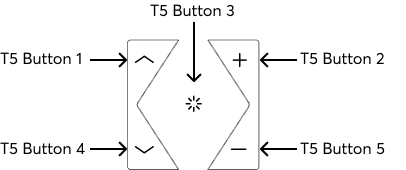
T5 buttons as separate inputs↑
Alternatively, the T5 buttons can be activated in the properties and used as digital inputs:
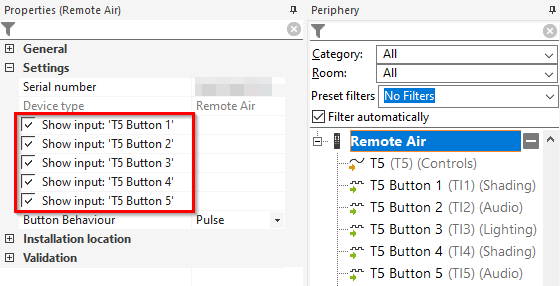
The assignment of the T5 inputs is as follows:
Sensors↑
| Summary | Unit | Value Range |
|---|---|---|
| Previous | Digital | 0/1 |
| Play/Pause | Digital | 0/1 |
| Next | Digital | 0/1 |
| Leave room | Digital | 0/1 |
| I | Digital | 0/1 |
| II | Digital | 0/1 |
| III | Digital | 0/1 |
| T5 | - | ∞ |
Diagnostic Inputs↑
| Summary | Description | Unit | Value Range |
|---|---|---|---|
| Battery Low | This input activates when the battery level is <= 15%. | Digital | 0/1 |
| Battery Level | This sensor indicates the current battery level. | % | ∞ |
Properties↑
| Summary | Description | Default Value |
|---|---|---|
| Serial Number | Serial number of Air device. Automatic pairing can be enabled on the Air Base. Automatic pairing can be enabled on the Airbase for a set time. | - |
| Show input: 'T5 Button 1' | - | |
| Show input: 'T5 Button 2' | - | |
| Show input: 'T5 Button 3' | - | |
| Show input: 'T5 Button 4' | - | |
| Show input: 'T5 Button 5' | - | |
| Button Behaviour | Specifies the behavior when a button is pressed. Pulse: Sends a pulse on rising edge OnOff: Sends ON on rising edge and OFF on falling edge, used for long click Automatic: Sends a pulse on rising edge for buttons 1 & 4 (shading) and 3 (lighting). Sends ON on rising edge and OFF on falling edge for buttons 2 & 5 (music) to enable volume up/down via long press | - |
Safety Instructions↑
Batteries are safe to use; however, caution is advised.
Potential risks when using batteries:
Batteries may leak. Even high-quality alkaline batteries can have a leakage rate between 100 and 2000 ppm.