Why?
When installing Smart Home features in a retrofit, it can be difficult to find wireless, battery-powered blinds that will integrate nicely with your Loxone system. QMotion offers a reliable, affordable, and easy to integrate solution, with a variety of fabrics and finishes available to match any aesthetic.
Hardware:
- Loxone Miniserver (any version)
- QMotion blind(s)
- Legrand QzHub3
- An internet connection for the Miniserver and Hub
How:
This guide will assume you are comfortable with the installation, commissioning, and configuration of the Miniserver. You will also need to download the Qmotion QzHub app (Google Play, Apple Store), create an account within the app, create groups as appropriate, and learn the QMotion blind(s) into the QzHub3. Please follow the documentation that came with your devices in order to do this.
Authenticating with QMotion:
In order to communicate with the blind(s) we will be sending commands to QMotion’s cloud server, which will, in turn, send those commands to the QzHub3, which will then control the blind. Because of this, before we can do anything we need to generate a “token” – a string of characters that we can use as a unique identifier to authenticate with their servers. To do this, first open the Qmotion QzHub app on your mobile device, then click the burger menu in the top left, select “Settings”, and then select your hub from the list that appears.
In the Hub Settings screen, select the Integrate option, and on the screen that appears, select “Generate New Code”. This will generate a 6-digit integration code that is required to create your authentication token.
On a Windows PC, open command prompt (this can be found in your list of programs in the Start Menu), and then enter the following string, replacing <Integration Code> with the 6-digit code you got from the app:
curl -X PATCH "http://prod-bcs-qm-shadecloud-app.azurewebsites.net/codes/<Integration Code>" -H "accept: */*" -H "Content-Type: application/json" -d "{}"
Important: This, and any other command strings in this integration guide or attached template, are very sensitive to proper spacing, syntax, line breaks, and capitalisation. Ensure they are copied precisely as written.
Press enter, and you will receive a response from the server. The information between the speech marks, covered in red below, is your token. Copy this somewhere and keep it secure.

Finding the IDs of your devices
In order to control your devices, you will need to know the IDs of your hub, any blinds you have, and any groups you have created. We’d recommend keeping this information, along with your token above, in a “note” block in the Config file, or somewhere else secure, to ensure it does not get lost.
While it is possible to find much of this information in the app, as they are long strings of characters we would recommend finding this information by sending further commands to the QMotion servers with command prompt, as this will allow you to directly copy and paste the information from the responses.
In command prompt, enter and send the following command, replacing <Token> with your authentication token from the previous step:
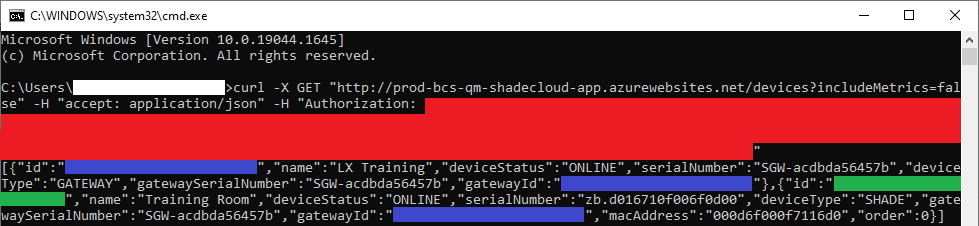
curl -X GET "http://prod-bcs-qm-shadecloud-app.azurewebsites.net/devices?includeMetrics=false" -H "accept: application/json" -H "Authorization: <Token>"
This will return a list of all of your devices, as well as their IDs. In the image below, the Gateway ID is in blue, and the ID of the blinds are in green:
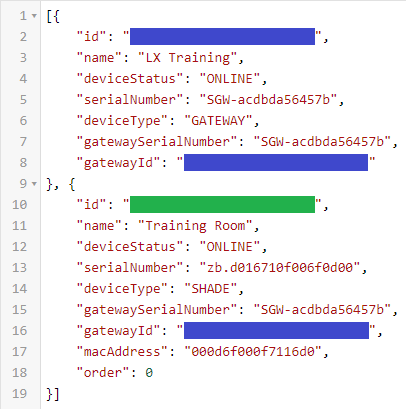
Note: If you’re having difficulty picking out the information you need from the returned string in the command prompt, you can copy and paste it into a website such as JSONLint. This will then validate it, making it easier to read:
Important: If you have paired multiple devices they will all show in this response. Ensure you name your devices uniquely and appropriately so you know which one is which.
If you wish to control groups of devices, you will also need to get the relevant group IDs. To do that, In command prompt, enter and send the following command, replacing <Token> with your authentication token:
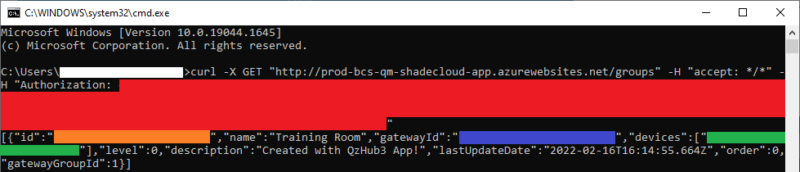
curl -X GET "http://prod-bcs-qm-shadecloud-app.azurewebsites.net/groups" -H "accept: */*" -H "Authorization: <Token>"
Similar to last time, you’ll get a response listing any groups you have created, with their IDs shown in orange:
Important: If blinds are always going to be controlled together, we would strongly recommend controlling them as a group rather than individually. The fewer messages are sent to the server, the quicker the response will be.
Config Setup:
The first thing we will need to do is to add the template for the virtual outputs that will send the relevant commands to the server. You can download the template from the Loxone Library.
In Config, under the Miniserver in the Periphery Tree, select “Virtual Outputs”. Then, on the top ribbon, select “Device Templates”, and then “Import Template”

In the window that pops up, navigate to and open the file you just downloaded. Then, go back into the same menu again, and in the dropdown you should now see “QMotion Blinds”. Click this to add it to your project, and click “ok” on the window that pops up regarding the IP address – this is nothing to be concerned about.
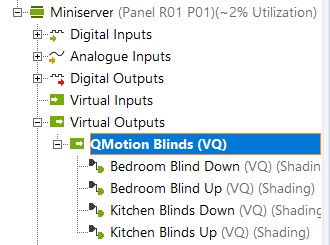
This will add a virtual output for QMotion blinds, which contains four example outputs; an up and down command for both a single device and a device group. The first thing to do is to rename these outputs and add them to the correct rooms and categories:
Note: If you have multiple devices/groups, we would recommend fully configuring and testing one device first. Once it is working as expected, you can create additional outputs, copy and paste the relevant fields across, adjust the settings to match, and just change the relevant IDs.
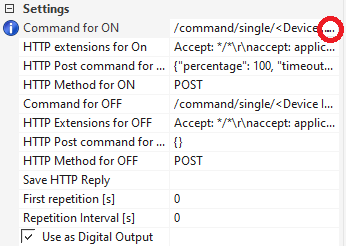
Now we need to adjust the commands in the template to match your groups and devices, as well as to include your authorisation token. For each of the four outputs, you will need to alter the following fields:
- Command for ON – Replace <Device ID> or <Group ID> with the ID of the device/group to be controlled
- HTTP extensions for ON – Replace <Token> with your authorisation token
- Command for OFF – Replace <Device ID> or <Group ID> with the ID of the device/group to be controlled
- HTTP extensions for OFF – Replace <Token> with your authorisation token
Note: When editing these fields, it is easiest to click the three small dots to the right of the field to open up the full editor window. As mentioned earlier, be careful when editing these, as any small changes in syntax, spacing, or line breaks can cause them to not function as expected.
Once the outputs have been edited, create and name an Automatic Blinds block, drag the required outputs onto the page, and connect them to the Q↑ and Q↓ outputs respectively.
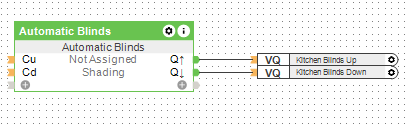
Important: Don’t forget to set the D parameter on your Automatic Blinds block! Even if you’re not using automatic shading, the block will not function without this parameter.
Ensure the block is set up correctly for the types of blinds you have (for roller blinds, Type should be 1), and set the runtimes appropriately by timing a full up and full down motion.
Please be aware that, as there are multiple steps in the communication between the Miniserver and the blinds, including the signal being sent to QMotion’s cloud servers, there is a small delay (around half a second in our testing) between signals being sent and the device responding. As such, we would recommend setting the run times as slightly longer to ensure that the blind always travels it’s full distance without stopping.
Save into your Miniserver, and if all has gone well your blinds will be working as expected!