The Loxone NFC Code Touch Tree is used for access control and features an NFC reader and illuminated keypad on a glass surface.
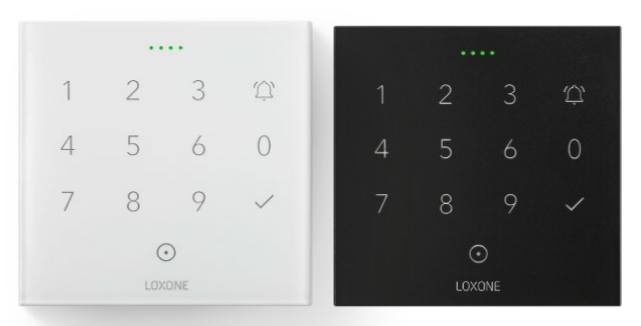
Access control solution via NFC tags, available as key fobs, stickers or cards. Alternatively, a numeric code can be entered on the keypad.
Combining an NFC tag and a numeric code enables two-factor authentication. The keypad also features a freely programmable doorbell button and a tick button to confirm entries.
You can find the previous NFC Code Touch Tree model here.
Table of Contents
- Mounting
- Commissioning
- Configuration
- Operation
- LED states
- Change Sensitivity
- Inputs, Outputs, Properties
- Safety Instructions
- Documents
Mounting↑
Fasten the included plastic mounting frame to a level surface or to a 68mm installation box.
An junction box is not required, but highly recommended, as it makes it much easier to tuck away connecting wires or a spare loop behind the device.
The NFC Code Touch can also be mounted using the single aluminium frame or in combination with the Intercom using the double aluminium frame, available separately.
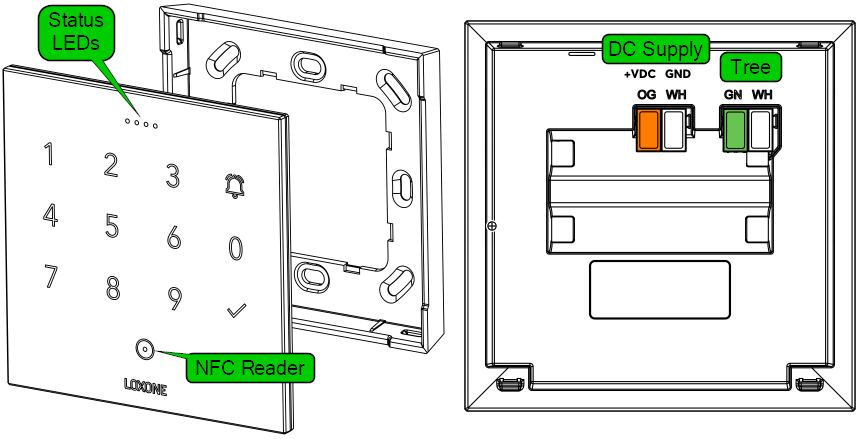
Connect the power supply (orange/white plug-in terminal) and the tree data lines (green/white plug-in terminal).
A self-adhesive cover is included in the delivery to protect against water. It must be attached above the terminals once connected.
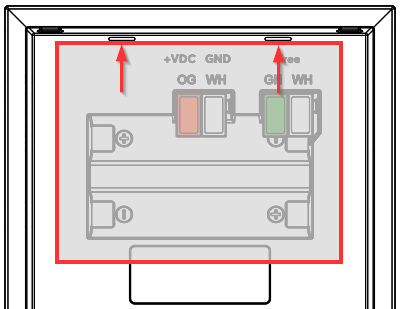
Two markings at the top edge of the housing help with positioning:
The NFC Code Touch is first inserted into the top of the frame and then snapped into place at the bottom. To release the device, pull firmly on the bottom to disengage the latch.
A suction cup can be used to detach the device from the aluminium frame.
Commissioning↑
Shortly after power-up, the right status LED will blink orange if the wiring is correct (connection to Tree Extension and Miniserver is established).
Then follow the pairing procedure on the Tree Interface.
Configuration↑
The device is programmed and set up using the Authentication NFC Code Touch function block in Loxone Config.
Drag the NFC Code Touch from the periphery tree to the programming page to create the function block.
Only then can the device evaluate access codes and NFC tags and display them correctly via the LED status.
Operation↑
In order to gain access to a building, a paired NFC tag is held up to the NFC reader on the device. The tag is read and authorisation is verified.
In order to authenticate using an access code, enter the numeric code on the keypad, followed by the tick button.
If the authorisation was successful, access is granted and the status LEDs light up green. As an example, the door can then be unlocked. If access is denied, the LEDs light up red.
Additional functions can be selected by entering a prefix.
To do so, first enter the prefix number set in the configuration and then hold the NFC tag up to the reader.
When using a code, first enter the prefix, then confirm with the tick button, followed by the access code.
After successful authorisation, the function assigned to the prefix is activated.
If an unauthorized NFC tag or numeric code is attempted several times in succession, the device is locked for 2 minutes for further operation, including all keys. This protection prevents brute force attacks.
An authorized NFC tag can unlock the device before that time.
Configuration also allows you to limit access via NFC tag or code to specific times, or set them up for one-time use.
More information can be found in the documentation of the Authentication NFC Code Touch function block.
Water on the surface of the NFC Code Touch can interfere with its operation. After the surface dries, the NFC Code Touch automatically re-calibrates and operates as usual.
LED states↑
A row of four LEDs at the top of the device actives during operation, and also indicates whether access was granted or denied.
The following table shows the possible LED states:
| LED display | Meaning |
|---|---|
| 4x white, counting down | Indicates the timeout after a digit was pressed. The next digit must be entered within this time. After the time has elapsed, the entered code is checked for authorisation. |
| 4x green, fading out | Access granted or confirmation for bell button. In NFC learning mode: Tag was successfully detected |
| 4x red, fading out | Access denied, tag or code invalid, or not authorised. |
| 4x red, flashing fast, counts down slowly | Device is locked after repeated use of an unauthorized NFC tag or code, or by activation of the input (Off) of the function block. If an unauthorized NFC tag or incorrect code has been used 15 times in a row, the device is locked for 2 minutes. By using a valid tag, this lock can be ended early. Manual lock: Device is locked as long as the input (Off) of the block is active. |
| 4x cyan, running light from left to right | NFC learning mode is active. |
| 4x yellow, flashing | Error while reading NFC tag in learning mode. Try again, hold tag steady! The NFC monitor provides information on the cause of the error. |
| Individual | The 4 status LEDs can be controlled together via configuration and display the primary colours. They are only displayed if no other status is currently active. |
| Only right LED active | Indicates the LED status of this Tree device. |
Change Sensitivity↑
In some settings, it may be necessary to change the sensitivity of the keypad using a device command or webservice command.
If battery powered, first select keep device awake in device status, and press any button.
Each key can be addressed via a TH number:
THProx=Proximity (determines the general sensitivity for the first keypress only)
TH0=Key 1
TH1=Key 4
TH2=Key 7
TH3=Key 2
TH4=Key 5
TH5=Key 8
TH6=Key 3
TH7=Key 6
TH8=Key 9
TH9=Bell Button
TH10=Key 0
TH11=Checkmark
The default value for parameters TH0 to TH11 on the NFC Code Touch is 20.
Lowering the value increases the touch sensitivity. For example, halving the default value results in approximately double the sensitivity.
Raising the value decreases the touch sensitivity. For example, doubling the default value results in approximately half the sensitivity.
A realistic and recommended range for these values is 15 to 30, depending on the desired touch response and the installation environment.
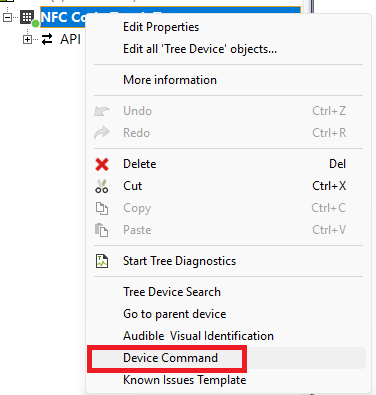
Each button has a certain value assigned to it. First this value has to be queried. To send a Device Command to the NFC, right-click on it and select Device Command.
Example for button 3:
To retrieve the current value of this button, send the following command: get/TH6. The response might be 25, for example.


You can now reduce the sensitivity by assigning a higher value. For example, you can send the following command: store/TH6/26.


To increase the sensitivity, select a lower number.
Numbers below 10 do not need a leading zero.
Finally, the change must be accepted by restarting the device with a Reboot command. You will see a timeout in the monitor, confirming the reboot.

Adjust the sensitivity in small increments, as in the example. Check if the button reaction improved. If the change is not sufficient, the command can be repeated with a higher/lower number.
If adjusting the sensitivity commands does not resolve the issue, send the following command: RevertTouchSettings followed by the Reboot command.
Actuators↑
| Summary | Unit |
|---|---|
| API Connector | Text |
Diagnostic Inputs↑
| Summary | Description | Unit | Value Range |
|---|---|---|---|
| Online Status NFC Code Touch Tree | Indicates whether the device can be reached by the Miniserver. Diagnostics for Air devices Diagnostics for Tree devices Diagnostics for Extensions | Digital | 0/1 |
Properties↑
| Summary | Description | Default Value |
|---|---|---|
| Monitor Online Status | If checked, you will be notified via System Status or the Mailer if the device is no longer available or goes offline. | - |
| Serial Number | Specifies the serial number of the device. Enter 'Auto' to automatically pair a Tree device with unknown serial number. This can only be used if there is only one Tree device of the same type on a standalone Miniserver (not in a Client-Gateway setup). Save in the Miniserver to pair the Tree device. Afterwards the program must be loaded from the Miniserver to transfer the actual serial number of the Tree device into the program. | - |
| Audible acknowledgement | Audible acknowledgement on button press | - |
Safety Instructions↑
The installation must be carried out by a qualified technician in accordance with all applicable regulations.
Follow the installation instructions closely to guarantee protection against contact, water and dust.
For security reasons we strongly recommend that you only use encrypted NFC tags from Loxone for access control.