How to setup the Keba KeContact P20 Socket ETH wallbox
DESCRIPTION
The Keba KeContact P20 Socket ETH wall box is an intelligent charging station for your electric vehicle and is optimally integrable with the Loxone Smart Home system.
In addition to a lot of security features, the wall box also has built in power metering. By communicating with the the Miniserver(via Ethernet network connection), the wall box is easily operated and charge data is always in available at the touch of a button.

TECHNICAL DATA
- Charge with a min 4.1kW up to 22kW (EN 61851 Mode 3 – minimum 6A per phase)
- Permissible relative humidity: 5% – 95%, non-condensing
- Operating temperature range 16A: -25 ° C – 50 ° C
- Operating temperature range 32A: -25 ° C – 40 ° C
- Protection: IP 54, NEMA 3R
- Locking by Security Torx screws
- Dimensions: 240 x 495 x 163 mm (WxHxD)
- Weight: approx 4.8 kg
- Cable entry: from top-wall or flush-mounted from behind
![]() The connected load of the wall box depends on the adjusted maximum charge current. For more information take a look at the wall box instillation guide.
The connected load of the wall box depends on the adjusted maximum charge current. For more information take a look at the wall box instillation guide.
COMMISSIONING
The initial steps for commissioning are professional installation and the electrical connection of the wall box.
For more information in the installation instructions:
>> The installation instructions can be found here <<
![]() The installation and commissioning of the wall box must be carried out only by a trained and authorised electrician.
The installation and commissioning of the wall box must be carried out only by a trained and authorised electrician.
The laws, standards and installation regulations of the respective country must be adhered to!
DIP SWITCH
After the wall box has been installed, the Ethernet cable can then be connected. The DIP switches must be set correctly on the board.
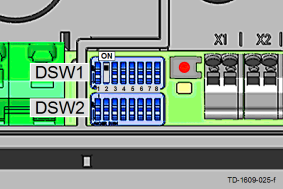
The upper DIP switch (DSW1) are used for general configuration of the wall box, for example, to set the maximum charge current.
With the lower DIP switches (DSW2) are for how the network is configured.
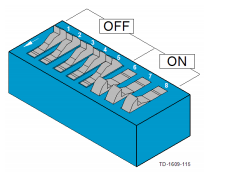
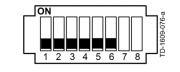
In the adjacent image, this is to show the switch positions; on / off.
DSW1 positions
For communication between wall box and mini server can be established, the UDP interface must be activated at the wall box.
Set to the DIP switches to a DSW1.3.
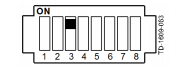
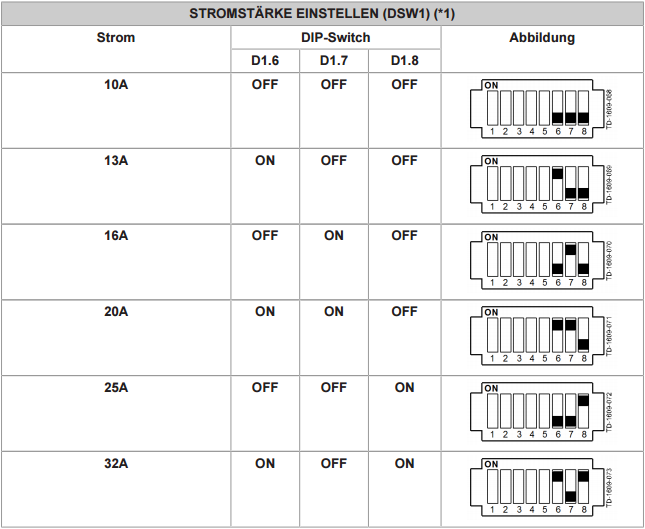
Use the dip switches to DSW1.6 DSW1.8 the maximum charging current can be set.
DSW2 positions
In the second row, among other things, the network configuration is made.
Thus, the wall box is assigned an IP address automatically, the DIP switches must be turned off to DSW2.1 DSW2.6.
![]() If the Keba Wallbox a static IP address assigned to it so this is only possible in the range 192.168.25.11 to 192.168.25.26. For this reason, we recommend the dynamic address assignment, as described above.
If the Keba Wallbox a static IP address assigned to it so this is only possible in the range 192.168.25.11 to 192.168.25.26. For this reason, we recommend the dynamic address assignment, as described above.
The further adjustment of the DIP switches, as well as information about the startup mode of the wall box are the instruction manual to remove.
![]() If the DHCP server is unreachable during a restart of the wall box it will not get an IP address assigned and is thus disconnected from the network.
If the DHCP server is unreachable during a restart of the wall box it will not get an IP address assigned and is thus disconnected from the network.
In such cases start the Wallbox again with an accessible DHCP server. The wall box will now obtain a valid IP address.
CONFIGURATION IN LOXONE CONFIG
After the wall box connected to the network and the power supply has been activated, it will be inserted with Loxone Config in the programming.
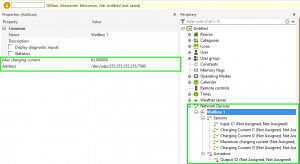
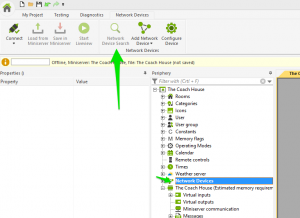
Start initially to the Loxone Config Software and connect to your Mini Server. Now load the current program from the mini server, and then click the button “Network Device Search”.
This will open the search dialog box. In “Network” tab, all network-compatible devices are now listed. Now Mark the wall box and then click the green “+” to insert the wall box in the programming.
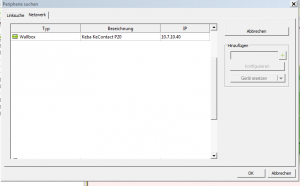
The wall box is now listed in the periphery tree.
Further programming is done with the config block “Wallbox”.