The DMX Extension is designed to integrate devices with DMX interface.
Various actuators are available in Loxone Config to integrate DMX devices. Compatible devices can also be paired.
A value of 0...100% can be output on each DMX channel. The values are scaled from 0...255.
Table of Contents
- Commissioning
- Adding a Loxone RGBW 24V Dimmer DMX
- Adding DMX devices
- Inputs, Outputs, Properties
- Safety Instructions
- Documents
Commissioning↑
The DMX Extension is installed on a DIN rail in a suitable enclosure.
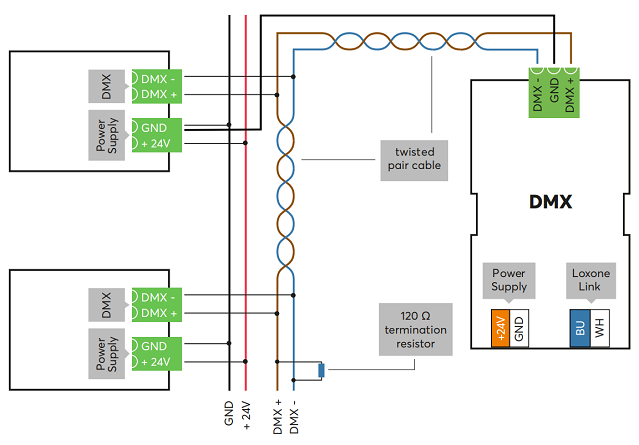
Connect the power supply, Link communication to the Miniserver and the DMX data lines.
GND must be also be connected to the DMX devices, this can also be achieved by connecting the GND of the power supplies of the respective devices. This connection is crucial for reliable data transmission.
DMX devices are daisy-chained, the last DMX device must be terminated with a 120 Ohm resistor.
For wiring, a wire pair of a Cat 5/6/7 cable is recommended, alternatively another twisted pair cable can be used.
We recommend a maximum cable length of 500m/1640ft.
The Extension starts after switching on the power supply, and the status LED will flash orange after a short time when the connection to the Miniserver is established.
Then follow the pairing procedure on the Link Interface.
Adding a Loxone RGBW 24V Dimmer DMX↑
Note: The Loxone RGBW 24V Dimmer DMX is no longer available.
To search for Loxone RGBW 24V Dimmer DMX, first click on the DMX Extension in Loxone Config, and then activate DMX Device Search.
The search results will list all connected Loxone DMX Dimmers.
Now select a dimmer, enter a name and select the actuator type, then click on Create device.
To apply the changes, save the program in the Miniserver.
Now the added RGBW Dimmers are ready for use and available in Loxone Config.
Adding DMX devices↑
Actuators need to be added to control other DMX devices. To do this, first click on the DMX Extension, and then on Add DMX Device:
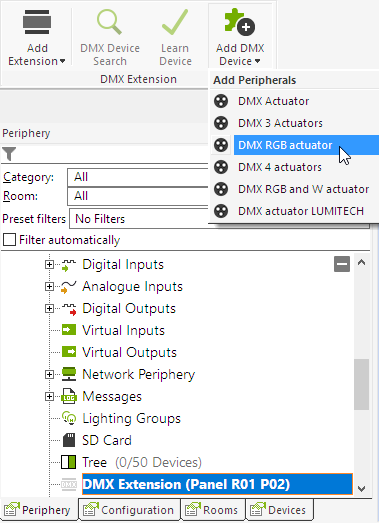
Then select an actuator to add it to the DMX Extension.
When adding actuators, they are created with ascending channel numbers. A single actuator uses one DMX channel, while an RGB actuator uses 3 channels and an RGBW actuator 4 channels.
The actuator channel number in Loxone Config must match the channel number on the device.
To apply the changes, save the program in the Miniserver.
Diagnostic Inputs↑
| Summary | Description | Unit | Value Range |
|---|---|---|---|
| Online Status DMX Extension | Indicates whether the device can be reached by the Miniserver. Diagnostics for Air devices Diagnostics for Tree devices Diagnostics for Extensions | Digital | 0/1 |
Properties↑
| Summary | Description | Default Value |
|---|---|---|
| Serial Number | Specifies the serial number of the device. Enter 'Auto' to automatically pair an Extension with unknown serial number. This can only be used if there is only one Extension of the same type on a standalone Miniserver (not in a Client-Gateway setup). Save in the Miniserver to pair the Extension. Afterwards the program must be loaded from the Miniserver to transfer the actual serial number of the Extension into the program. | - |
| Monitor Online Status | If checked, you will be notified via System Status or the Mailer if the device is no longer available or goes offline. | - |
Safety Instructions↑
Installation must be carried out by a qualified electrician in accordance with the applicable regulations.
This device must be mounted on a DIN rail in an electrical distribution enclosure to ensure protection against contact, water and dust.
Documents↑
Quick Start Guide Loxone RGBW 24V Dimmer DMX (No longer available)
User Manual Loxone 24V PWM Dimmer (No longer available)