The Button Air is an easily identifiable, battery-operated device with a large red button and an integrated LED.
The magnetic attachment to the supplied wall bracket coupled with a non-slip stand allows it to be used in many different locations.
When the Button Air is pressed, freely configurable actions can be carried out. The integrated LED is controlled either directly as an output with switch-on and switch-off duration or via the Emergency Alarm Block.
Table of Contents
Mounting↑
With the magnetic mounting plate included, the Button Air can either be mounted on the wall or, alternatively placed on any surface thanks to its non-slip stand.
Screw the mounting plate into place at a suitable location.
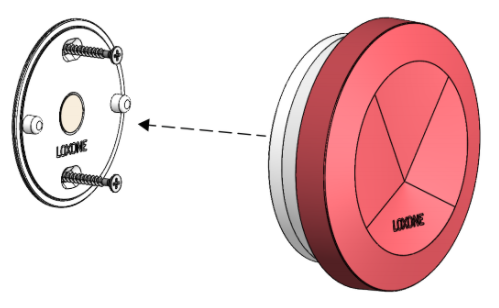
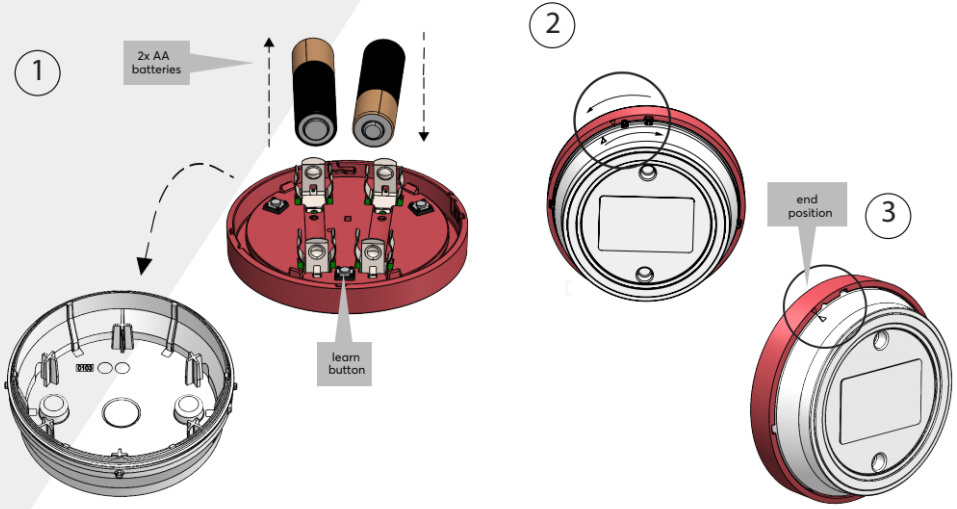
To commission the device, open it by turning the top red section anticlockwise and then removing it. Then remove the green pull tab from the batteries.
The status LED indicates that the unit is ready to be paired in. To fit the unit, observe the illustration and the markings on the housing. The unit can then be configured for use.
Commissioning↑
In delivery state, pairing mode will be active after inserting the battery. This is indicated by the status LED flashing red/green/orange.
Then follow the pairing procedure on the Air Interface.
The status LED is located on the back of the unit between the batteries. The front red button or one of the 3 buttons inside the device serves as the pairing button.
To activate the pairing mode manually, hold down the pairing button for at least 5 seconds immediately after inserting the battery.
Programming↑
There are 2 options available for configuration:
If the Button Air is assigned in the Emergency Alarm Block and therefore used for an alarm, then Button Air lights up when an alarm has been activated by a button press. The alarm can be deactivated again by a long press on the button. In addition, configuration for any purpose can be created with the digital input of the unit. To do this, drag either the device or the input from the periphery tree to the configuration page. The LED of the unit cannot be controlled manually.
Alternatively, by activating the "Use LED" tick box in the Button Air parameters, the input/output for button and LED become visible in the peripheral tree. By configuring the switch-on and switch-off duration in the parameters of the LED output, any flashing behaviour can be defined.
Use in the emergency Alarm Block is no longer possible in this variation.
In order to control the LED without delay, the wake-up function is activated in the Button Air. This will reduce the battery life.
Battery Replacement↑
To replace the batteries, open the device by turning the top red section anticlockwise and then removing it. Remove the two AA batteries and insert the new batteries.
The device will start and the status LED flashes green 3 times when ready for operation. To close the device, refer to the illustration and the markings on the housing. After that, the device can be used again.
Sensors↑
| Summary | Description | Value Range |
|---|---|---|
| I | Input is active when the button is pressed. | 0/1 |
Actuators↑
| Summary | Description | Value Range |
|---|---|---|
| LED | As long as this output is active, the LED flashes at the set interval. The output is only visible if the option "Use LED as Output" has been activated on the unit. | 0/1 |
Diagnostic Inputs↑
| Summary | Description | Unit | Value Range |
|---|---|---|---|
| Online Status Button Air | Indicates whether the device can be reached by the Miniserver. Diagnostics for Air devices Diagnostics for Tree devices Diagnostics for Extensions | Digital | 0/1 |
| Battery level | Provides the current battery level. | % | 0...100 |
| Battery low | Indicates low battery, battery needs to be replaced. | - | 0/1 |
Properties↑
| Summary | Description | Default Value |
|---|---|---|
| Monitor Online Status | You will be notified via System Status or Could Mailer if the device is no longer available or offline. As this device and it's functionality are critical to safety, it is not possible to disable this setting for this device. | - |
| Serial Number | Serial number of Air device. Automatic pairing can be enabled on the Air Base. Automatic pairing can be enabled on the Airbase for a set time. | - |
| Use LED as Output | If ticked, the LED can be used as an Output in the configuration. In this case, use with the Emergency Alarm block is no longer possible. If the device is already used in an Emergency Alarm block, this option is deactivated. | - |
| Display Error Output | If checked, error output will be displayed in 2nd row. | - |