BASIC FUNCTIONALITY
By using Autopilot Designer, you can set up some small bits of custom logic without having to go into Loxone Config. Autopilot logic can be created through the Loxone app or the Loxone Web interface.
The basic principle of Autopilot Designer is simple “If this, then do that” logic that allows you to set up a whole range of different functions based on different criteria. Please bear in mind that because Autopilot Designer is a powerful tool, it is possible who has access to these through Loxone Config, so you will need to ensure that this is setup for anyone who wishes to use Autopilot Designer.
CREATING AUTOPILOTS
Autopilots are created using the Loxone App or they can be created through the Loxone Web Interface. A very brief overview of what Autopilot Designers can do can be viewed in this video
In order to setup Autopilots, you will need to navigate to the Autopilot Designer which is found in the same location for both, the Web Interface and the Loxone App.
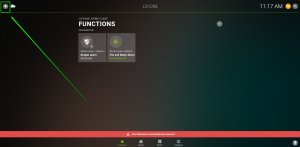
Firstly, press to location bubble in the top left corner of the screen
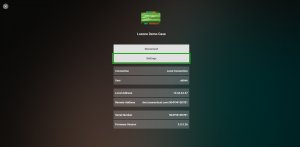
Once in that screen, you can then navigate to the settings menu
From within the settings, you can then enter the Autopilot designer and setup any custom events you would like.
There are limitations on what can be used. The following object can be used as events for Autopilots:
- Time
- Categories
- Operating Modes
- Weather data
These different objects can be combined in all kinds of different ways to achieve any form of custom logic you may desire post-config.
With those objects in mind, in order to set up an Autopilot, simply open the Autopilot Designer and you will be greeted with this interface
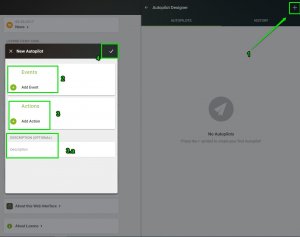
1. Pressing this will open the “New Autopilot window”
2. Here you can add events. These include the times, Operating Modes and categories that exist within config. This is the “If” part of the logic, so “if this event happens, do the action”
3. The Actions section is where you set up the “do” part of your logic. Once the above event occurs, this action will take place. This is where you can change operating modes, change lighting moods etc.
3a. A description can be added here to roughly outline what your Autopilot is doing. This is the name the block will use within Loxone Config
4. Pressing this button will complete your Autopilot design and add it to the Autopilots list.
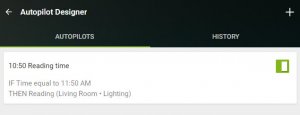
In the above example, I have set up an Autopilot that will change the living rooms light mood to “Reading” at 10:50 am. Notice how you can also toggle whether or not it is actually active via the switch on the right-hand side.
WITHIN CONFIG
Once you have created Autopilots, they will then be added into the Config file. It is crucial that you load from the Miniserver, as if you save-in and don’t merge when the window asking you to do so appears, you will lose any autopilots that were set up after the config changes.
![]()
It is crucial you load-from a Miniserver if Autopilots have been used. Failing to do so will result in loss of any Autopilots that have been set up.
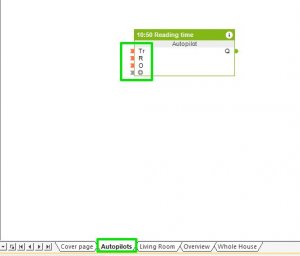
Once you have created Autopilots within the Loxone App or web interface, a new page will appear if you load from the Miniserver in config. This page will house all Autopilots that have been set up, naming them via their description.
By using the block withing Loxone Config, you can set up extra logic around the autopilot. Please bear in mind that if this Autopilot is a core part of any logic that you have set up, then it will break if this Autopilot is deleted.
Double-clicking on an Autopilot block will open up a window that shows you the logic behind the Autopilot. It will also provide a small amount of extra information on the logic behind it (such as which lighting controller being used).
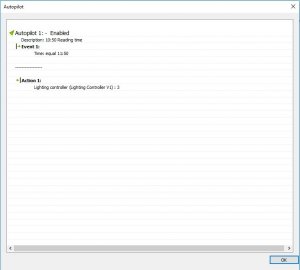
Here you can see that this is the logic from the previous example. Here you can see the added details, such as the time = <value>, the lighting controller in use and whether or not it’s enabled (not currently active, but will become active if it’s criteria is met).
INPUTS
| Input | Type | Function |
| Tr | Digital Input | Allows the toggling on/off of the Autopilot. |
| R | Digital Input | A discrete OFFfor the Autopilot. This will only ever turn it off, never on. |
| O | Digital Input | A discrete ON for the Autopilot. This will only ever turn it on, never off. |
OUTPUTS
| Output | Type | Function |
| Q | Digital Output | On when the Autopilot is enabled. |