The Automatic Shading integrated function block is used to control shading devices such as blinds, roller shutters, curtains or awnings.
It is used with shading devices that have an integrated interface for control. (Loxone Ready)
In addition to manual operation, shading can be automated, based on sunlight and room temperature, in combination with Intelligent Room Controller.
The goal is to avoid overheating of a room due to solar radiation.
Table of Contents
- Inputs
- Outputs
- Parameters
- Properties
- Programming example
- Functional Description
- Direction parameters
- Start / End offsets
- Slat adjustment
- Enable Sun Position Automatic via User Interface
- Timing Diagram
- History
Inputs↑
| Abbreviation | Summary | Description | Unit | Value Range |
|---|---|---|---|---|
| Tg | Toggle | Toggles between open, stop, close. For single button control. | - | 0/1 |
| Po | Partial open with push & hold | - | 0/1 | |
| Pc | Partial close with push & hold | - | 0/1 | |
| Co | Complete open | If in motion, stops. | - | 0/1 |
| Cc | Complete close | If in motion, stops. | - | 0/1 |
| So | Slightly open | Venetian blinds close completely and move slats into shading position. Roller blinds, curtains and awnings move into position according to parameter (Sop). | - | 0/1 |
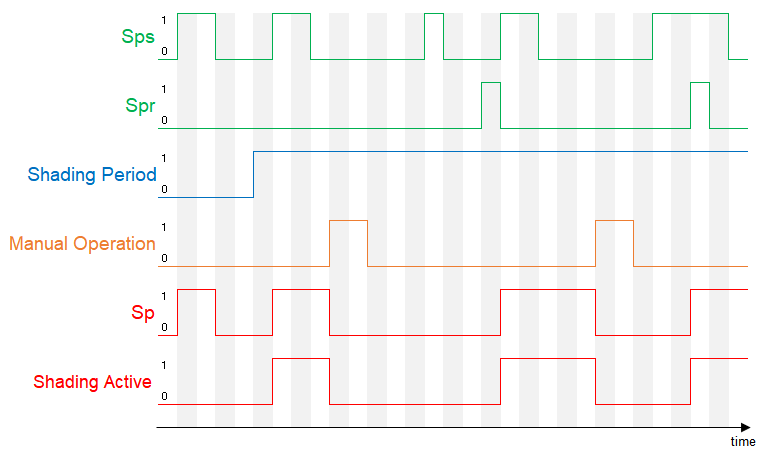
| Sps | Sun position automatic start | Activates the sun position automatic when On at the beginning of the shading period, or also with a pulse during the shading period. The sun position automatic is deactivated for the rest of the day, if block is operated manually. Pulse on (Spr) followed by a rising edge on (Sps) or pulse on (Spr) while (Sps) is active, restarts the sun position automatic. | - | 0/1 |
| DisSp | Disable sun position automatic | Disables the sun position automatic when On. | - | 0/1 |
| Spr | Sun position automatic restart | Pulse followed by a rising edge at input (Sps) or pulse while input (Sps) is active, restarts the sun position automatic. | - | 0/1 |
| Wa | Wind alarm | Moves shading to the wind alarm position set in parameter (Wap) and locks the block(can still be operated through the App/Webinterface). Used for storm protection. Active Automatic is only suspended instead of cancelled. After Wa end, automatic is restarted with a positive edge on Sps or of the sunshine-systemvariable. Automatic conditions are not re-evaluated on end on windalarm. If both conditions are permanently active during windalarm, automatic can be restarted via pulse on Spr. The name of the connected sensor is used in the user interface. | - | 0/1 |
| Dwc | Door/window contact | Opens shading completely and locks the block when On. Manual operation via user interface is still possible. (0 = closed, 1 = open). | - | 0/1 |
| Off | Off / Lock | Pulse (< 200 ms): Stops movement. Pulse (> 200 ms): Block is locked. Dominating input. Pulse (> 500 ms): The name of the connected sensor is used in the user interface. | - | 0/1 |
| Pos | Position of shading | Move the shading to the specified position. | % | 0...100 |
| Slat | Position of slats | Move the slats to the specified position. This input is only visible in certain configurations. | % | 0...100 |
| T5 | T5 control | Button 1: Complete open Button 4: Complete close | - | ∞ |
| DisPc | Disable periphery control | Disables inputs Tg, Po, Pc, Co, Cc, So, T5 when On. (e.g Child lock, cleaning) Control via user interface is still possible. | - | 0/1 |
Outputs↑
| Abbreviation | Summary | Description | Value Range |
|---|---|---|---|
| Pos | Position of shading | 0.0 = open, 1.0 = closed | 0...1 |
| Slat | Position of slats | 0.0 = horizontal, 1.0 = vertical This output is only visible in certain configurations. | 0...1 |
| Im | In motion | Blinds in motion | 0/1 |
| Blk | Motor blocked | This output is only visible in certain configurations. | 0/1 |
| Obs | Obstacle | 1 = an obstacle has been detected. This output is only visible in certain configurations. | 0/1 |
| Sp | Sun position automatic | On, if input (Sps) = 1 and input (DisSp) = 0 ...and if the setting “Use sunshine variable” is checked and the sun is shining, or if the Automation based on sun position is switched on in the App. | 0/1 |
| Wds | Wind, door/window contact state | Active when input (Wa) or input (Dwc) is 1. | 0/1 |
| Off | Off | Active when input (Off) is 1. | 0/1 |
| API | API Connector | Intelligent API based connector. Can link several functions between devices and blocks. API Commands | - |
Parameters↑
| Abbreviation | Summary | Description | Unit | Value Range | Default Value |
|---|---|---|---|---|---|
| Wap | Wind alarm position | 0 = Completely open 1 = Completely closed | - | 0/1 | 0 |
| Spe | Sun position automatic end action | 0 = No action 1 = Complete open 2 = Complete close 3 = Set slats horizontal | - | 0...3 | 1 |
| Spm | Sun position automatic mode | 0 = Optimal brightness - no direct sunlight, with as much light as possible. Automatic remains off with closed shading. If the input (Sps) is active, a pulse on (Spr) restarts the sun position automatic. 1 = Optimal cooling - blocks even more solar radiation, but also results in lower brightness. Automatic remains off with closed shading. If the input (Sps) is active, a pulse on (Spr) restarts the sun position automatic. 2 = Optimal brightness - no direct sunlight, with as much light as possible. Automatic is activated even when the shading is closed. 3 = Optimal cooling - blocks even more solar radiation, but also results in lower brightness. Automatic is activated even when the shading is closed. | - | 0...3 | 1 |
| Tlc | Time long-click | Long-click duration on inputs (Po), (Pc) for complete open / close. If you prefer a double-click, then set the value > (Opd) or (Cld). 0 = Always start complete travel. | - | ∞ | 3 |
| Tdc | Time double-click | Double click duration on inputs (Po), (Pc) for complete open / close. 0 = Not used | s | 0...∞ | 0,3 |
| Dir | Compass direction | Compass direction of the window: 0 = north 90 = east 180 = south 270 = west -1 = not configured | - | -1...360 | -1 |
| Dts | Direction tolerance start | Direction tolerance for the sun position automatic when the sun enters the shading area. | ° | 0...90 | 85 |
| Dte | Direction tolerance end | Direction tolerance for the sun position automatic when the sun exits the shading area. | ° | 0...90 | 85 |
| Spi | Sun position automatic interval | Specifies how often the slats may adjust during sun position automatic control. This parameter is only visible in certain configurations. | min | 1...∞ | 60 |
| Spos | Sun position automatic start offset | Start offset of the sun position automatic relative to Sunrise. | min | -90...90 | 30 |
| Spoe | Sun position automatic end offset | End offset of the sun position automatic relative to Sunset. | min | -90...90 | -30 |
| Sop | Slightly open position | Position used for input (So) and (Sps). This parameter is only visible in certain configurations. | - | 0...1 | 0,8 |
| Sw | Slat width | Width of the slats. This parameter is only visible in certain configurations. | mm | 0...∞ | 70 |
| Sd | Slat distance | Distance between two horizontal slats. This parameter is only visible in certain configurations. | mm | 0...∞ | 60 |
| Spu | Slat position upwards movement | Relative slat position in percent 0 = Slats are horizontal during upwards movement 50 = Slats are horizontal at 50%, and during upwards movement are turned inwards This parameter is only visible in certain configurations. | % | 0...50 | 0 |
Properties↑
| Summary | Description | Value Range | Default Value |
|---|---|---|---|
| Use sunshine variable | Sun position automatic is only activated if the system variable Sunshine and the input Sps are active. | - | - |
| Number of activity entries | Number of entries in the activity log. 0: log is disabled The activity log tracks relevant changes since program start. | 0...100 | 20 |
Programming example↑
You can create this block by dragging a shading motor with integrated interface from the periphery tree to the programming page.
If you add the block manually, a shading motor must be assigned to it.
A Loxone Touch is connected to the block via the T5 input, for operation according to the Loxone Switch Standard.

In addition, the compass direction is specified in parameter (Dir), to ensure that the sun position automatic is only activated when the sun is actually shining on the window. On demand, the Intelligent Room Controller requests shading via the output (Shd) to the input (Sps) of the Automatic Shading block.
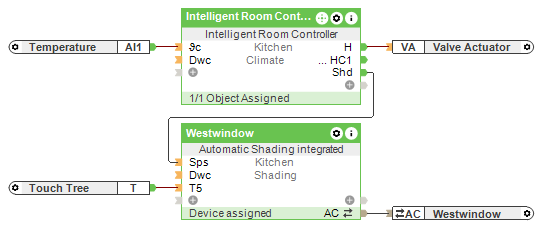
When using venetian blinds, the parameters Sw, Sd must also be set for them to be controlled correctly.
Functional Description↑
When configured with the recommended settings, the sun position automatic is activated when the room controller enables it via input (Sps). If however, the sun position automatic is activated manually, e.g. via App, the signal from the room controller is not required.
The sun position automatic begins when the sun reaches the shading area and ends when it passes.
During this time, the slats are adjusted according to the angle of the sun. At the end, the blinds move to the position specified with parameter (Spe).
Manual shading, independent of the sun's position, can be triggered via input (So) or in the App with "Slightly open". The slats are then adjusted horizontally.
The sun position automatic can be deactivated via input (DisSp).
If the blinds are operated manually during shading period (e.g. using an app), then the sun position automatic is deactivated for that shading period. To reactivate the automatic control, a pulse on input (Spr) or activation via user interface is necessary.
 | When the sun position automatic is activated, the blinds may not adjust immediately. Shading only starts based on the position of the sun and the related parameters. |
Output (Sp) indicates whether the sun position automatic is active.
To control multiple blinds simultaneously, the corresponding central function block is used.
Additional inputs, outputs and parameters may be required if standard push buttons are used or additional logic is programmed.
Direction parameters↑
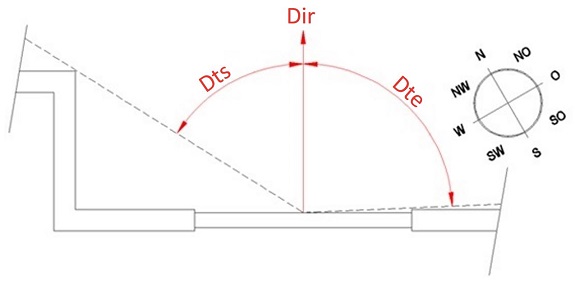
Dir: Compass direction of the shading device relative to the geographical north. (0 = North, 90 = east, 180 = south, 270 = West)
Dts: Direction tolerance when the sun enters the shading device. The directional tolerance is relative to the perpendicular angle of the shading device. Consider, for example, building protrusions. If your shading device is not affected, you can leave this at its default value of 85º.
Dte: Direction tolerance when the sun exits the shading device. The directional tolerance is relative to the perpendicular angle of the shading device. Consider, for example, building protrusions. If your shading device is not affected, you can leave this at its default value of 85º.
Start / End offsets↑
With parameter (Spos), the sun position automatic will be delayed by this number of minutes after sunrise.
This is relevant for windows that may not get the sun directly after sunrise.
With parameter (Spoe), the sun position automatic will be brought forward by this number of minutes before sunset.
This is relevant for windows that may be affected by the sun prior to sunset.
There are two possible applications for the two parameters:
Often the sun is obscured by other buildings, structures or trees after sunrise and before sunset. Here, the start or end time of the sun position automatic can be adapted to accommodate for these.
Another possibility is to shift the times so that sunrise or sunset can be seen with the shading open.
Slat adjustment↑
When the sun position automatic is active, the blind slats are adjusted based on the sun's position.
The slats are tilted to an angle that prevents any direct sunlight from entering in between them.
Generally, the adjustment is carried out at the intervals set with parameter (Spi), but only at 15° increments, and only if necessary.
If, for example, the sun's path is at a relatively constant angle, its elevation will hardly change. For this reason, an adjustment is not necessarily carried out at every interval.
When the sun is rising, the value required at each interval is calculated and the slats are adjusted if necessary.
When the sun is setting, the value required for the following interval is calculated at each interval and the slats are adjusted if necessary.
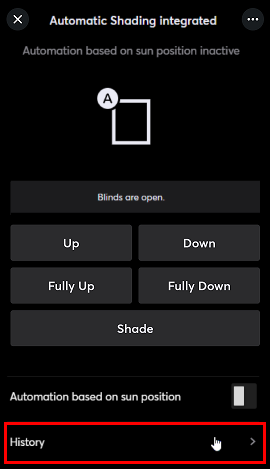
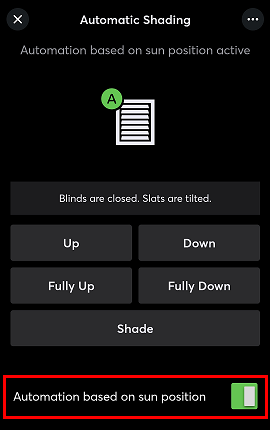
Enable Sun Position Automatic via User Interface↑
The sun position automatic can be started manually via the user interface, thereby blinds are lowered when the sun is at the window. Whether the sun is shining, it is cloudy, or the Sps input of the block is active or not is not taken into account.
Timing Diagram↑
History↑
In the user interface, the history of the function block can be displayed.
A maximum of 100 entries can be shown.
When you restart or save to the Miniserver, the history is cleared.