The LOXONE Digital Experience Tour
Free & Interactive
Your digital sales representative that is set up to inspire and convince your customers.
Differentiation
Offer your customers an experience they will never forget and set yourself apart from the competition.
Self-explanatory
The system demonstrates its capabilities and gives your customer an in-depth insight into the LOXONE world.
What is the Digital Experience Tour?
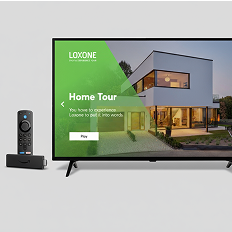
Videos produced by LOXONE that bring the space around you to life. In the Smart Home Tour, LOXONE features are activated directly in your showhome at defined times. Lights and shading adjust automatically when their functions are explained in the video. This allows interested parties to experience LOXONE up close.
All you need is a presentation room, the free LOXONE Digital Experience Tour app, and a selection of recommended products for an optimal customer experience. Video variants for commercial use, special applications, and more are also available.
Download the app now
What our Partners say
Here’s what our customers say
QUOTE
“An excellent experience where you can learn about what a smart home with LOXONE is and what advantages it offers through a great demonstration.”
QUOTE
“The tour gave us a great insight into the world of LOXONE. We were able to test and experience all the components.”
Quote
“Very informative tour. Even for us as enthusiastic LOXONE users. We got a lot of inspiration for additions and integration of other devices.”
Products for your Experience Tour
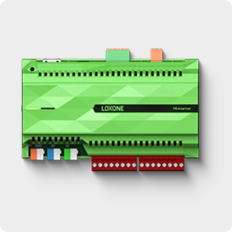
Miniserver
The Miniserver is the heart of the Digital Experience Tour. It controls lighting, shading, audio, and much more, allowing visitors to experience the world of LOXONE live.
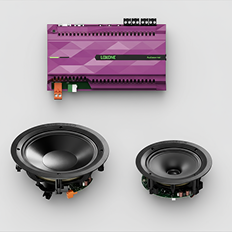
Audioserver and Speaker
The Audioserver complements your setup with smart multiroom audio. While the TV handles the main sound, ringtones, alarms, and sound effects can be optimally reproduced via the Audioserver – for an immersive experience.
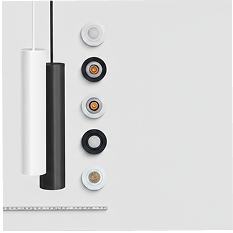
Lighting with three light circuits
The Digital Experience Tour impressively demonstrates how light can change moods. With basic, accent, and indirect lighting, interested parties can experience live how scenes automatically adjust and set the scene in the room.
Shading control
During the tour, the shading also reacts dynamically to the video. Blinds or curtains automatically darken the room, demonstrating how LOXONE ensures comfort and energy efficiency.
Fire TV device
For the best performance, we recommend a current Fire TV device such as the Fire TV Stick 4K Max or Fire TV Cube. Only the latest generations reliably support all functions of the Digital Experience Tour.
Implement in three steps

Step 1
Download the app and follow the automatic guide
Connect the Fire TV Stick and download the free LOXONE Digital Experience Tour app. When you start it for the first time, a setup guide will walk you through the basic setup.
Step 2
Create virtual text input & connect to the Function Blocks
In LOXONE Config, create a virtual text input and connect it to the API Connector. This way, the app’s commands are automatically forwarded to the appropriate blocks.
Step 3
Select desired videos and bring the space to life
Start the tour, check the processes, and adjust lighting scenes, shading, or audio as needed – for a perfect customer experience.
Tips & Tricks
How do I set up the Digital Experience Tour?
When you start the app for the first time, a setup guide will walk you through the process of setting up the Digital Experience Tour. You can also set it up manually, of course. The Digital Experience Tour uses the following Function Blocks, which are connected to the API Connector:
- Lighting Control
- Automatic Shading,
- Integrated Automatic Shading or Central Shading
- Audio Player
How do I use a virtual text input?
The Digital Experience Tour transmits the command via the network to a virtual text input, which we create in LOXONE Config and then connect to the API Connector of the Function Blocks. We name the virtual text input after the room we are using, for example, “Showroom.”
Tip: Make sure that your virtual text input has a unique name and that no other Function Block or room favorite that you use has the same name.
Now simply drag the virtual text input to any other Function Block for which you have installed products. Done! The virtual text input receives the corresponding command fully automatically from the LOXONE Digital Experience Tour app and forwards it to the corresponding blocks in the configuration.
Important: Only use one type of Function Block and do not mix them. For shading, for example, use either the Automatic Shading block OR the Integrated Automatic Shading block OR the Central Automatic Shading block.
What rights must the new user have?
Now create a new user with at least the following rights:
- Website/App
- Right for internal & external access to the virtual text inbox
How do I create a lighting mood for the Digital Experience Tour?
For the Digital Experience Tour, different lighting scenes with different IDs must be created in LOXONE Config. The ID is required to ensure that the correct lighting scene is started. We recommend making the fine adjustments to the lighting scenes in the free LOXONE App.
Note: To create IDs from 70 onwards, you must first create a total of 8 scenes in LOXONE Config in order to use IDs 1–8. For lighting scenes with colour changes, we recommend a change interval of 6 seconds.
How can I play audio for the Digital Experience Tour?
There are two options for audio playback of the Digital Experience Tour:
- Playback of all sound, including effect sounds (ring tone, alarm, sound check) via the TV
- Recommended: Play the video’s audio track via the TV and the sound effects via the LOXONE Audioserver. To do this, simply connect the virtual text input to the audio player in LOXONE Config.
What is the functionality test?
In the function test, you can see all commands sent to the Miniserver with timestamps. If you now click on one of the commands, it will be sent immediately and you should see the reaction in the room. If there is no reaction, your app is not properly connected to the Miniserver.
How do I control the Digital Experience Tour using a Touch Pure Flex?
The Digital Experience Tour can also be controlled via web commands – for example, if you have a Touch Pure Flex and want to start a specific tour at the touch of a button.
Important: The Digital Experience Tour app must be open on the Fire device.
- Create a virtual output in LOXONE Config. The address is structured as follows:
- http:User:Password@IP address of the Fire TV Stick:8080/
- The username and password refer to the config user, which is also stored in the DET settings. The IP address of the Fire TV Stick can be found in the Fire TV Stick settings.
- Create virtual output commands using your desired commands from our command list:
- Command when ON: Desired command (e.g., “Play?id=4&lang=en-us” to start the video with ID 4 in English with Audioserver)
- You then link the virtual output command to one of the touch points on the Touch Pure Flex. The display type of the touch point must be “Button.”
Command list:
- High: up
- Down: down
- Left: left
- Right: right
- Confirm: select
- Back: back
- Lock/unlock settings: lock/settings
- Play: play?id=4,5,6&lang=de-as/nas
- Language code: Please refer to the JSON for the respective video at: https://dsr.loxone.com/dede/contentDET.json
- Video IDs: Home Tour: 4, Office Tour: 5, Powershow: 6
What network settings must the Miniserver have?
To ensure a correct function of the Digital Exprience Tour the Minisierver Network Configuration must be “HTTP enabled” under “Network ports”.
FAQs
Which Fire TV device should I use?
We recommend an Amazon Fire TV Stick 4k Max or a Fire Cube for the Digital Experience Tour. We have extensively tested both device types for errors and performance.
If a Fire TV device is currently unavailable from any provider and you are looking for an alternative device, please note the build model number of the respective device. Supported devices (including build model number): Fire TV Cube (2nd & 3rd Gen ; AFTR & AFTGAZL), Fire TV 4-Series (AFTTI), Fire TV Stick Lite & Fire TV Stick HD (AFTSS), Fire TV Stick (3rd Gen; AFTSSS), Fire TV Stick 4K Max (AFTKA), Fire TV Stick 4K Max (2nd Gen; AFTKM). Compare the build model number supported by the DET with the one from the official Amazon product page.
Which light circuits are recommended?
We recommend different lighting circuits, e.g., LED spots RGBW for basic lighting, LED Pendulum Slim for accent lighting, and RGBW LED strips for indirect lighting.
Why am I getting a 401 or 403 error?
If you receive a 401 or 403 error message when using the app, this could mean that the user created in the configuration does not have sufficient rights to use these commands. Check the user’s rights.
Why am I getting a 404 error?
If you receive a 404 error, this could mean that the connection to the Miniserver has failed. Check the network settings in the Digital Experience Tour app and whether the Miniserver is generally accessible on the local network.
The Miniserver does not respond, I do not receive an error message
Check the username and password of the Miniserver user you have set up, as well as the rights you have assigned. Activate the display of error messages in the settings and check which error messages are being displayed.
Does the DET work with a Gateway Miniserver?
No, the virtual text input must be connected within the client Miniserver through which the functions are executed.
Why am I getting an IOException?
An IOException means that the connection is not working properly. The problem could be:
Your FireTV device does not have an internet connection.
Your FireTV device and your Miniserver are not on the same network.
Your port may not be set correctly.
I've tried everything and it still doesn't work. What should I do?
Send a log file from the Digital Experience Tour app menu, including your email address, and contact LOXONE Support.