The EnOcean Extension is designed to integrate devices with EnOcean wireless interface.
From the Loxone Library suitable templates for the integration of devices can be imported.
Table of Contents
- Commissioning
- Pairing EnOcean devices
- Adding an Universal EnOcean Device
- Inputs, Outputs, Properties
- Safety Instructions
- Documents
Commissioning↑
The EnOcean Extension is installed on a DIN rail in a suitable enclosure.
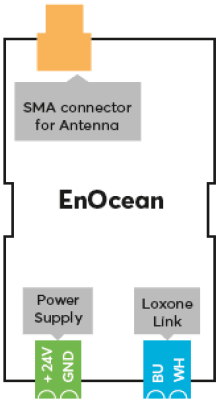
Connect the power supply, Link communication to the Miniserver and install the SMA antenna.
 | To ensure optimal signal quality, use the optionally available rod antenna. If the enclosure is made of metal, install the antenna outside the enclosure using the SMA extension cable that is supplied with the rod antenna. Alternatively, a flat self-adhesive SMA antenna is available. |
The Extension starts after switching on the power supply, and the status LED will flash orange after a short time when the connection to the Miniserver is established.
Then follow the pairing procedure on the Link Interface.
Pairing EnOcean devices↑
To search for EnOcean devices, first click on an EnOcean Extension in Loxone Config, and then activate EnOcean Device Search.
| Pairing procedures may vary depending on the manufacturer. |
The window that opens will list all EnOcean devices that were activated while searching. To get devices to appear during the search, you have to activate them:
Button - press the button.
Motion sensor - press the pairing button.
Window sensor - use the magnetic contact of the window sensor to change the current state.
Actuators - press the pairing button.
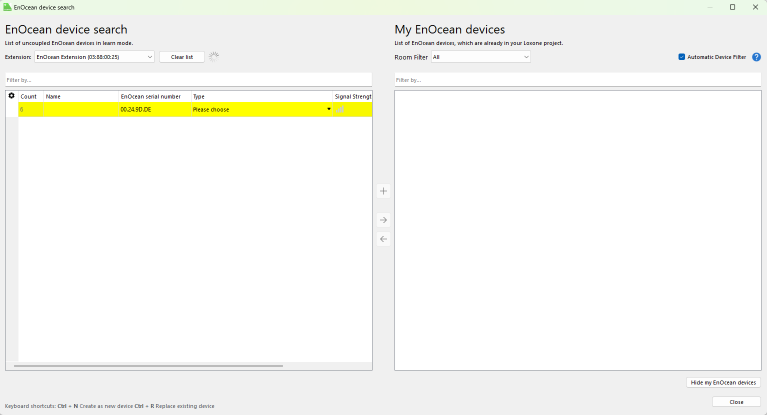
To apply the changes, save the program in the Miniserver.
Now the added devices are ready for use and the functions are available in the Periphery tree in Loxone Config.
Adding an Universal EnOcean Device↑
Universal EnOcean devices allow you to integrate sensors and actuators that are not pre-defined in Loxone Config.
Supported Telegram Types:
The following telegram types are supported:
RPS (05 / F6)
1BS (06 / D5)
4BS (07 / A5)
Adding a Universal Device in Loxone Config
A user-defined EnOcean device can include both actuators and sensors.
1. Create a Universal EnOcean Device:
2. Select the appropriate unit type for your use case.
3. Add sensors and actuators to the newly created device.
4. Configure bit range properties:
Set the lower and upper bit ranges of the sensors and actuators in the device properties.
Refer to your device's manual for supported value ranges.
5. Use the EnOcean Monitor to view the data transmitted by the device.
Example - Reading Button Data:
Button press sends: 0x70
Button release sends: 0x00
Binary for 0x70 = 0111 0000
Binary for 0x00 = 0000 0000
Bits 4, 5, and 6 can be used for a digital actuator (LSB = Index 0).
For analog sensors, you must define the value range based on the sensor documentation.
Supported Sensor Types
The Loxone EnOcean Extension supports a wide variety of wireless sensors, including:
Presence sensor: 0 = no presence / 1 = presence
Window handles: 0 = closed / 1 = open / 2 = tilted
Humidity sensor: 0-100%
Contact sensor: 0 = open, 1 = closed
Light, temperature, and occupancy sensors:
Type 1: 0-510 Lux, 0-+51°C
Type 2: 0-1020 Lux or 0-+51°C
Type 3: 0-1530 Lux or -30-+50°C
Light sensors:
Type 1: 300-60000 Lux
Type 2: 0-1024 Lux
Room controllers: Below is an overview of supported EEP profiles, their values, and the range of supported sensors:
| EEP 07-10-01/A5-10-01 | EEP 07-10-02/A5-10-02 | EEP 07-10-03/A5-10-03 |
| EEP 07-10-04/A5-10-04 | EEP 07-10-05/A5-10-05 | EEP 07-10-06/A5-10-06 |
| EEP 07-10-07/A5-10-07 | EEP 07-10-08/A5-10-08 | EEP 07-10-09/A5-10-09 |
| EEP 07-10-0A/A5-10-0A | EEP 07-10-0B/A5-10-0B | EEP 07-10-0C/A5-10-0C |
| EEP 07-10-0D/A5-10-0D | EEP 07-10-10/A5-10-10 | EEP 07-10-11/A5-10-11 |
| EEP 07-10-12/A5-10-12 | EEP 07-10-13/A5-10-13 | EEP 07-10-14/A5-10-14 |
| EEP 07-10-15/A5-10-15 | EEP 07-10-16/A5-10-16 | EEP 07-10-17/A5-10-17 |
| EEP 07-10-18/A5-10-18 | EEP 07-10-19/A5-10-19 | EEP 07-10-1A/A5-10-1A |
| EEP 07-10-1B/A5-10-1B | EEP 07-10-1C/A5-10-1C | EEP 07-10-1D/A5-10-1D |
| EEP 07-10-1E/A5-10-1E |
Each profile (e.g., A5-10-01 to A5-10-1E) includes combinations of:
Temperature sensor: typically 0-40°C or -10 to +41.2°C
Humidity sensor: 0-100%
Controller: 0-255 or 0-63
Fan control: 0-255 or 0-7
Light sensor: 0-1000 Lux or brightness
Input voltage: 0-5V
Presence or motion detection
Switches & buttons
Switches: 0 = off, 1 = on
Buttons: 0 = not pressed, 1 = pressed (2-, 4-, 8-button configurations supported)
Temperature & humidity sensor types
Combined: 0-+40°C, 0-100% humidity
Temperature sensors: type 1 -40-0°C to type 23 +50-+130°C
Supported Actuator Types
The Loxone EnOcean Extension also supports the following actuator types based on EnOcean technology:
Dimmer: 0-100%, 4BS Telegram (EEP A5-38-08)
Relay: 0 = open, 1 = closed, RPS Telegram (EEP F6-02-01)
Blind/shutter actuator: RPS Telegram (EEP F6-02-01)
Universal actuator: RPS Telegram (EEP F6-03-01)
General actuator: 4BS Telegram (EEP A5-20-01)
| Refer to the manufacturer or supplier for the correct EEP number and value range for each sensor or actuator. |
Diagnostic Inputs↑
| Summary | Description | Unit | Value Range |
|---|---|---|---|
| Online Status EnOcean Extension | Indicates whether the device can be reached by the Miniserver. Diagnostics for Air devices Diagnostics for Tree devices Diagnostics for Extensions | Digital | 0/1 |
Properties↑
| Summary | Description | Default Value |
|---|---|---|
| Serial Number | Specifies the serial number of the device. Enter 'Auto' to automatically pair an Extension with unknown serial number. This can only be used if there is only one Extension of the same type on a standalone Miniserver (not in a Client-Gateway setup). Save in the Miniserver to pair the Extension. Afterwards the program must be loaded from the Miniserver to transfer the actual serial number of the Extension into the program. | - |
| Switch style USA | Top position OFF (Europe), bottom position OFF (USA) | - |
| Monitor Online Status | If checked, you will be notified via System Status or the Mailer if the device is no longer available or goes offline. | - |
Safety Instructions↑
Installation must be carried out by a qualified electrician in accordance with the applicable regulations.
This device must be mounted on a DIN rail in an electrical distribution enclosure to ensure protection against contact, water and dust.