The Audio Player block defines an audio zone, usually a room or area of a building where targeted sound reinforcement is required. It works with the stereo outputs of the Audioserver or a Stereo Extension, and with master-client loudspeakers (Master-Client Technology) connected via the Tree Turbo interface of the Audioserver or Miniserver Compact.
In larger rooms, several speaker outputs can be assigned to the same Audio Player block, whether they are passive or Master-Client speakers.
For each speaker, you can set whether it plays the left channel, the right channel, or the sum of both (stereo downmix). The stereo downmix is recommended in most cases, as it provides the most balanced audio quality.
Tartalom
- Bemenetek
- Paraméter
- Kimenetek
- Tulajdonságok
- Programming example
- LOXONE App
- Internetes rádió
- Spotify
- Könyvtár
- USB
- SMB Access to SD Card
- Network share
- Vonalbemenet
- AirPlay
- Text to Speech (TTS)
- Eseményhangok / Egyéni hangok
- Jelenlét szimuláció
- Előzmények
- Settings
Bemenetek↑
| Rövidítés | Rövid leírás | Leírás | Mértékegység | Értékhatár |
|---|---|---|---|---|
| V+ | Volume+ | Növeli a hangerőt a (Vsts) paraméterben meghatározott léptékkel. Dupla kattintással kiválasztja a következő kedvencet. | - | 0/1 |
| V- | Volume- | Csökkenti a hangerőt a (Vsts) paraméterben meghatározott léptékkel. Dupla kattintásra kikapcsolja a lejátszót. | - | 0/1 |
| V | Set volume | Ha a lejátszó kikapcsolt állapotban van, a lejátszás automatikusan el fog indulni. | % | 0...100 |
| Play | Play | Lejátszás | - | 0/1 |
| Pause | Pause | Szünet | - | 0/1 |
| P | Presence | Elindítja a lejátszást ha 1. | - | 0/1 |
| Prev | Previous track | Előző szám | - | 0/1 |
| Next | Next track | Következő szám | - | 0/1 |
| Fav | Set favorite | Kiválasztja a kedvencet az ahhoz hozzárendelt ID szám alapján. Ha a kiválasztott ID nem létezik, az első kedvenc kerül kiválasztásra. | - | ∞ |
| Alarm | Alarm | A (Va) paraméterben meghatározott hangerőn elindítja a riasztó dallamot. | - | 0/1 |
| FireAlarm | Fire alarm | A (Va) paraméterben meghatározott hangerőn elindítja a tűzjelző dallamot. | - | 0/1 |
| Bell | Bell | A (Vbell) paraméterben meghatározott hangerőn elindítja a kapucsengő dallamot. | - | 0/1 |
| Buzzer | Buzzer | Elindítja az ébresztőóra műveletet a beállításokban meghatározott módon. Ha az "Ébresztőóra Csengő" ki van választva, a ébresztő dallamot a (Vbuzzer) paraméterben meghatározott hangerőn elindítja. | - | 0/1 |
| LineIn | Set Line In | Kiválasztja az Audioserver vonalbemenetét, mint forrást, a vonalbemenet azonosítót alapul véve. | - | 0...∞ |
| Off | Off / Lock | Ki / Tiltás | - | 0/1 |
| DisPc | Disable periphery control | Tiltja a V+, V-, V, Play, Pause, Prev, Next, Fav, Bell, Buzzer, T5, TTS, Cs, BTp bemeneteket ha be van kapcsolva. (pl.: gyerekzár, takarítás) Felhasználói felületről lehetséges a kezelés. | - | 0/1 |
| DisP | Disable presence | Ameddig ez a bemenet bekapcsolt állapotban van, minden változás a (P) bemeneten figyelmen kívül lesz hagyva. | - | 0/1 |
| T5 | T5 control | T5 vezérlés | - | ∞ |
| TTS | Text to speech | Lejátsza a (TTS)-t a (Vtts) paraméterben meghatározott hangerőn. | - | - |
| Rtd | Reset to default | Visszaállít minden beállítást és paramétert a blokk alapértelmezett értékeire, ami meg lett határzva a sablonban. | - | 0/1 |
| Tg | Toggle | Vált lejátszás és szüneteltetés között (toggle) | - | 0/1 |
| Cs | Custom sound | Egyedi hang lejátszása [fájlnév] ezen a hangerőn [vol]. Pl.:soundcheck.mp3:80 [fájlnév]:[vol] Egyedi hangokat az Audioserver SD kártyáján lehet tárolni az Event_Sounds mappában! Csak mp3 fájlok támogatottak. | - | - |
Paraméter↑
| Rövidítés | Rövid leírás | Leírás | Mértékegység | Értékhatár | Alapértelmezett érték |
|---|---|---|---|---|---|
| Von | Power on volume | Hangerő, lejátszás indításakor vagy folytatásakor. -1 = Elementi az előzőleg beállított hangerőt mint indítási hangerő. | % | -1...100 | 10 |
| Vm | Maximum volume | Maximális hangerő beállítása | % | 0...100 | 100 |
| Vsts | Step size volume | Csökkenti a hangerőt a (Vsts) paraméterben beállított értékkel. Dulpa kattintásra kikapcsolja a lejátszót. | % | 1...100 | 1 |
| Va | Minimum volume alarm sounds | Ha a jelenlegi lejátszási hangerő magasabb, azt használja a minimum hangerő helyett. | % | 0...100 | 75 |
| Vbell | Minimum volume doorbell | Ha a jelenlegi lejátszási hangerő magasabb, azt használja a minimum hangerő helyett. | % | 0...100 | 40 |
| Vbuzzer | Minimum volume alarm clock | Ha a jelenlegi lejátszási hangerő magasabb, azt használja a minimum hangerő helyett. | % | 0...100 | 10 |
| Vtts | Minimum volume TTS and announcements | Ha a jelenlegi lejátszási hangerő magasabb, azt használja a minimum hangerő helyett. | % | 0...100 | 20 |
| Tdc | Time double-click | Dupla kattintás hossza | s | 0...10 | 0.35 |
| Roff | Ignore room off command | Szoba / helyiség elhagyása figyelmen kívül hagyása (T5 vagy 3. nyomógomb) | - | 0/1 | 0 |
| BuzzerFav | Alarm clock favorite | A helyiség érbersztőhöz használt kedvencének ID-ja, ha az ébresztő órához a helyiség kedvencét használja. | - | ∞ | 1 |
| BTp | Bluetooth pairing | Ameddig ez a bemenet bekapcsolt állapotban van, elérhető a bluetooth párosítás. Ezalatt az idő alatt, minden bluetooth kompatibilis Loxone eszközt párosítani lehet pl.: okostelefonnal vagy más bluetooth képes eszközzel. Ez a paraméter csak bizonyos konfigurációkban látható. | - | 0/1 | 0 |
| Ft | Volume Fading Time | A V bemeneten beállított hangerő állítás a beállított idő alatt fog megvalósulni, ha a lejátszó aktív. Az elhalványulási idő, a Buzzer bemenetre is érvényes. 0 = Nincs alkalmazva, a hangerő változtatás azonnali. | s | 15...1800 | 0 |
Kimenetek↑
| Rövidítés | Rövid leírás | Leírás | Értékhatár |
|---|---|---|---|
| Stereo LR | Stereo Left & Right | A teljes stereo jelet adja a kimenetre | 0/1 |
| Play | Play status | 1 ha a lejátszó lejátszás alatt van | 0/1 |
| Volume | Current volume | Aktuális hangerő | ∞ |
| 2C | Pulse on double-click | Impluzus dupla vagy tripla kattintásra vagy a bemenetre küldött impulzusra (Ki). | 0/1 |
| 3C | Pulse on triple-click | Impulzus tripla kattintásra. | 0/1 |
| Stereo L | Stereo Left | A stereo jel bal oldalát adja a kimenetre. | 0/1 |
| Stereo R | Stereo Right | A stereo jel jobb oldalát adja a kimenetre. | 0/1 |
| V+ | Pulse on Volume+ | A funkció csak akkor engedélyezett, ha külső vezérlésű hangerő szabályzású sztereó kimenetek vannak csatlakoztatva. | 0/1 |
| V- | Pulse on Volume- | A funkció csak akkor engedélyezett, ha külső vezérlésű hangerő szabályzású sztereó kimenetek vannak csatlakoztatva. | 0/1 |
| Sub | Subwoofer | A sztereó jel subwoofer csatornáját adja a kimenetre. Ez a kimenet csak Master/Client subwooferekkel használható. | 0/1 |
| BTp | Bluetooth Pairing | Amíg ez a kimenet aktív állapotban van, a Bluetooth párosítás aktív. Ezalatt az idő alatt a Bluetooth képes Loxone eszközöket párosítani lehet okostelefonokkal vagy más Bluetooth eszközökkel. Ez a kimenet csak bizonyos konfigurációkban látható. | 0/1 |
| API | API Connector | Intelligens API alapú csatlakozó. Több funkciót tud csatlakoztatni eszközök és blokkok között $LINK::https://updatefiles.loxone.com/KnowledgeBase/Online/Common/Documents/API_Commands.pdf@@API Commands$$ | - |
Tulajdonságok↑
| Rövid leírás | Leírás | Értékhatár | Alapértelmezett érték |
|---|---|---|---|
| Művelet ébresztéskor | Az ébresztő bekapcsolásakor végzett művelet | - | - |
| Airplay Engedélyezése | Airplay engedélyezése a lejátszóhoz. Ez a beállítás nem érhető el ha a zene szolgáltatásokat Lejátszó csoport kezeli. | - | - |
| Spotify Connect engedélyezése | Spotify Connect engedélyezése a lejátszóhoz. Ez a beállítás nem érhető el ha a zene szolgáltatásokat Lejátszó csoport kezeli. | - | - |
| Helyiség kedvenc prioritás | Ha be van pipálva, a lejátszó bekapcsoláskor a helyiség első kedvence került lejátszásra. | - | - |
| A tevékenységi bejegyzések száma | A tevékenységi bejegyzések száma az előzményekben. 0: Előzmények kikapcsolása Az előzmények nyomonkövet minden fontos változást a program indítása óta. | 0...100 | 20 |
| Lejátszó azonosító | A lejátszó azonosítója az Audioserver-en vagy audió eszközön | ∞ | - |
| Automatikus felüláteresztő szűró | Ha csatlakoztatva van subwoofer egy Audio lejátszóhoz, a terhelés csökkentése érdekében a többi hangszóró nem fogja a basszus frekvenciákat lejátszani. Ezt az automatikus funkciót ki lehet kapcsolni a jelölőnégyzet pipájának kivételével. Ezután minden csatlakoztatott hangszóró a teljes frekvenciasávban fog működni. | - | - |
Programming example↑
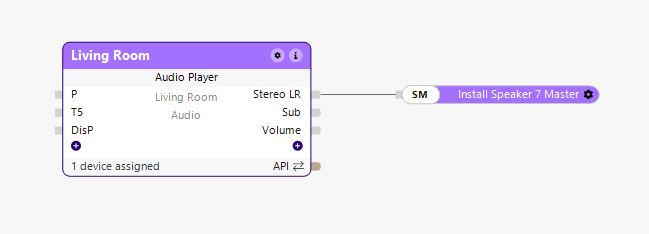
Example 1: Audio Player in the living area
The Audio Player sits in the living area, connected to an Install Speaker 7 Master and an Install Speaker Client. It is controlled by presence via the (P) input, so the sound system switches on as soon as presence is detected.
It can also be operated manually with a T5 button (Touch). Night mode disables the presence sensor at night via (DisP), so playback is not triggered during the night.

The (Stereo LR) output is generally recommended: it outputs a stereo downmix for even sound distribution. If the listening position is fixed, individual speakers can be assigned to the left or right channel.
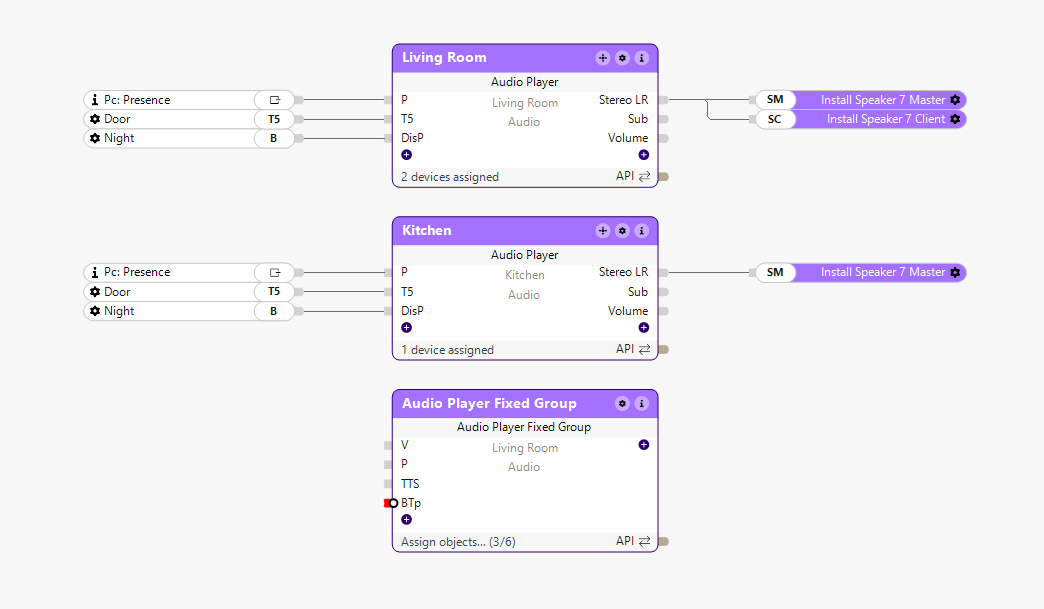
Example 2: Open area with two Audio Players
Two Audio Players are used, one for the living room and one for the kitchen, each with its own speakers. As this is an open-plan area, they are combined with the Audio Player Group Fix block: each area is still controlled individually, but the same source is played in both simultaneously.
Example 3: Multiple speakers on one Audio Player
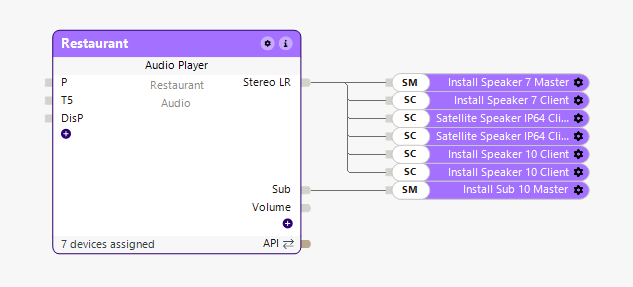
One Audio Player controls several speakers and two subwoofers in a restaurant. The speakers and subwoofers connect directly to the Audio Player, giving even sound distribution and deeper bass throughout the room, suitable for both background music and clear sound reproduction.
LOXONE App↑
The Audio Player is operated intuitively from the LOXONE App, which acts as the central user interface for audio zones, volume, music sources and groups.
Once an Audio Player is configured in Loxone Config and saved to the Miniserver, it appears in the app automatically, organised by room and category.
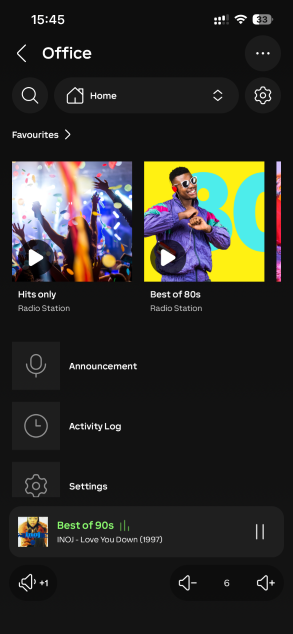
The following functions are available:
- Play / Pause
- Volume
- Favourites / Playlists
- Sources
- Dynamic groups
- Announcements
- History
- Settings
Favorites / Playlists
In the LOXONE App you can organize your favorite music sources into Favorites or Playlists, so your music is only one tap away.
Favorites can be cycles through with a double-click, based on the Loxone switch standard.
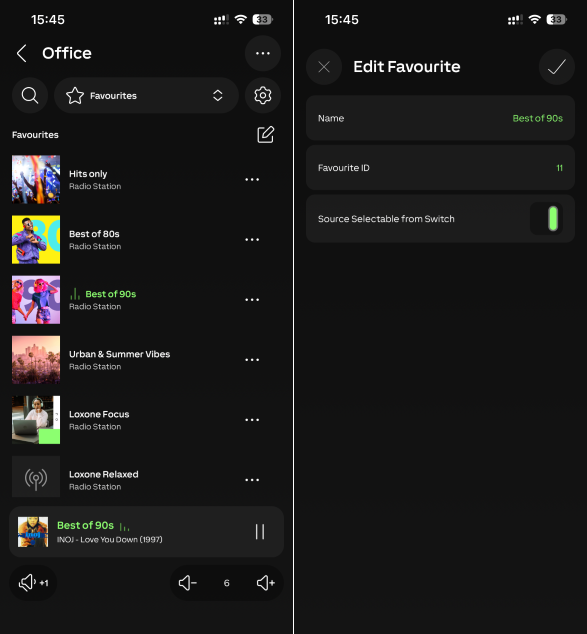
Edit favorites by tapping the edit icon (1); they can also be transferred to other Audio Players.
To edit a favourite you created, tap the ... next to it: change its name, change its ID, and choose whether it can be activated from the keypad.
Announcements
From the LOXONE App you can make a live announcement straight through the Audio Players. This is available only on mobile devices (smartphones or tablets).
Select the room, then start the announcement with the microphone icon. Ideal for short messages at home or work. Playback pauses automatically and resumes afterwards.
Dynamic Groups
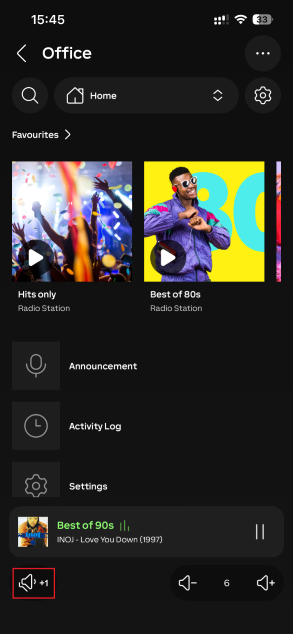
Dynamic grouping in the LOXONE App combines several Audio Players so they play the same content. Tap the speaker icon to form, split, or dissolve a group.
A dinamikus csoportokat az Audioserver WebAPI-ján keresztül is lehet vezérelni: A virtuális kimenet alatt létrehozott API-parancsok lehetővé teszik a funkcióblokk-logikának, hogy automatikusan hozzon létre, frissítsen és szüntessen meg csoportokat, így az audioelosztás a változó teremkonfigurációkhoz igazodik, kézi beavatkozás nélkül. Az alábbi dokumentum egy konfigurációs példával együtt ismerteti a parancsokat:
Dinamikus Audio Csoportosítás WebAPI Dokumentáció
Bluetooth
Itt tudod engedélyezi a Bluetooth eszközök párosítását az Audió lejátszóval, pl.: okostelefonról való lejátszáshoz. A párosított eszközöket egyetlen kattintással el tudod távolítani.
 | Csak Master hangszóróval vagy Wireless hangszóróval kombinálva érhető el. |
Hangszínszabályzó
Az Audió lejátszó egy 10 csatornás hangszínszabályzót is tartalmaz, amit az applikáció beállításaiban találsz meg.
Általában nincs szükség állításra, mert a Loxone hangszórói alapból az optimálisra vannak hangolva. Az hangszínszabályzó segítségével finomhangolhatod a hangzást az egyéni ízlésének megfelelően, illetve kiegyenlítheted a helyiségben fellépő enyhe akusztikai eltéréseket.
A beállításokat Audio lejátszónként kell alkalmazni és át lehet küldeni másik lejátszókra is.
Internetes rádió↑
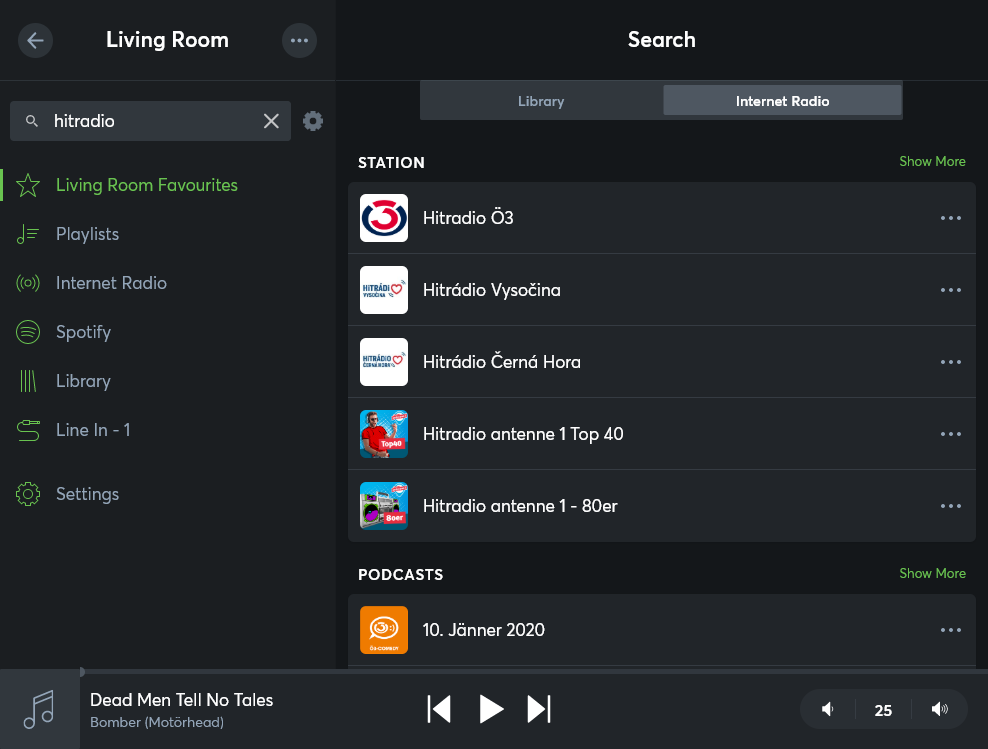
The TuneIn internet radio service gives access to a wide range of radio stations and podcasts. Search for stations in the app or user interface and save them as favourites: open the station's menu (three dots) and select Add as Room Favourite.
Adding a Custom Internet Radio Stream URL
The LOXONE App lets you add custom audio stream URLs directly to the Audio Player, for radio stations not supported by default (e.g. BBC or other online stations). A stable internet connection is required for uninterrupted playback.
Add radio stations:
- Open the desired Audio Player and tap Radio.
- Tap the plus icon to add My Radio Stations.
- Enter the station name, streaming URL and upload a custom image for the station.
- The station then appears under My Radio Stations.
- There you can edit it or add it to your room favorites.
Spotify↑
Spotify integration plays Spotify music or playlists. A Spotify Premium account is required.
A single Premium account can play one stream to one or more zones at once, via fixed or dynamic groups.
To play different content in multiple zones at the same time, multiple Premium accounts are required. These do not need to be part of a Family plan.
In the LOXONE App, tap Spotify, then Add Spotify Account. You are redirected to the Spotify website. Log in and confirm access. The service is then ready to use.
Spotify Connect
By default, all Audio Players appear in the Spotify app. You can disable this in the Audio Player properties.
Könyvtár↑
The library plays audio files stored on an SD card, USB stick or network drive (network share), an easy way to manage local audio sources and play them through the Audio Player.
It appears when such files are available; if needed, show it with the gear icon to the right of the search field.
The following sections explain how to add each audio source.
USB↑
USB data carriers with audio files can be connected to the USB port of the Audioserver or Miniserver Compact.
USB sticks: FAT32/NTFS, one partition, max. 2 TB.
USB hard drives: FAT32/NTFS, one partition, max. 2 TB, max. 500 mA power consumption. Drives that draw more than 500 mA need an external power supply.
Once plugged in, the audio files appear in the Library in the app or user interface.
Local files on a USB drive are only available on Audio Player blocks linked to the Audioserver/Miniserver Compact it is connected to. For access from several Audioservers/Miniserver Compact, add the files via a central network share, e.g. a NAS.
Supported formats: MP3, AAC, ALAC, FLAC, WMA, WMA lossless, WAV, M4A, OGG
SMB Access to SD Card↑
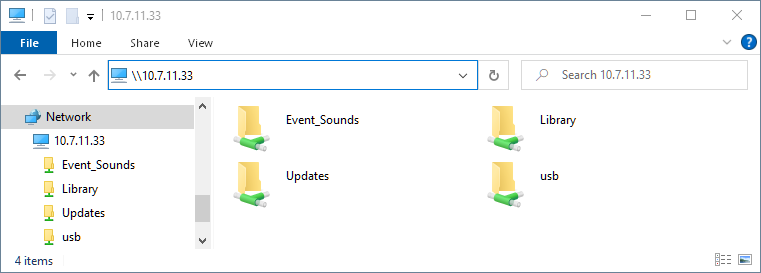
Audio files can be stored on the SD card of the Audioserver or Miniserver Compact. The folders are accessed via an SMB network share provided by the device.
In Windows, open them by entering the device's IP address or hostname in File Explorer, e.g. \\192.168.1.7 or \\hostname
SMB access is disabled by default and must be enabled in Loxone Config → Audioserver → Settings.
Additionally, a password can be set for added security; the username for this is then "audio".
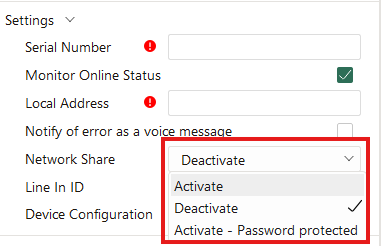
Store audio files in the Library folder to play them from the library. The SD card is limited in size and speed, so use a USB drive or network share for larger collections.
The usb folder appears when a USB device is connected, letting you add or replace files on it.
These folders are for easy file management and maintenance, not for use as network shares on other Audioservers/Miniserver Compact. Local files on the SD card are only available on Audio Player blocks linked to that device; for access from several devices, use a central network share, e.g. a NAS.
The SD card folders use the SMB1 protocol, which is no longer enabled by default in Windows 10 and 11. Enable it in the Control Panel under Programmes > Turn Windows features on or off, tick Support for SMB 1.0/CIFS file sharing, confirm with OK, and restart if prompted.
Network share↑
SMB network shares can be added to the library. Once added, a share is available to all Audioservers and Audio Players.
In the app, open Library, tap the menu icon (three dots) in the top right corner, and select Add Network Folder.
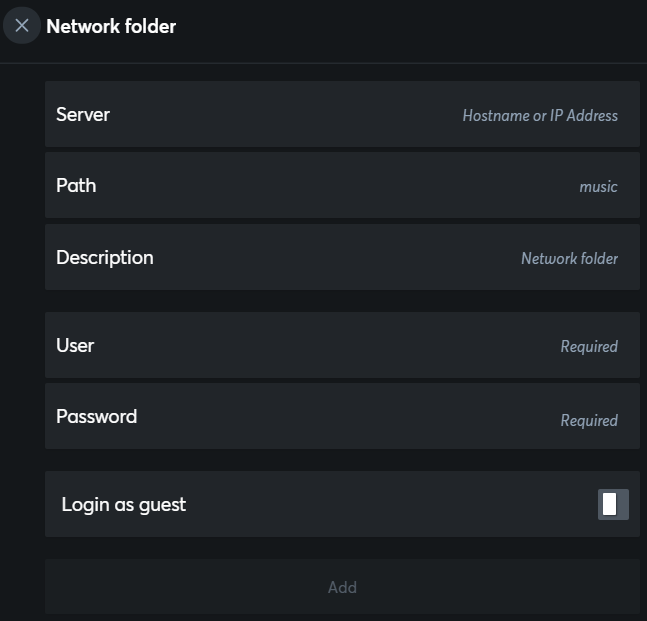
Enter the server name or IP address, path, description, username and password. The audio files are then available in the library.
The outdated SMB1 protocol is not supported for network shares.
Vonalbemenet↑
The line-in of the Audioserver can be selected as a source across all Audio Players. Show it with the gear icon to the right of the search field and activate it; it is then available as a source.
AirPlay↑
A 2.5.01.11-es verziótól kezdve az Audioserver támogatja az audio lejátszást AirPlay 2 keresztül
Minden kimenet AirPlay vevőkét lesz elérhető és ki lehet választani, az Apple termékeken, mint lejátszó eszköz.
Az AirPlay-en keresztüli lejátszás független az Audio lejátszótól és elsődleges prioritású amíg az Apple eszköz csatlakoztatva van. Bármely más forrásból már elindított lejátszás meg lesz szakítva, amikor az AirPlay lejátszás elindul.
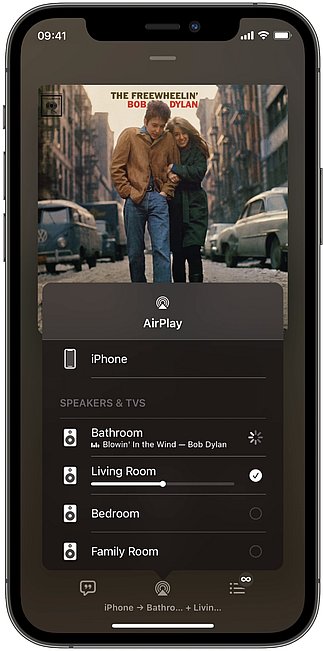
Amennyiben csak egy Audió lejátszó van a helyiségben, az lejátszót a helyiség után kerül elnevezésre, vagy a hozzá tartozó blokk után.
Ezek a zónaneveket használja az AirPlay és a Spotify Connect is.
Egy rendszeren belül az Apple eszközök és az Audió zónák neveinek egyedinek kell lennie.
További információt az AirPlay-en keresztüli lejátszásról és a rendszer követelményekről a következő helyen találsz: Apple guide.
A blokk működése AirPlay-en keresztüli lejátszás közben:
AirPlay lejátszás közben a blokk funkcionalitása limitálva van, ilyenkor az AirPlay vezérli a lejátszást. Ez eredményezi a következő speciális tulajdonságokat:
Ha egy kimeneten Airplay lejátszás kezdünk, a más forrásból származó lejátszások megállnak azon a kimeneten és a kapcsolat ideiglenesen megszakad, függetlenül attól, hogy több kimenet van hozzárendelve egy Audio lejátszóhoz, vagy több Audio lejátsztó van csoportosítva az Audio lejátszó fix csoportok blokkban. A nem hozzárendelt kimenetek folytatni fogják a lejátszást.
Ez szükséges, ugyanis minden különálló kimenetet ki lehet választani, mint AirPlay lejátszó. A csoportokat az AirPlay fogja kezelni és létre lehet őket hozni, a kívánt kimenetek (hangszórók) kiválasztásával az AirPlayt használó alkalmazásból.
A következő funkciók elérhetőek AirPlay lejátszás alatt is.:
Lejátszás szüneteltetése
Hangerő változtatása
Események mint, a csengő, ébresztő és riasztások.
AirPlay-es lejátszás közben más funkciók nem érhetőek el, függetlenül attól, hogy az applikációból indították el gombnyomással vagy logikával.
Az AirPlay-es lejátszás megállítása vagy az eszköz lecsatlakoztatása visszaállítja a korábbi funkciókat és csoportokat.
Text to Speech (TTS)↑
A Text to Speech funkció lehetővé teszi a szövegek akusztikus beszédként történő lejátszását.
Ehhez a funkcióblokknak a (TTS) bemenetére kell adni egy szöveget, amely aztán a hozzárendelt hangkimeneteken lejátszásra kerül.
| A TTS funkcióhoz internet kapcsolatra van szükség. Legfeljebb 400 karakter hosszú szövegek (szóközökkel együtt) támogatottak. |
Alapértelmezetten a TTS kimenet a rendszer nyelvén generálódik le.
Más nyelv használatához, határozz meg egy prefixumot a szöveg elején függőleges egyenes szimbólummal elválasztva.
Példák:
de|Das ist ein deutscher Text
en|Now the text is English
Támogatott nyelvek:
de Német
en Brit Angol
us USA Angol
es Spanyol
ca Katalán
cz Cseh
sk Szlovák
pl Lengyel
fr Francia
nl Holland
be Flamand
it Olasz
cn Kínai
hu Magyar
ru Orosz
bg Bolgár
fi Finn
se Svéd
nb Norvég
pt Portugál
tr Török
ja Japán
Eseményhangok / Egyéni hangok↑
Az Audio lejátszónak több bemenete is van, ami előre definiált eseményekhez tartozó dallamot játszanak le:
- Alarm: warning sound for danger or burglary
- FireAlarm: tűzriasztás dallama
- Bell: doorbell ring
- Buzzer: ébresztőóra dallama
- Custom sound: a user-defined sound for individual notifications
A megfelelő hangfájl akkor játszódik le, amikor a hozzá tartozó bemenet aktiválódik. Amikor az eseményhang véget ér, az Audio Player visszatér az előző lejátszáshoz.
Built-in event sounds can be replaced: put files with the same name and format in the Event_Sounds folder on the Audioserver, Miniserver Compact or Wireless speaker, accessible at \\{ip-address}\Event_Sounds.
Saját dallamok lejátszásához, másold be a dallamot ugyan abba a mappába és hívd meg a (Cs) bemeneten vagy egy logikán keresztül (pl.: Status blokk vagy Szöveg Generátor blokk). A hangerőt úgy tudod beállítani, hogy a fájl elérési útja után beírod a következő képpen [fájlnév]:[hangerő], pl. soundcheck.mp3:80.
Use the logic to trigger a custom sound, for example linking an Intercom's bell output to play a specific sound in a specific room.
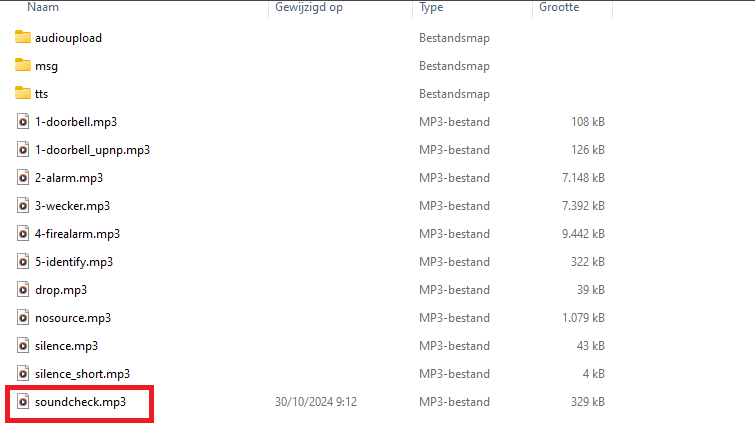

Megjegyzés az egyedi dallam teljes terjedelmében lejátszásra kerül és nem lehet megállítani.
Note: all custom sounds have a 2-second delay, due to the required on-sync time before playback.
Up to 8 Eventer sources can be used simultaneously: a maximum of 8 different events (grouped or ungrouped) can play in parallel.
A grouped event, a grouped command sent to several players at once, uses only 1 Eventer source for the whole group. An ungrouped event uses 1 source each.
Jelenlét szimuláció↑
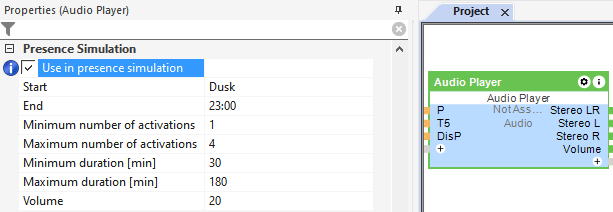
Ez a funkcióblokk rendelkezik jelenlétszimulációval.
Engedélyezd és paraméterezd a jelenlétszimulációt a beállítások ablakban:
Előzmények↑
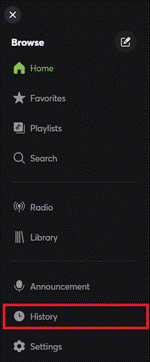
A blokk előzményeit tudjuk megjeleníteni a felhasználói felületen.
Maximálisan 100 bejegyzést tudunk megjeleníteni.
Ha újraindítod a Miniserver-t az előzmények törlésre kerülnek.
Settings↑
In the settings you can set the volumes for the various audio functions: the start-up volume for music, and the volumes for text-to-speech, the alarm clock, the doorbell and the alarm. Playback starts at the selected volume so you can assess it right away.
The start-up volume follows parameter (Von). With the Variable start-up volume option (or by setting (Von) to -1), the Audio Player saves the last volume used and starts with it.