The Loxone Link Interface allows connecting Extensions, and is provided from every type of Miniserver.
Table of Contents
Connecting Extensions↑
Up to 30 Extensions can be connected to a Miniservers Link Interface according to the following diagram:
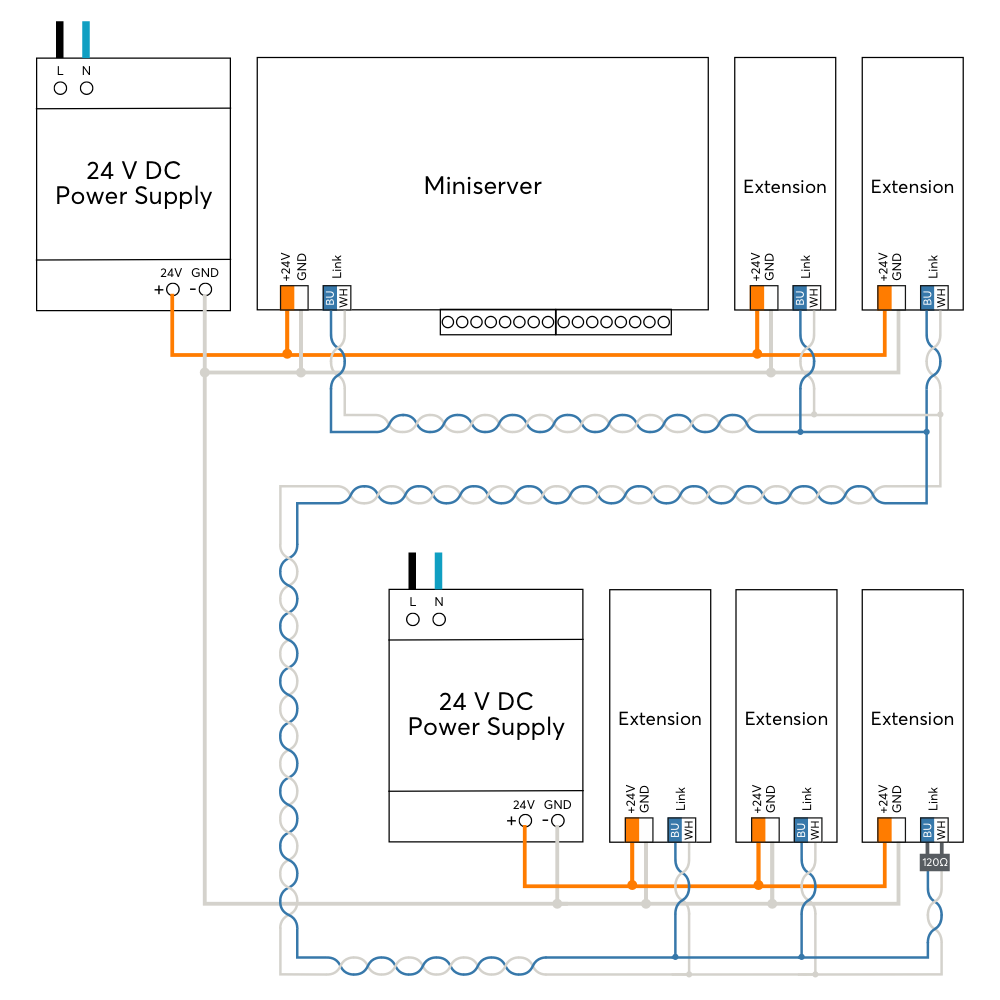
Connect the Extensions to a Miniserver by daisy-chaining the Link interfaces. If any of the Extensions are connected to a separate power supply, then all power supply's GND (negative) have to be interconnected. This connection is crucial for reliable data transmission.
The blue/white pair of a CAT5/6/7 cable is used to wire the Link throughout a building. This allows a maximum length of 500m/1640ft.
The Link interface is terminated at the last Extension using the 120 Ohm resistor that is included with the Miniserver.
After switching on the power supply, the Extensions first flash red, and after successful connection to the Miniserver they flash orange.
You can now proceed with pairing the Extensions.
Pairing Extensions↑
To search for Extensions, first click on a Link Interface in Loxone Config, and then activate Extension Search.
The window that opens will list all connected Extensions that are not yet part of the program to the left:
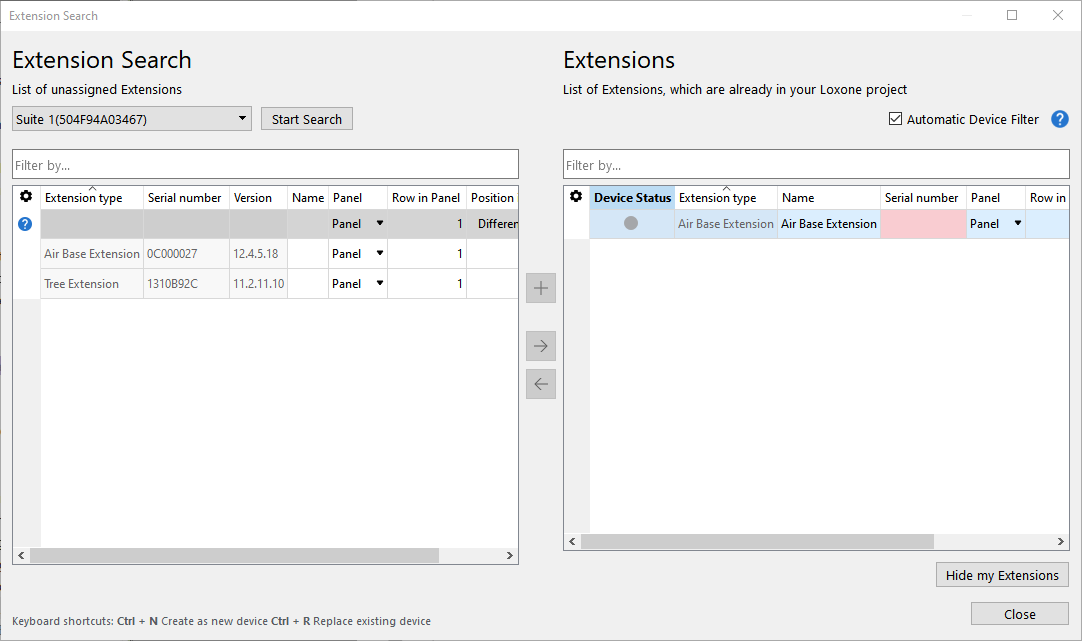
If you select an Extension here, it will identify itself by flashing the status LED. This allows you to assign and name the Extensions correctly.
Select the desired Extension, assign a name and installation location and add it to the programming using the + button.
The right window lists all the Extensions that are currently part of the program. You can display them by clicking the button Show my Extensions. You can also replace an existing Extension with a new one of the same type that was found in the search. This is useful when a device needs to be replaced or devices are added to a pre-configured program. Select the device to be added and the device to be replaced. By clicking on the button with the arrow pointing right, the old device is replaced with the new one in the program.
To apply the changes, save the program in the Miniserver.
Now the added Extensions are ready for use and available in the Periphery Tree in Loxone Config.
Update and diagnostics of Extensions↑
If an Update is necessary for Extensions, they are highlighted orange in Device Status. This often happens after a recent update of the Miniserver or when adding Extensions with an older firmware version.
The Miniserver automatically updates the Extensions in the background, the Extensions generally remain operational. However, there can be delays in communication. In rare cases, some functions of Extensions may not be available until the update is completed.
The following options are available for Diagnostics:
1. The Status LED of an Extension allows for quick error checks.
Red flashing: No connection to Miniserver, check wiring and Miniserver.
Orange flashing: Connection to Miniserver ok, but Extension not yet added to the program.
Green flashing: Everything okay, Extension is online.
Orange/Red flashing: Transmitting update.
Quick red/green flashing: Extension was selected in Loxone Config and is identifying.
Not flashing: Check power supply.
2. Link Diagnostics provides a more detailed analysis. First connect to the Miniserver, select a device with Link interface, and then click on the button Link Diagnostics.
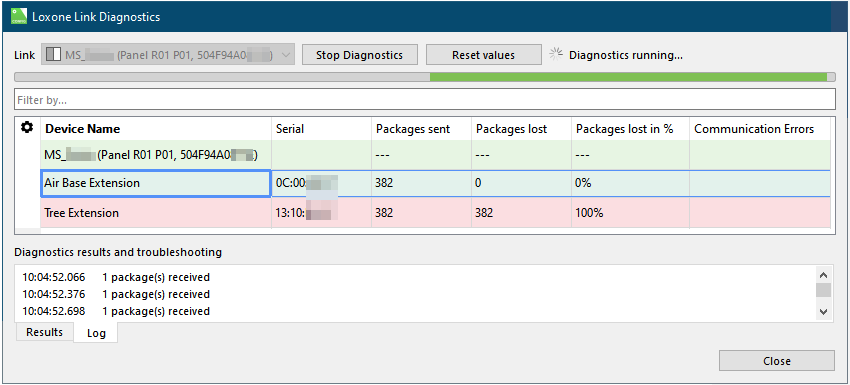
The Extensions are now listed in the Link Diagnostics window. Diagnostic data is transmitted continuously, and can be used to detect any errors. Any errors are displayed accordingly. Please monitor the Link Diagnostics for a while, even temporary errors (e.g. poor contact, potential difference) can be detected by packet loss.
Checklist to troubleshoot the Link interface
Loxone Health Check
The diagnostics of the Miniserver and the Loxone interfaces can be started via the Loxone Health Check:
