CONTENTS
Wiring Tree Devices
Connecting switches and actuators
Connecting blinds or curtains
Connecting lights to a dimmer
Connecting several DMX dimmers
Connecting temperature sensors
Connecting proportional (0 – 10V) actuators
Connecting digital (I/O) actuators (thermal example)
Circuit protection
Connecting a 24V motion sensor
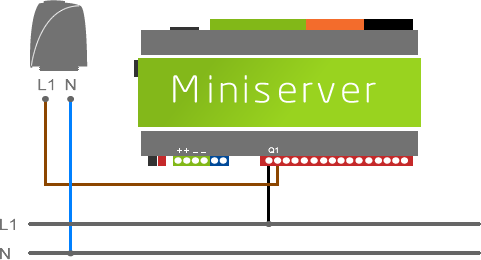
Connecting a 230V motion sensor
Connecting coupling relays for higher load switching
Polarity reversal for DC motor control
Connecting open collector outputs
Wiring LED tape with the Multi Extension Air
Connecting 1-Wire sensors
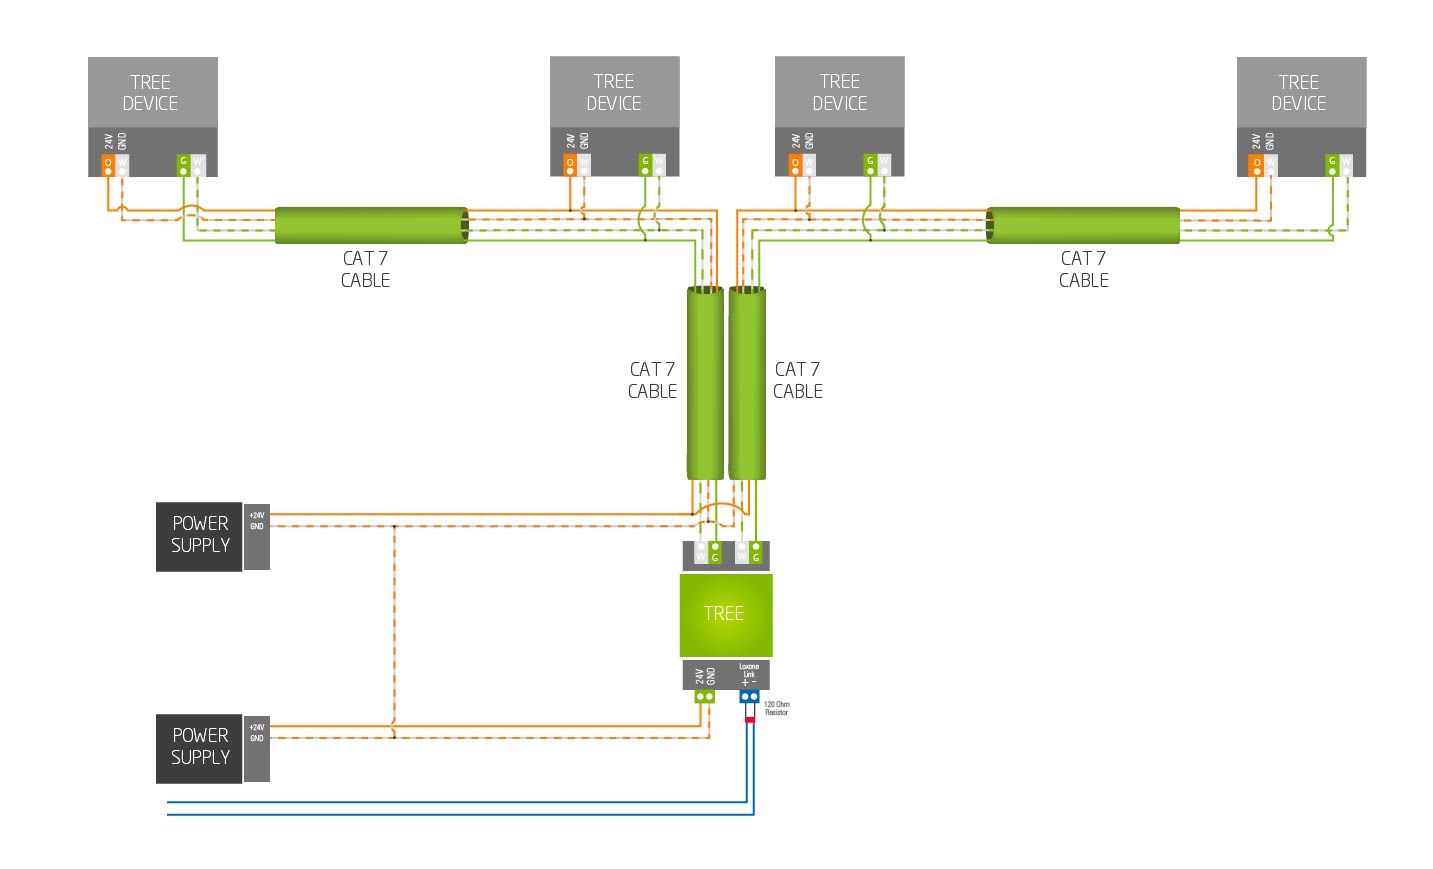
WIRING TREE DEVICES
Connecting Tree devices couldn’t be simpler, just connect the Tree (Green and White) and the 24V DC Power (Orange and White)
CONNECTING SWITCHES AND ACTUATORS
Shows how to wire in a switch and a light bulb as an example.
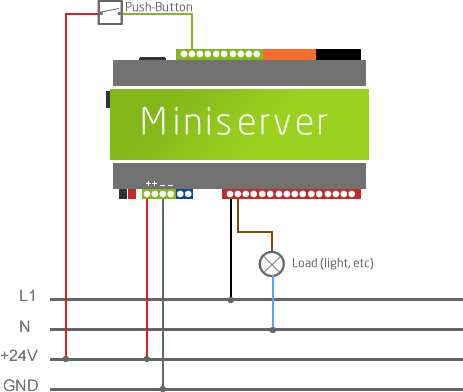
You can connect any switch you choose as well as PLC push buttons to the Miniserver.
More on this here
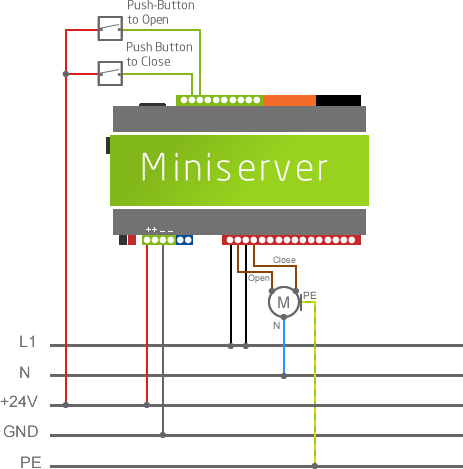
CONNECTING BLINDS OR CURTAINS
An example for connecting a blind motor, Open is Up, Close is Down.
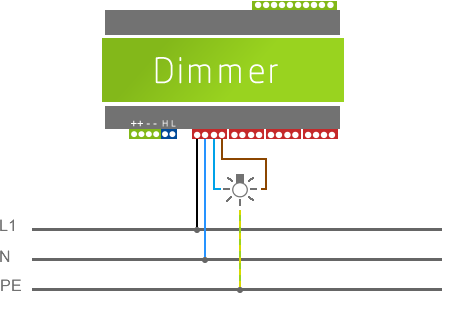
CONNECTING LIGHTS TO A DIMMER EXTENSION
Wiring example for a single dimmed light circuit.
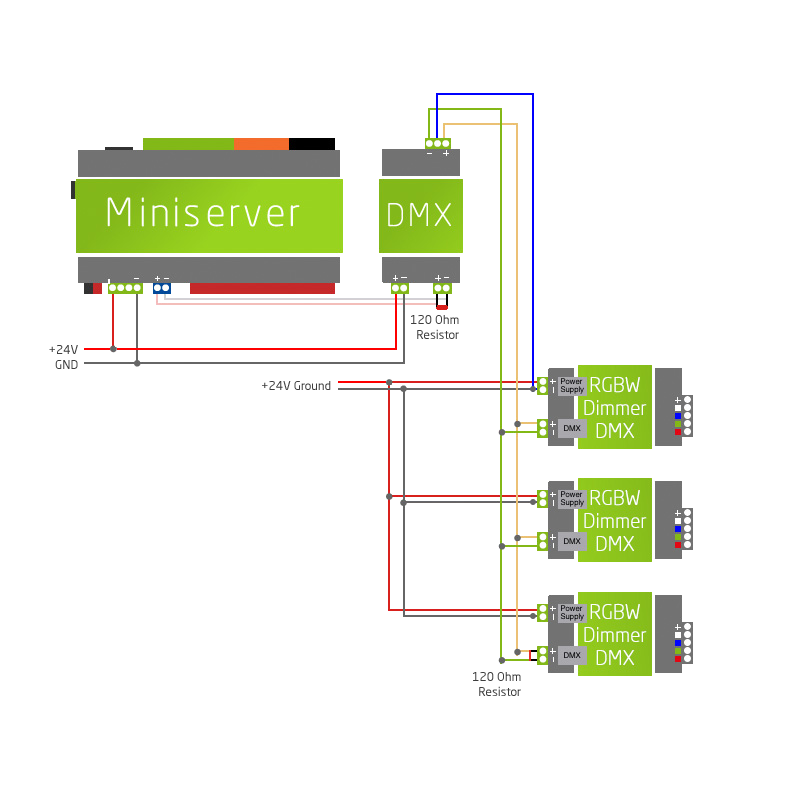
CONNECTING SEVERAL DMX DIMMERS
hows how to connect several DMX dimmers to the DMX extension.
You must connect all the power supply GND’s together. Otherwise problems may occur due to difference in potential
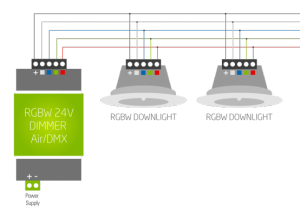
CONNECTION OF LED SPOT RGBW TO THE RGBW 24V DIMMER AIR / DMX
Please note that per RGBW 24V dimmer AIR / DMX RGBW maximum 8 downlights can be connected.
Warning: With simultaneous use of the color channels (RGB) and the warm white channel (WW) of the color channel is dimmed proportional. Example: If the WW channel dimmed to above 30%, the brightness of the RGB channel is reduced to 70%.
RGBW Spot Quick Connection Guide (PDF)
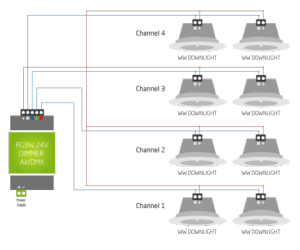
CONNECTION OF LED SPOT WW TO THE RGBW 24V DIMMER AIR / DMX
Please note that for each dimmer channel a maximum of 8 warm white downlights can be used.
CONNECTING 0-10V TEMPERATURE SENSORS
Temperature sensors are connected to the analogue inputs of the Miniserver or the Extension. +24 V and GND can, if necessary, be looped from one temperature sensor to the next but each sensor requires its own link back to an analogue input.
1: + 24V
B/2: GND
C/3: 0 – 10V

CONNECTING PROPORTIONAL (0 – 10V) ACTUATORS
A proportional actuator for valves or heating manifolds needs to be connected to the 24V power supply and is then controlled by a 0 – 10V input signal to set the position.
CONNECTING DIGITAL (I/O) ACTUATORS (THERMAL EXAMPLE)
Digital 230V thermal actuators for UFH manifolds are controlled by a digital output of the Miniserver or the Extension.
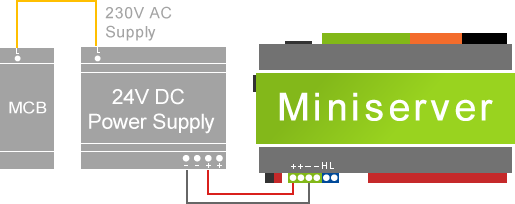
CIRCUIT PROTECTION OF 24V POWER SUPPLY
The primary function of a fuse or MCB is to protect the cable from creating a fire risk due to being loaded outside it’s normal operating load. However an appropriately rated MCB can be used to also offer some protection to power supplies. Depending on the size of the power supply an appropriate type and rating MCB should be chosen. It is sensible to afford your Miniserver and Extension’s power supply it’s own breaker. If the MCB and the power supply are not within the same consumer unit then 17th edition regulations should be taken into account to decide whether RCD protection is required.
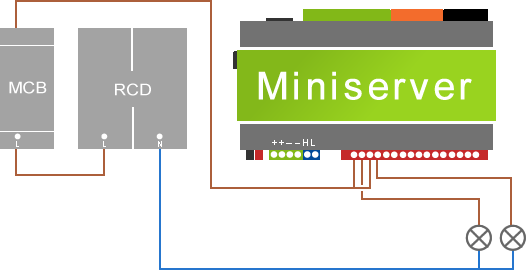
CIRCUIT PROTECTION OF OUTPUTS
In compliance with 17th edition wiring regulations all circuits must be protected by an RCD and appropriately rated MCB. The rating of the MCB is dependent on the overall load and gauge of the cable used.
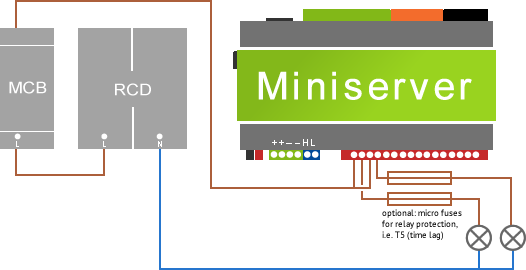
OUTBOUND CIRCUIT PROTECTION WITH MICROFUSES
In addition to the RCD and MCB protection of the mains circuits that are switched via the Miniserver (or Extensions), the switching gear inside the Miniserver can be protected as well by the use of microfuses on the outbound wiring side of the relays.
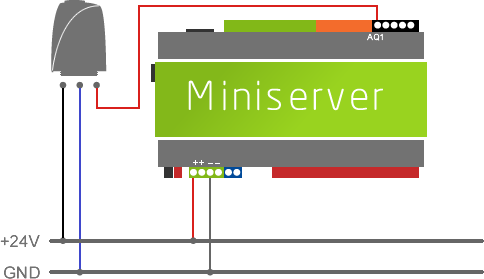
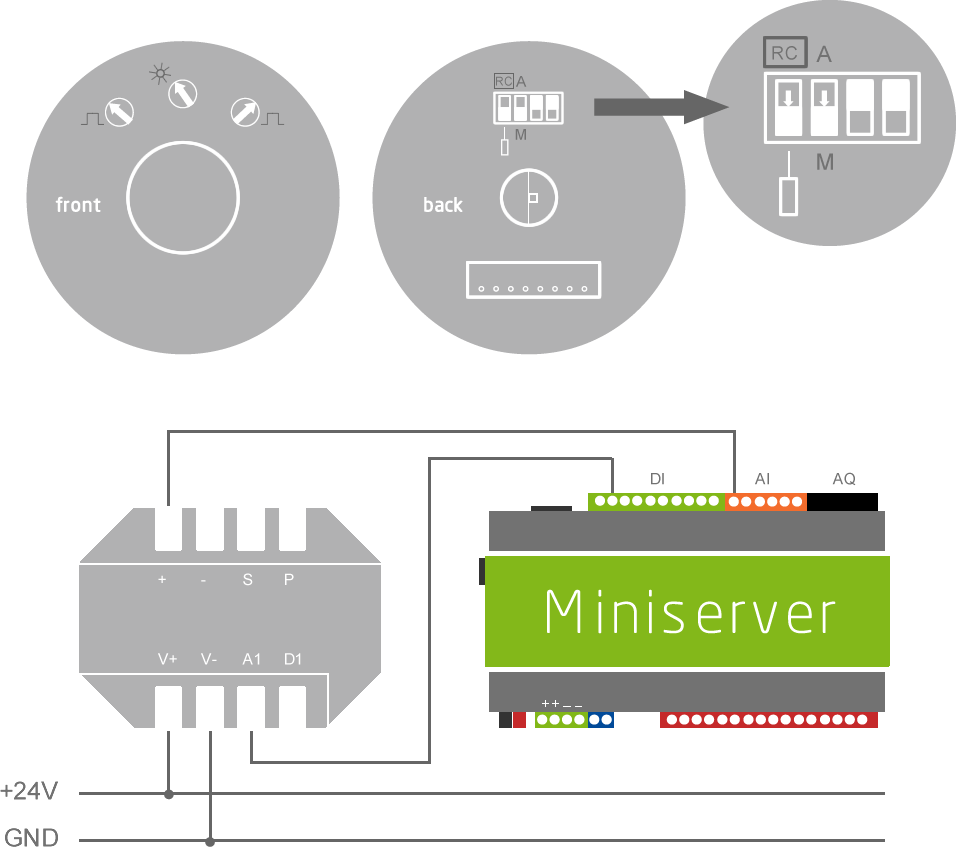
CONNECTING A 24V MOTION SENSOR
Here is an example of how to wire up a 24V motion sensor (this example is for the one we sell in our webshop). The PIR is wired directly to a digital input on the Miniserver, Extension or Dimmer Extension. In addition the PIR also provides a brightness value (5-2000 lux) via a 0-10V output signal. This can be connected to an analogue input.
Refer to the following diagrams to see how to set the DIP switches and how to wire the PIR.
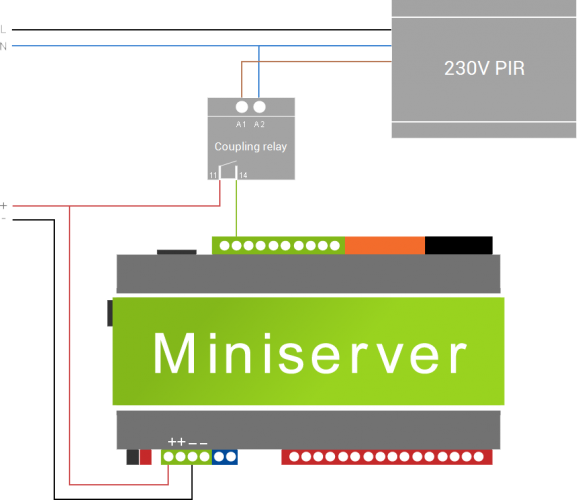
CONNECTING A 230V MOTION SENSOR
The contact of the PIR switches 230V which is too high for the digital inputs. To use such a sensor with the digital inputs you need to wire this contact to a coupling relay (input A1). Input A2 of the coupling relay is connected to neutral.
The relay contact 11 is then connected to 24V and the contact 14 is connected to the digital input of the Miniserver, Extension or Dimmer Extension.
When the motion sensor is triggered the coupling relay 24V is switched on and the Miniserver then detects this change in voltage. See the diagram below for wiring connections.
CONNECTING COUPLING RELAYS FOR HIGHER LOAD SWITCHING
To switch higher loads (for example a 3kWh immersion heater) you need to use a coupling relay or a contactor. Connect a relay of the Miniserver or Extension to the A1 input of the coupling relay. Input A2 of the coupling relay is connected to neutral. Using the relay contacts 11 and 14 the 230V signal can be switched. See the diagram below for connections.

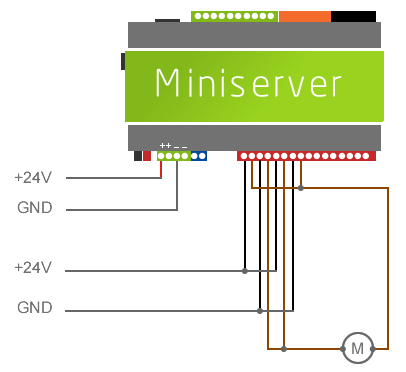
POLARITY REVERSAL FOR DC MOTOR CONTROL
Below is an example on how to control DC motors which are often used with blinds, awnings and curtains. Unlike AC motors the direction is controlled by reversing the polarity of the motor.
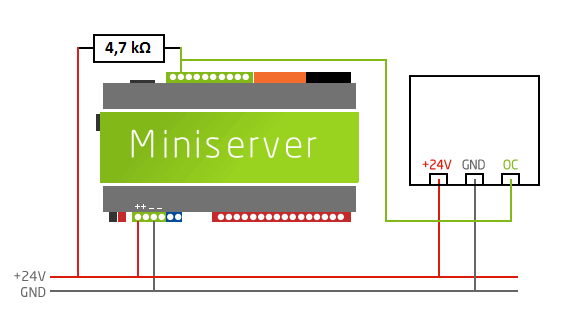
CONNECTING OPEN COLLECTOR OUTPUTS
You can connect sensors with open collector outputs to the digital inputs on the Miniserver and other extensions. A pull up resistor must also be connected. This is needed because the open collector outputs GND and not a positive voltage.
For the pull up resistor you can use a standard 4.7 k ohm resistor, see the below diagram for how to connect.
The sensor will now be working with reverse logic. Therefore if the sensor is off, the digital input will be set to high (16V) and when the sensor is on the digital input will be set low (GND). In the software you can reverse this behaviour so that when the sensor is on the input is high. To do this either use the NOT function block or negate wherever the input is connected to.
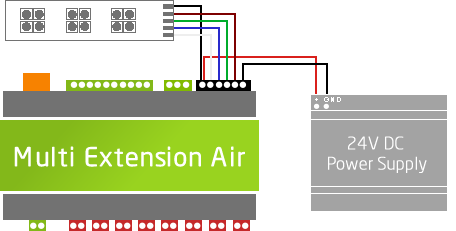
SEPARATE POWER SUPPLY FOR THE MULTI EXTENSION AIR AND LEDS
We recommend that you use a separate power supply to power your LEDs. You can see how to connect this in the diagram below, please note that the maximum current is 2.1A per channel (50W at 24VDC).
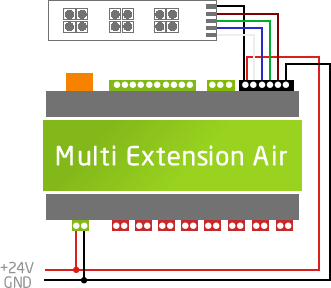
SAME POWER SUPPLY FOR THE MULTI EXTENSION AIR AND THE LEDS
For your LEDs, you can use the same power supply as for the extension. However, the power supply must be of the correct rating for the amount of tape and the extension. You can see how to connect this in the diagram below, please note that the maximum current is 2.1A per channel (50W at 24VDC).
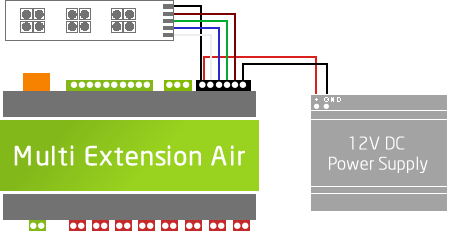
12VDC POWER SUPPLY FOR THE MULTI EXTENSION AIR AND LEDS
You can use a separate 12V power supply instead of 24V if you have lower voltage LEDs. Please note however that the maximum current will now be 1A per channel (25W at 24VDC). You can see how to connect this in the diagram below.
1-WIRE SENSORS
IBUTTON
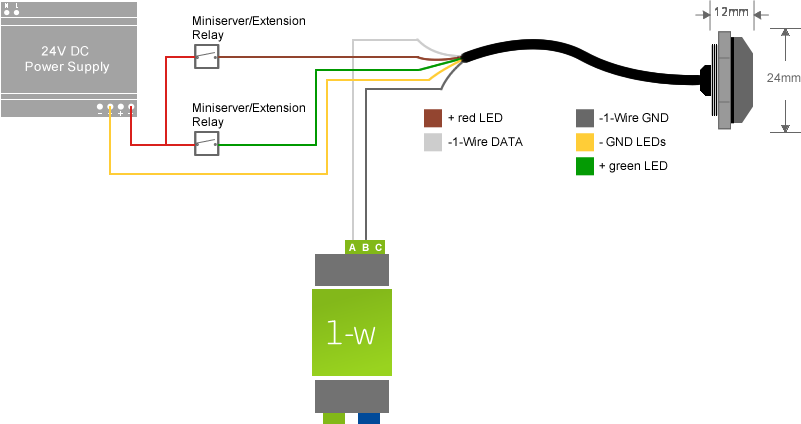
TERMPERATURE
